This article was created by the illustrators and manga artists who teach at the illustration and manga school, egaco, based on the knowledge and skills they have honed through commercial production and other work. If you would like to learn more about content that is tailored to what you want to draw, we recommend taking a private lesson at egaco.
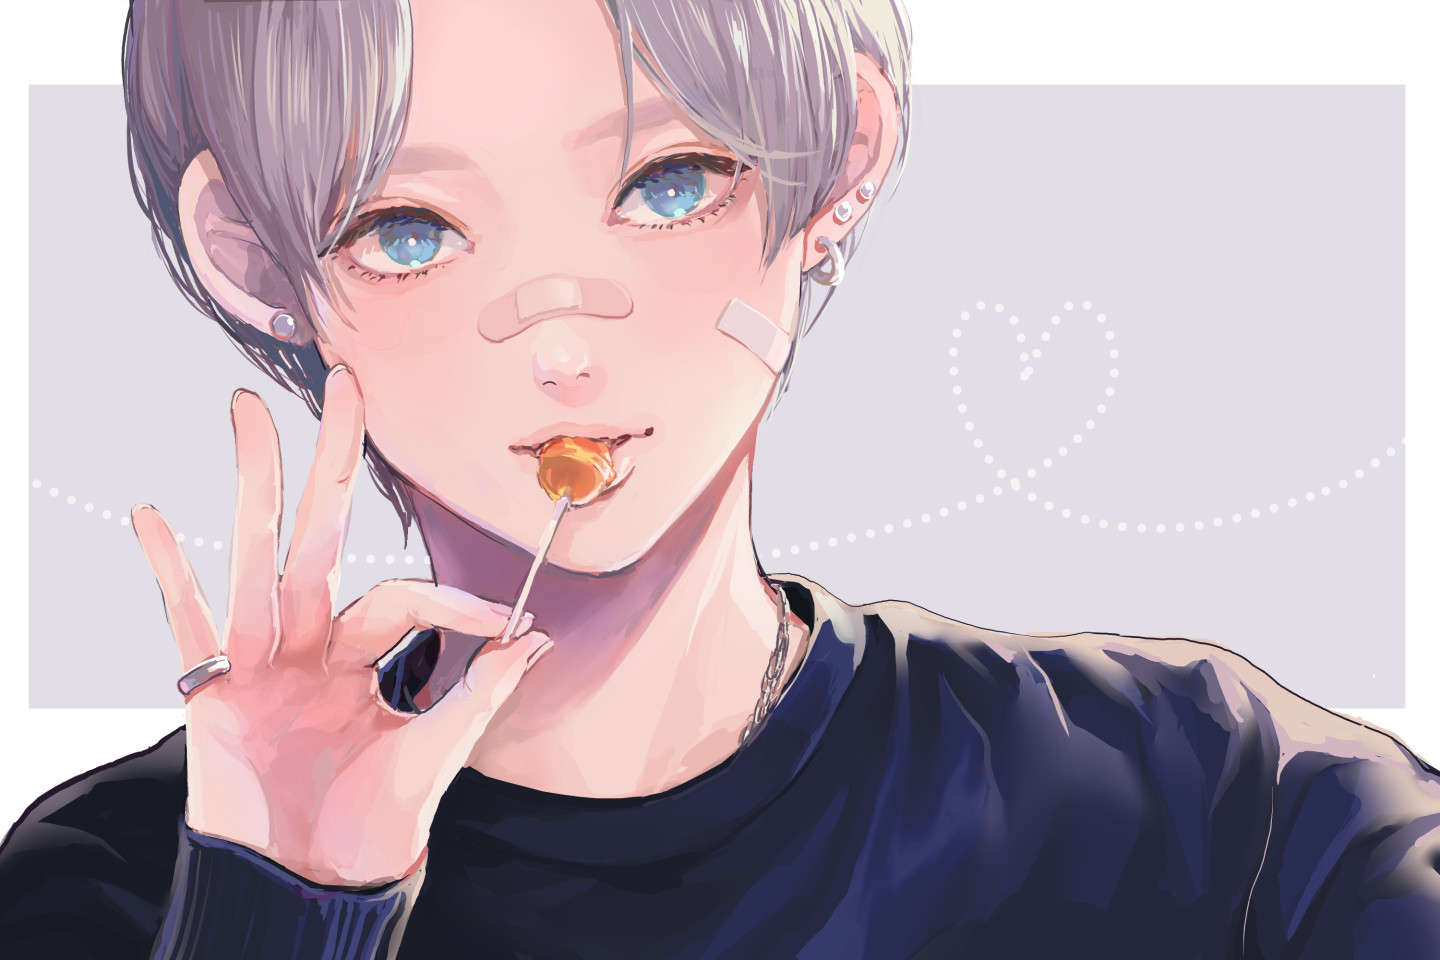
When painting characters’ eyes, there might be a lot of people who just paint them in a vague way, saying “something like this”.
The eyes are an important part that greatly affects the impression of the character, and how to paint the eyes is an important element that expresses the originality and individuality of the illustration.
If you can’t draw attractive eyes like your favorite artist, or if you want to make them sparkle but can’t get them look like they’re shining, then you need to check out this article!
You’ll be able to get some hints on how to draw the ideal sparkling eyes.
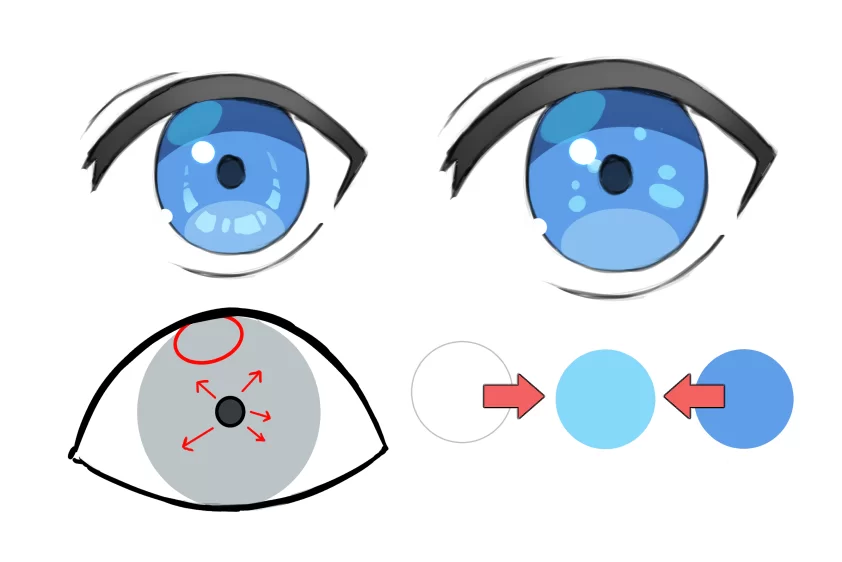
To draw eyes that really stand out, you need to understand the pupil and iris!
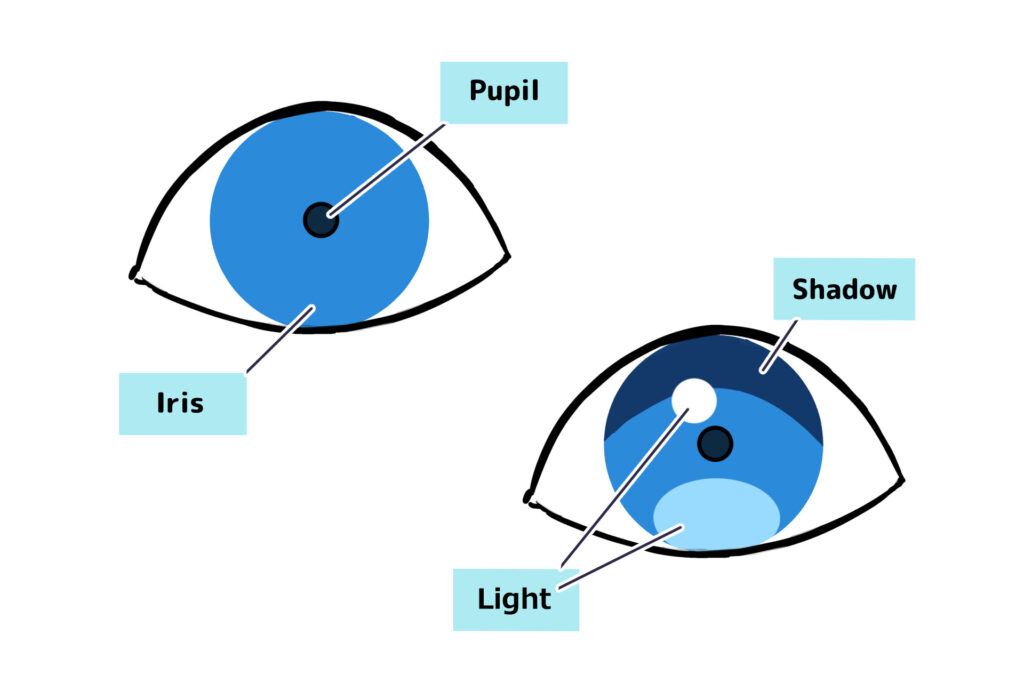
Inside the eye, there is a pupil and an iris.
When viewed from the front, the black part in the center of the eye is the pupil,
and the brownish-red part surrounding the pupil is the iris. Put simply, it refers to the colored part of the eye.
And the impression of the eye changes depending on how the light and shadow fall on the eye.
What is the trick to drawing a natural pupil and iris?
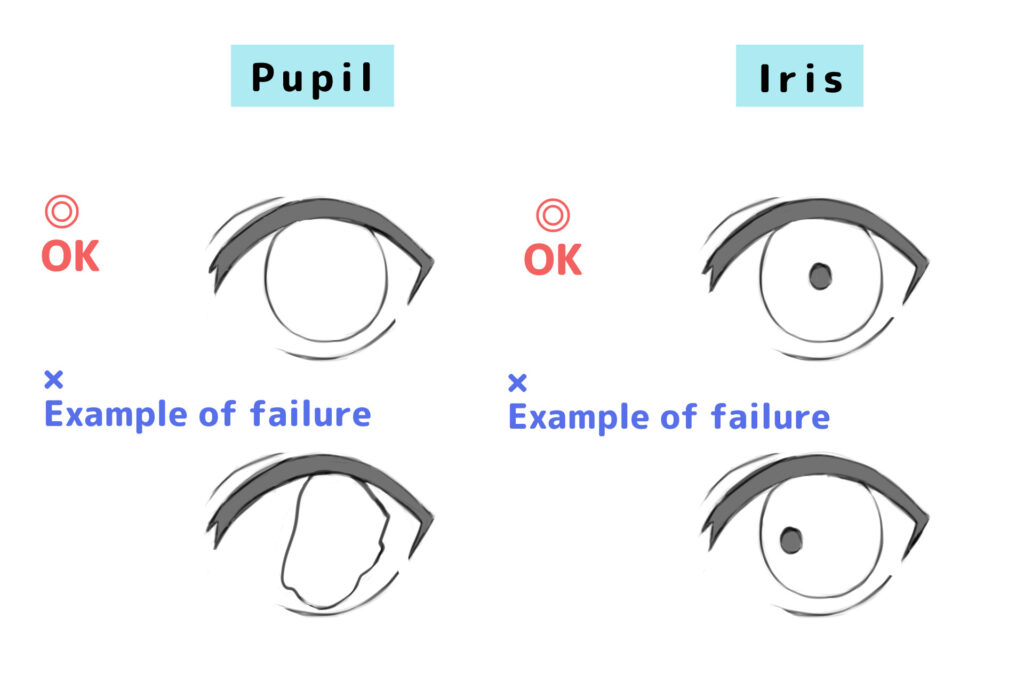
There are various ways to draw and express the eyes (such as drawing the pupil with ♦, as in Demon Slayer ( Kimetsu no Yaiba ).
However, if you deviate too much from the basic shape and position, the look of the eye might become unnatural and different from the norm, so be careful about the degree of your alterations.
Remember that the basic shape of the iris is round
Random shapes that are too long or too angular will look unbalanced and give an unstable impression.
Draw the pupil in the center of the iris
There are cases where the pupil is deliberately drawn off-center to change the direction of the gaze, but this is a highly advanced technique and often doesn’t work. Basically, you’d better draw the pupil in the center.
The basics you need to know about how to paint eyes
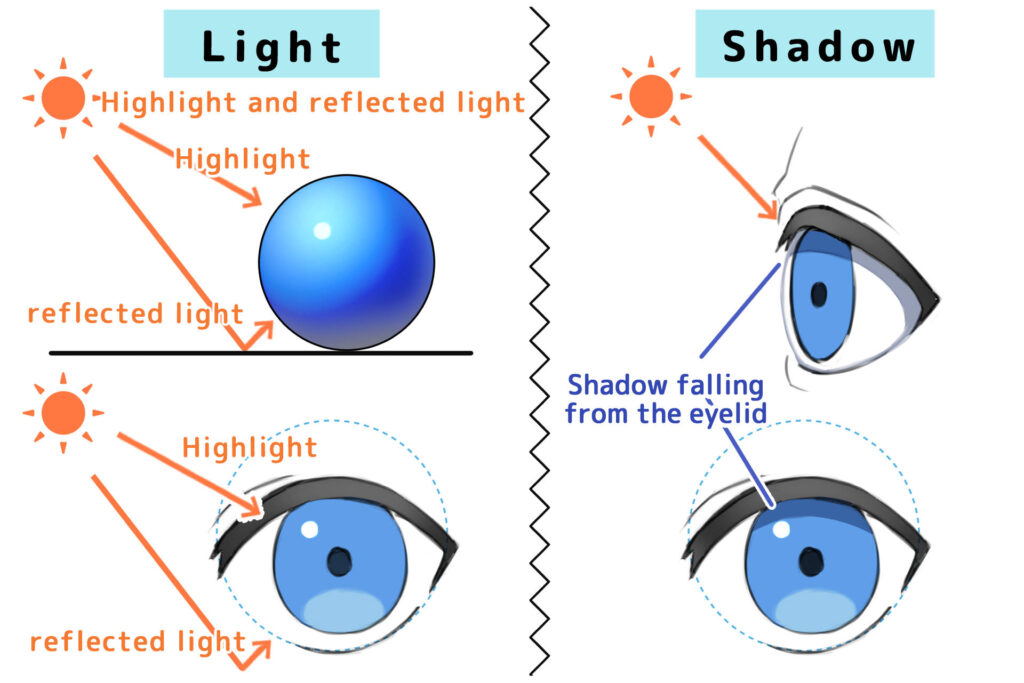
Let’s learn where to put light and shadows
There are two types of lights; the one is highlight and the other is reflected light.
While highlight refers to light that hits the subject directly, reflected light is light that hits another object and is reflected back to the subject and shine it indirectly, as the name suggests.
By adding these two types of light separately, you can get closer to the sparkling eyes like a jewel.
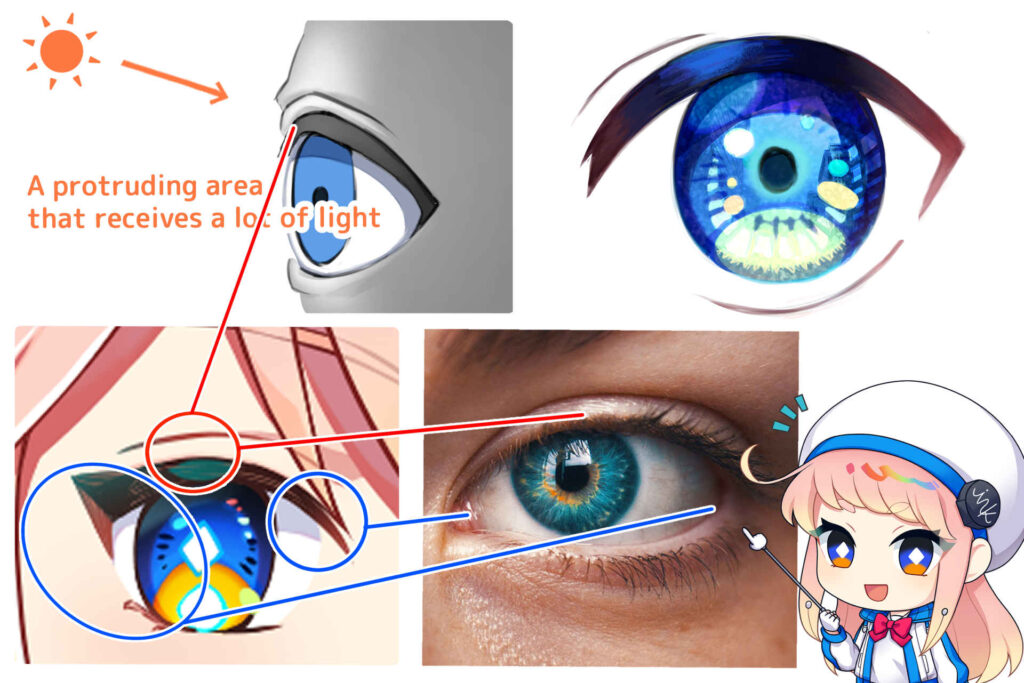
Add the light near the light source
The eyeballs are round like marbles, and light enters the eyes in a round shape near the light source, such as sunlight or electric lights. Unless the light is coming from below, the upper part of the eyes will often shine. This is the highlight.
Reflected light is light that is reflected on the skin, such as the cheeks, and hits the lower part of the eyes. The key is to add it in more subtly than the highlight because the reflected light is less bright.
Remember that shadows fall on the upper part of the eyes!
To sum up, shadows of eyes are only those that fall from the bangs and upper eyelids; therefore, the upper part of the eyes will be dark and shadowed.
If you put it anywhere else, such as under the eyes, the entire eye will become dark, so be careful.
How to paint the eyes in a way that even beginners can understand!
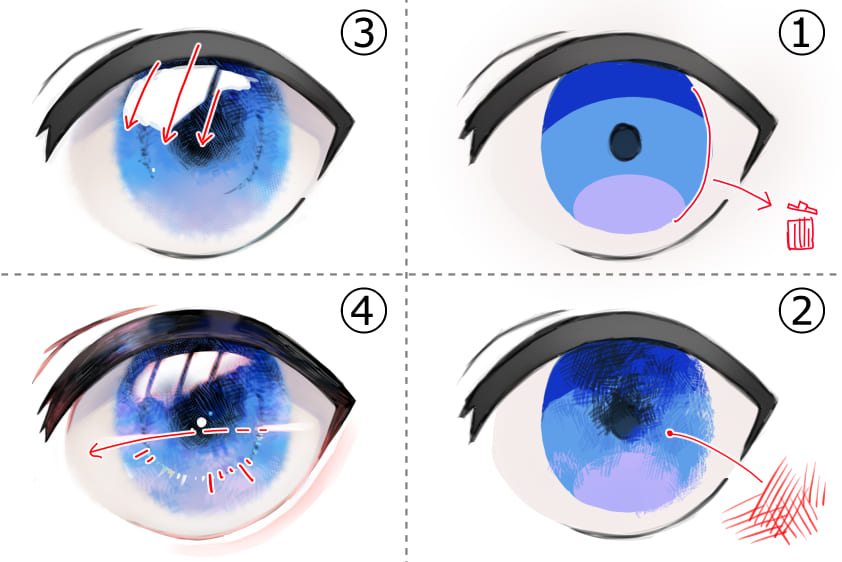
First, let’s master the basic way of painting the eyes!
- STEP01 Paint the base
-
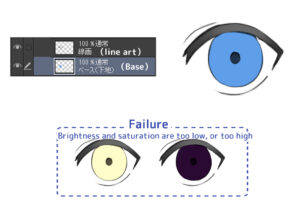
Decide on your eye color. We recommend that you keep the brightness and saturation of the color neutral, not too low or too high, thinking about adding light or shadow later. This will be the base color for the eyes. Move it under the line drawing layer of the eyes.
- STEP02 Add shadows
-
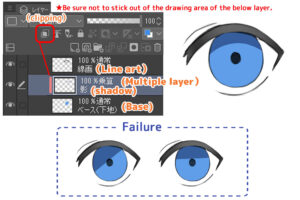
Add a shadow to the upper part of the iris with a color darker than the base color. At this point, be conscious of the three-dimensionality of the eyes. If the shadow is placed vertically, it will spoil the three-dimensionality of the eye. Place the shadow layer on top of the base and set your PC to a clipping mode.
- STEP03 Add reflected light
-
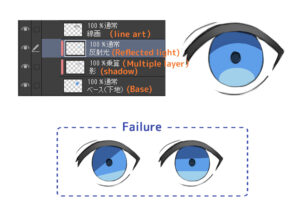
Add a reflected light to the lower part of the eye with a color brighter than the base color. Draw a semicircle with a fan shape in mind. If the light is placed vertically, it will detract from the three-dimensionality of the pupil. Place the reflection layer on top of the base and set your PC to a clipping mode.
- STEP04 Add highlight
-
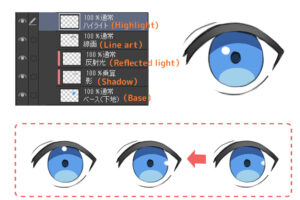
In this case, we set the light source to the upper right corner. The upper right corner of the iris is highlighted with a round light in a color brighter than the reflected light. The size and shape of the highlight will greatly change the impression of the eyes, so find a highlight that you like. However, the more changes added to the rounded shape, the more difficult it will be to make it look natural. Since highlights often overlap the line drawing, move the layer above the line drawing.
少しNG …. A little bit imperfect
What are the points to keep in mind for the entire process of painting the eyes?
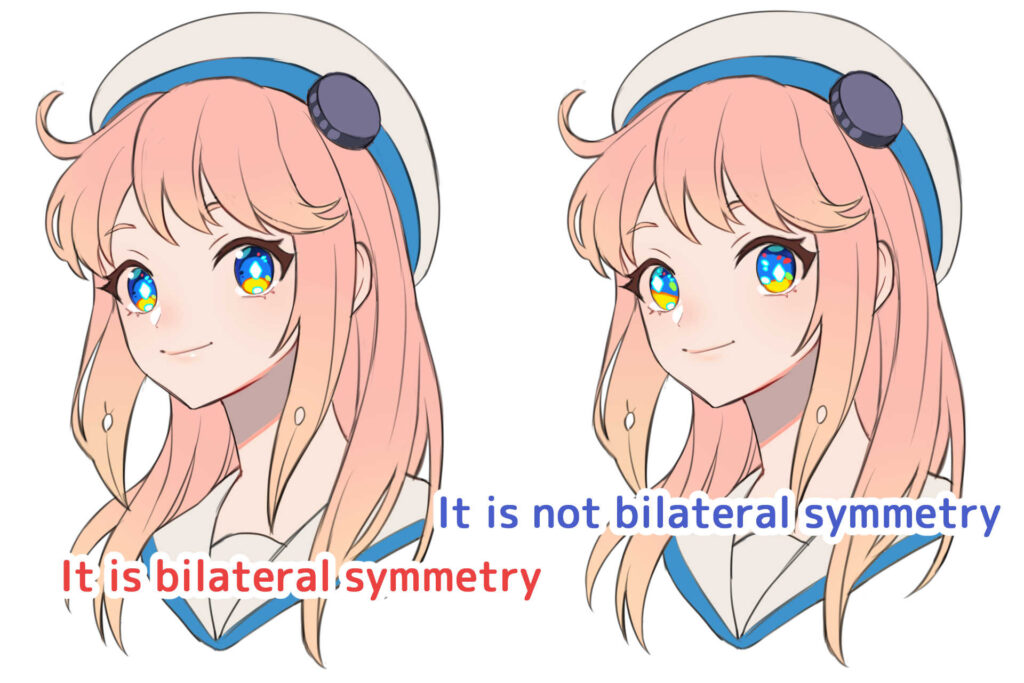
Are you painting the right and left eyes symmetrically? If there is a difference in the way you add light and shadow to the left and right eyes, it will look unbalanced and reduce the appeal of the character.
In particular, the pupil and highlight are prominent points in the eyes, so even if the angle of the face is not facing the front but slanted, be careful to make sure they are in the same position on the left and right!
Make your eyes even more attractive with a little extra effort!
To make your eyes look more sparkling, you can increase the amount of information by adding more details and colors, so that the light refracts and shines like a cut of gemstone.
Once you’ve mastered the basic painting method, try adding the following elements!
Draw the pattern of the iris on the eyes
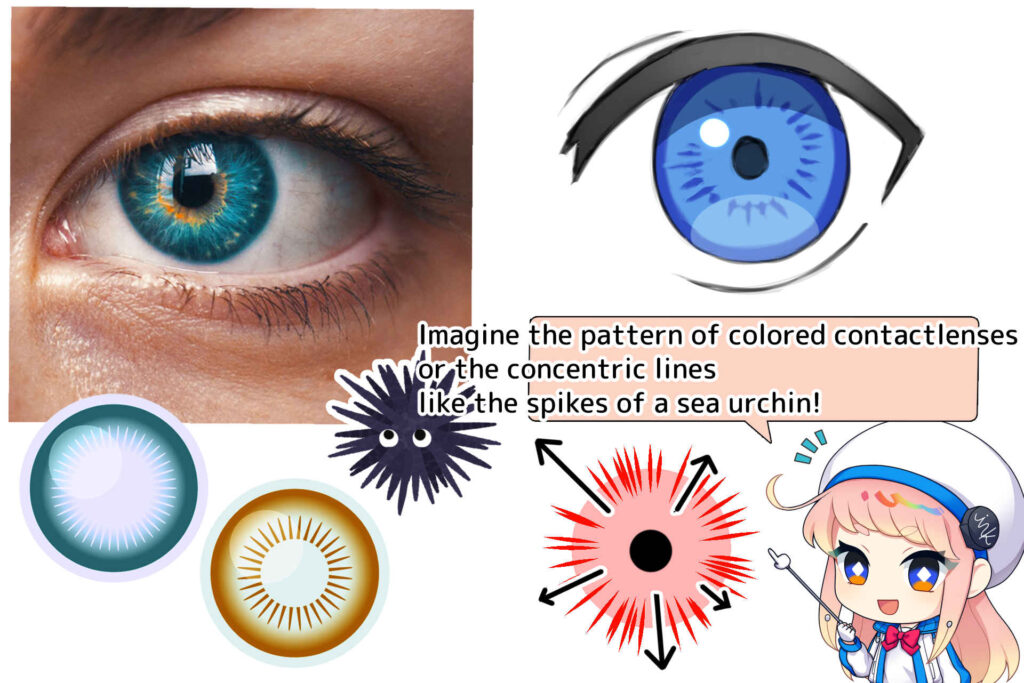
If you look closely at the eyes, you can see that there are lines within the iris. To increase the amount of writing, it is better to describe them. Imagine the pattern of colored contact lenses to get closer to a natural result.
Add a texture to the eyes
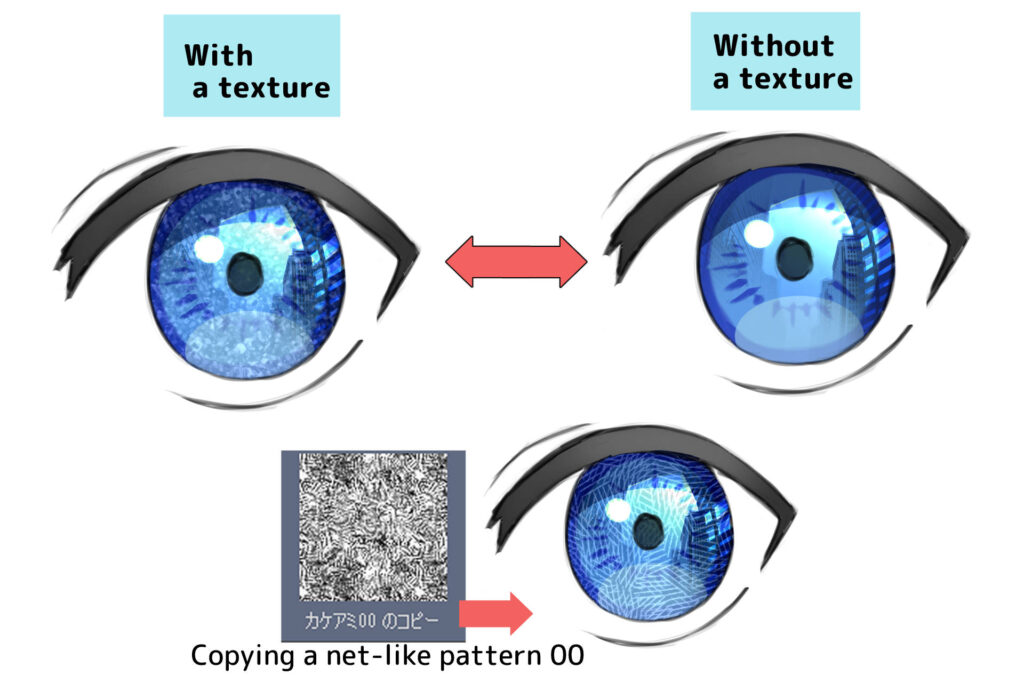
If you’ve tried drawing the iris pattern by yourself but felt like it’s not quite enough, why not try adding textures?
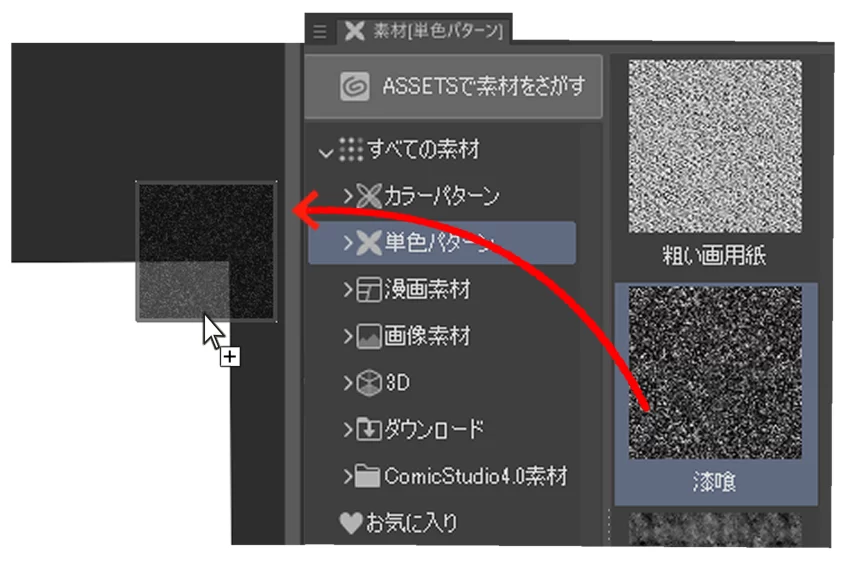
Select “Plaster” from the “Solid Color Pattern” materials and add it to the canvas using drag & drop.
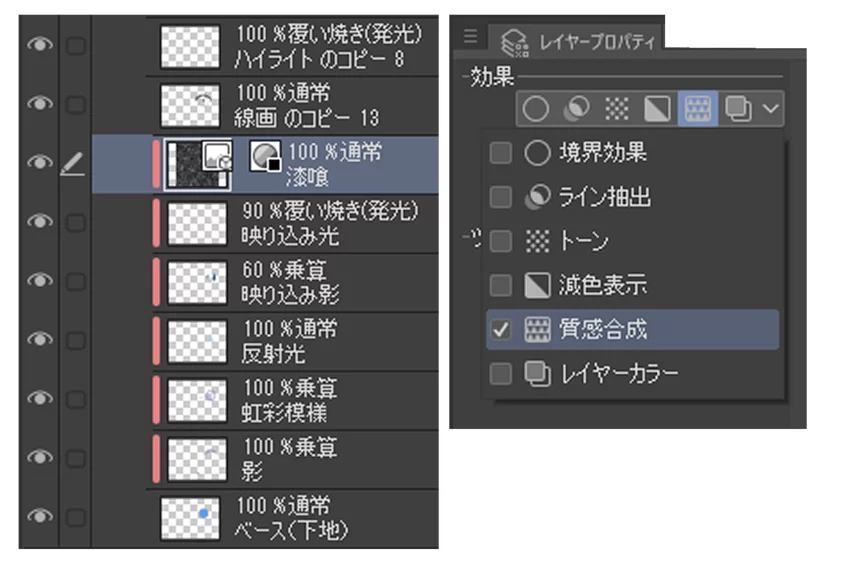
Place it on the base, then tick the column of Composing Textures in the Layer Properties after Clipping.
Increase the light that is weaker than the highlight
If you increase the brightest color, highlight, it will make the eyes unclear, so scatter the light that is weaker than the highlight to make it more brilliant.
Increase the number of colors to make the eyes more vivid
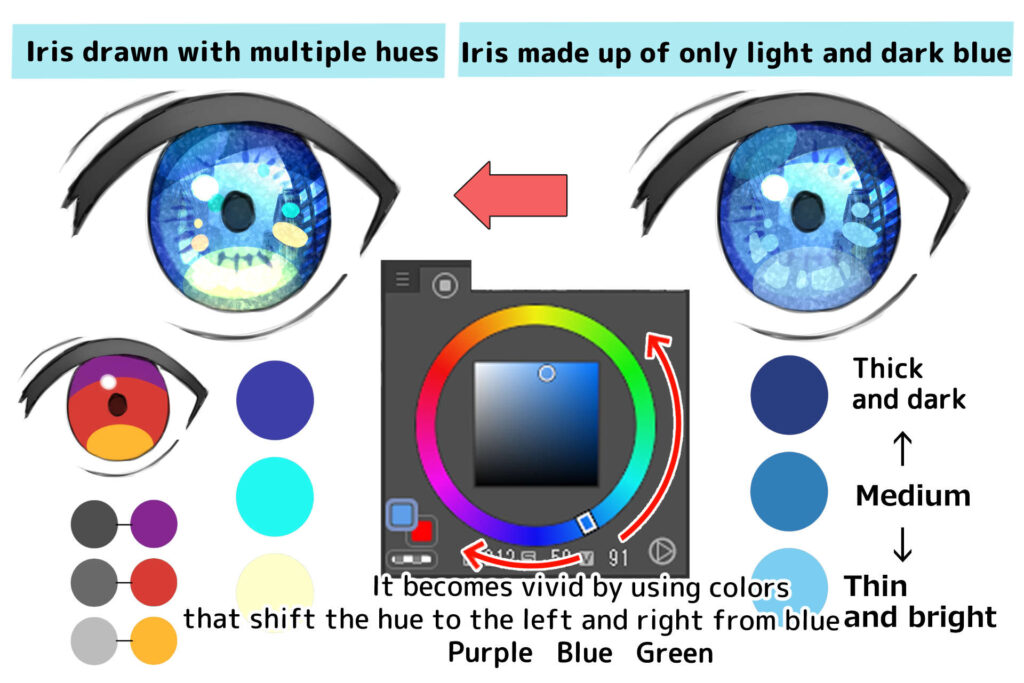
While eyes with a uniform color are simple and lovely, using a lot of colors can easily give a gorgeous impression. Be careful not to use too many colors, as this can make the eyes look uncoordinated! Be careful not to use too many colors, as it can make the design look unbalanced! Also, because warm and cool colors tend to repel each other, we recommend using colors that are next to each other on the color wheel.
Make your eyes more powerful by using different colors!
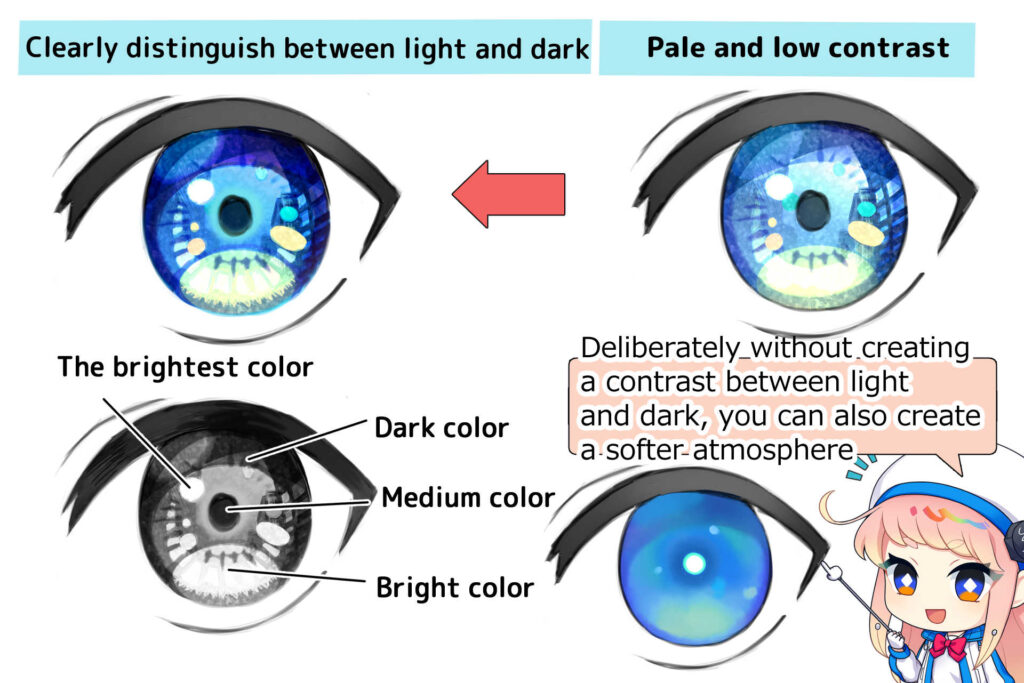
あえて明暗差を出さない事で柔らかい雰囲気を出す事も出来ます。….Deliberately without creating a contrast between light and dark, you can also create a softer atmosphere
If there is not much difference between colors and they are all the same color, it tends to look dull. Make sure to use a good contrast between dark and light areas!
Let’s add some light and color variation to the eyelashes too!
If you follow the above instructions, you will probably notice that the eyes are drawn in a lot of detail, but the eyelashes are drawn simply. To eliminate this sense of discomfort and make them look more natural,
let’s add light to the area where the eyeball is most prominent, close to the light source, just like the eyes. Also, if you make the inner and outer corners of the eyes a slightly reddish color, you can express the color of the “mucous membrane” and achieve a natural finish.
Draw the reflection of the eyes
The scene that the person is looking at is reflected in the person’s real eyes. By drawing this reflection, you can give the eyes a sense of reality and depth. It’s also a good idea to draw it to increase the amount of detail.
Introducing a variety of ways for painting the eyes!
Eyes like jewels
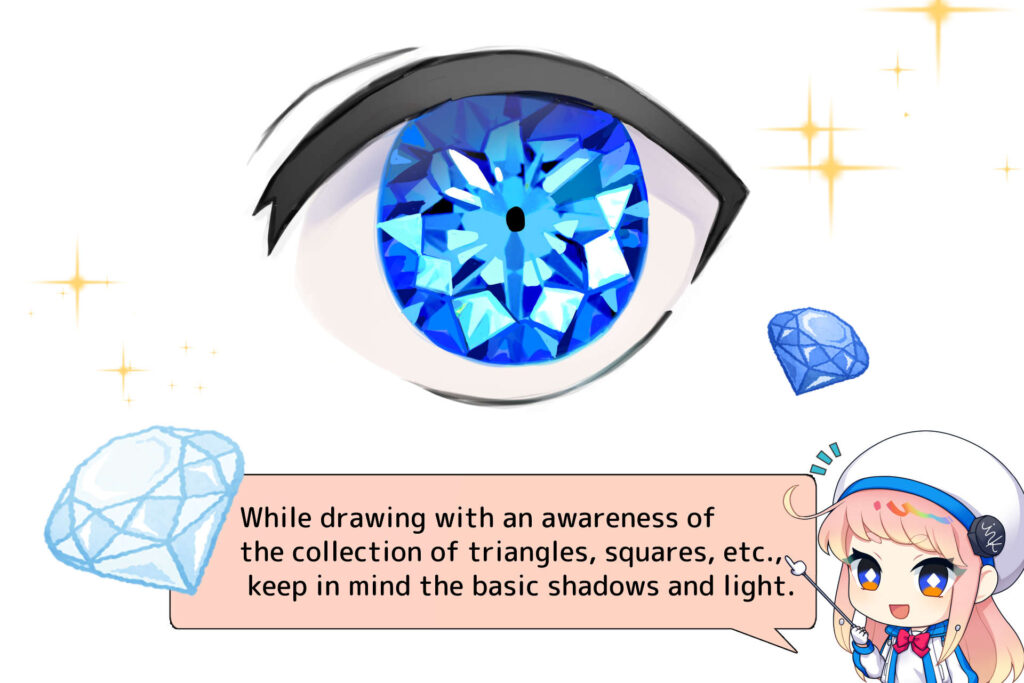
You can express a gorgeous sparkle by drawing the eyes in a way that resembles the cutting of a gemstone.

How to paint eyes to look like gemstones
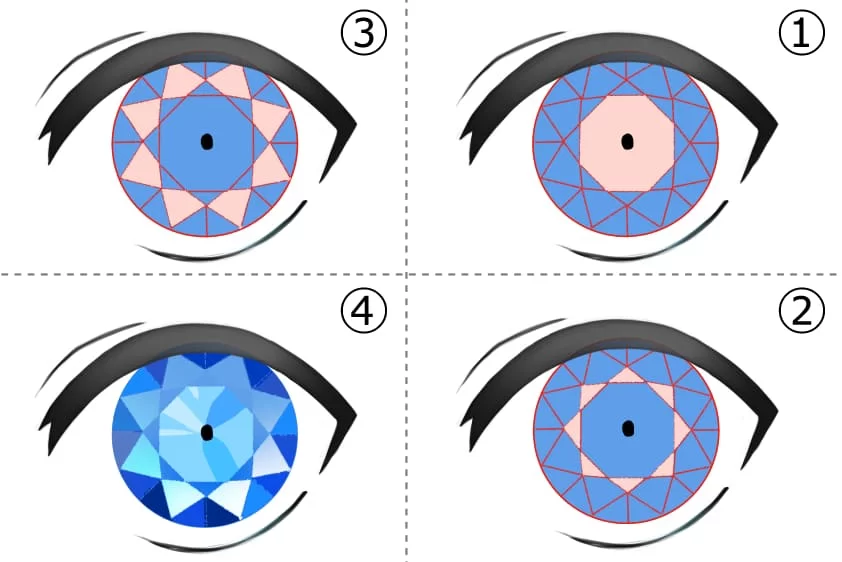
- Draw the part called a table, which is the largest area on the top surface, as a polygon. In the example, it is an octagon, but a hexagon or heptagon is also fine.
- Draw the small facets that spread out in a star shape adjacent to the table as triangles, called star facet.
- Draw a diamond-shaped surface connecting the star facet (2) and the upper girdle facet (4), called the bezel facet. This part will form the iris pattern of the pupil.
- Remaining area will be the surface called the upper girdle facet. Just be careful to make sure that there is a clear difference in color between the bezel facet (3) and this area.
Realistic eyes
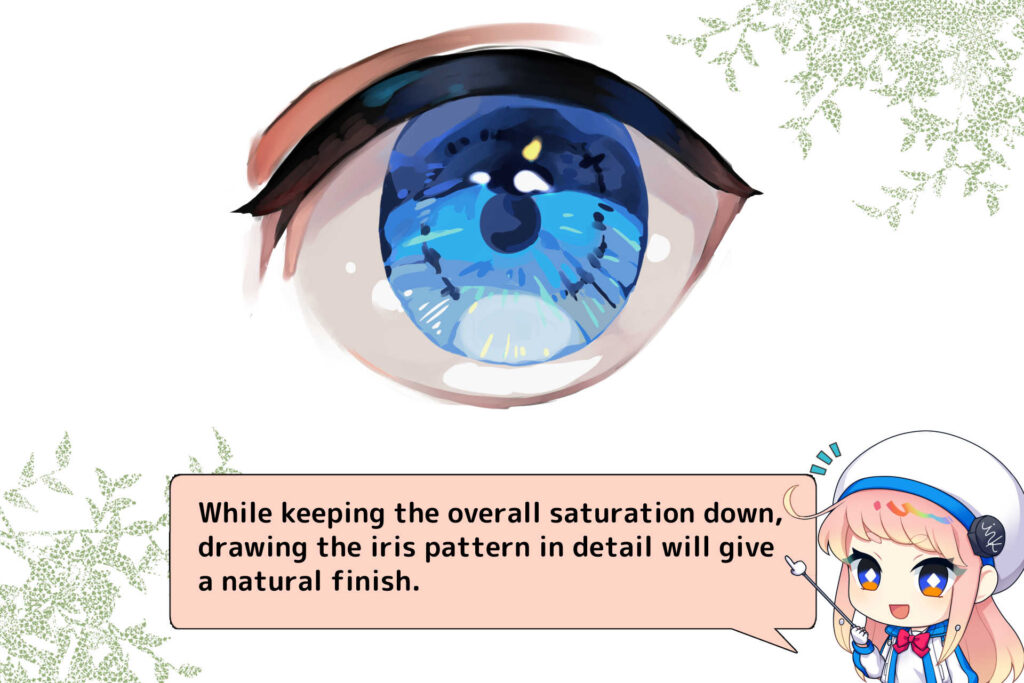
You can draw realistic eyes by not using too many high-saturation colors, and carefully depicting the mucous membranes and eyelashes at the inner & outer corners of the eyes.
How to paint realistic eyes

In order to create a realistic impression, please draw the eyes in a realistic way patiently. The image is sketching the eyes with colors.
- Continue painting up to the Basic Painting of Eyes section of this article.
- Referring to pictures of real eyes, draw the patterns of the iris and the intermediate colors in detail.
At this point, be careful not to change the basic shape of (1) too much.
Also, if you use colors that are not too vivid but are more subdued, you can achieve a natural finish.
Moist eyes
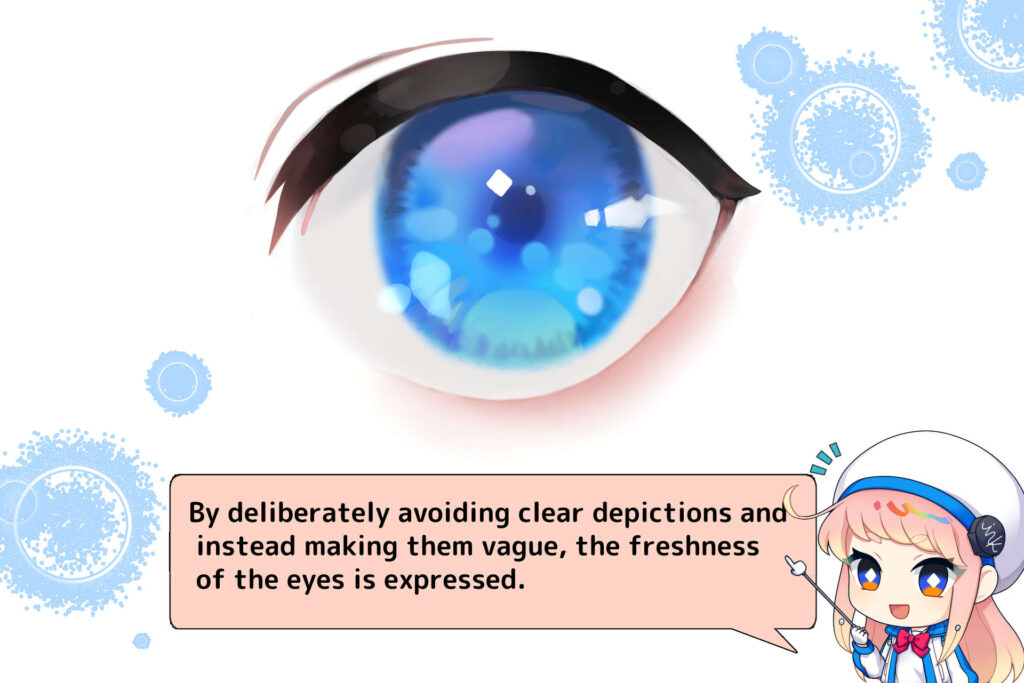
Procedures for painting moist eyes
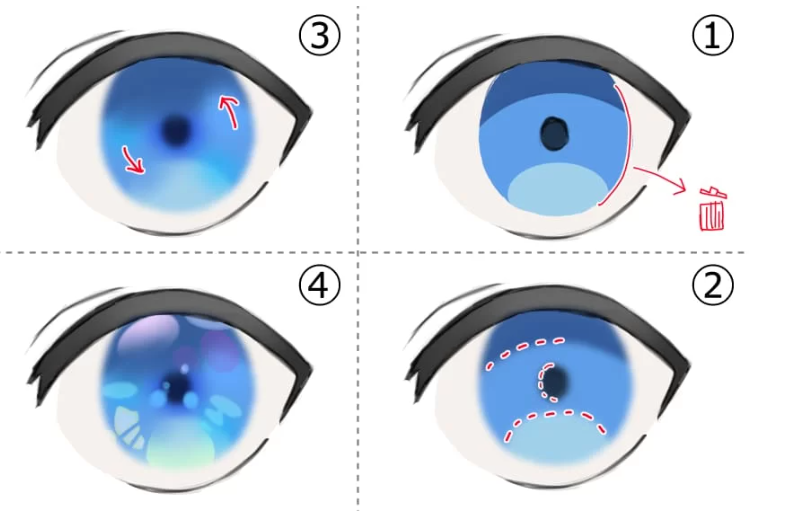
By not clearly depicting the eyes, but leaving them vague, the freshness of the eyes is expressed.
- The line drawing of the iris that forms the boundary should be deleted.
- The color of the iris and pupil will be blended together and blurred to create a sense of unity between the white parts, iris and pupil.
- The borders of the shadows and reflected light are a little noticeable, so blend them together to make the borders disappear.
- We will add a lot of fine highlights to express a super moist eyes. At this point, by changing the hue little by little, you can add a sparkle to the image without making it monotonous. Finally, add white highlights in the iris and pupil, then you’re done!
Vivid eyes
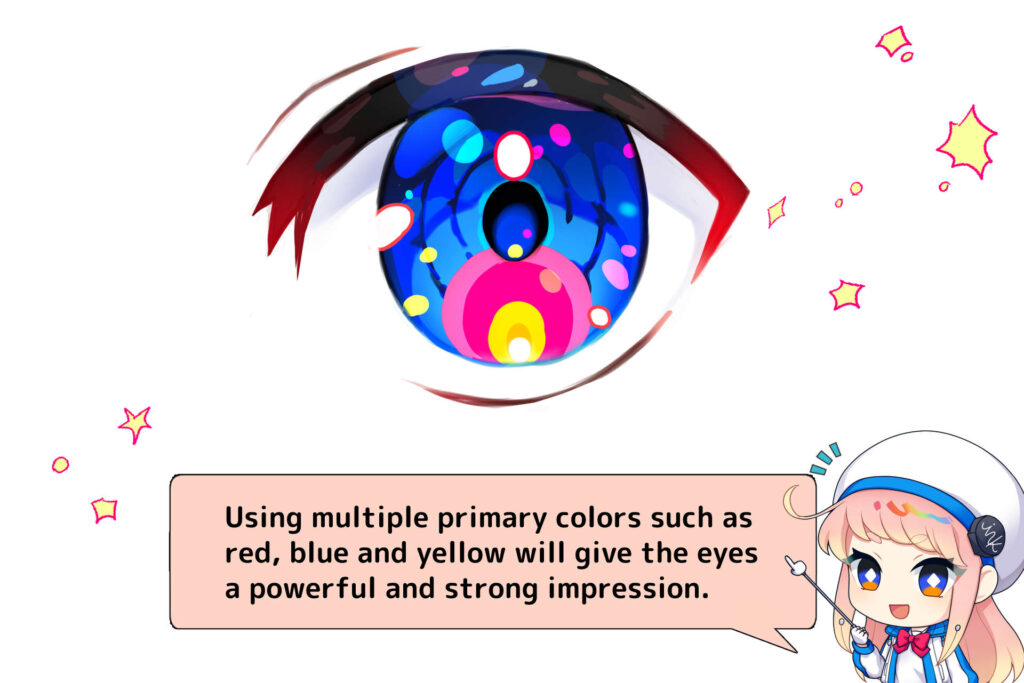
Using many colors with high saturation and creating strong contrast will give the eyes a vivid and impressive look.
Procedures for painting vivid eyes
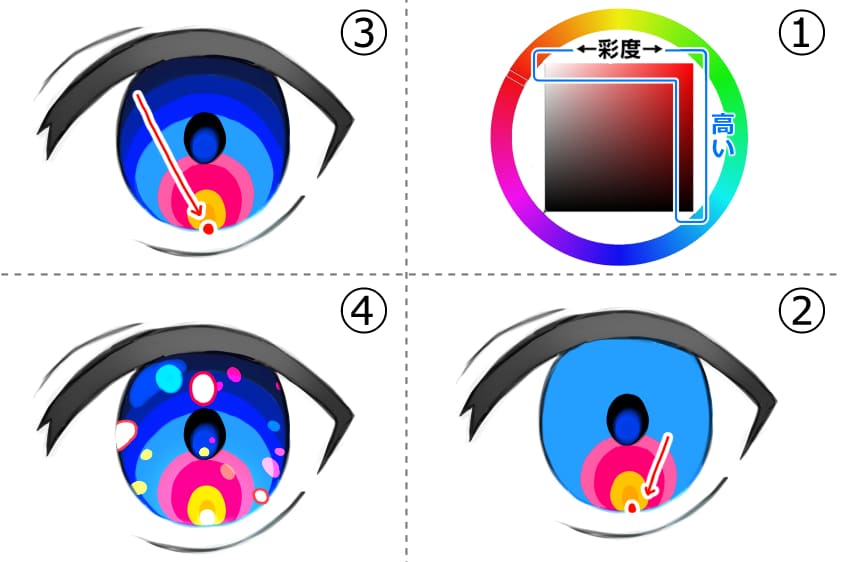
By clearly depicting colors with high saturation, as opposed to realistic or moist colors, you can create a powerful, punchy impression. If you use tools with gradations, such as blurring or watercolor pens, it is easy to create a vague depiction, so use tools with clear edges, such as G-pens.
- Use colors with the highest saturation! When choosing colors from color circle, choose from the range, upper horizontal, right vertical.
- Draw the reflected light using the opposite color (complementary color) to the base color. Also, create a gradation so that the brightness gradually increases when moving towards the center of the reflected light.
- Create a gradation so that the shadow area above the pupil gradually blends into the base color. Since the key points are the high saturation and contrast, setting the shadow color to a darker shade will make the difference in color stand out clearly when you add highlights.
- Scatter fine highlights using the three primary colors of subtractive mixture; cyan, magenta and yellow. These three colors’ combination makes our eyes flicker, however, they also give a strong, dazzling impression. Finally, add highlights in white to the eye, and you’re done!
Eyes with a transparent look
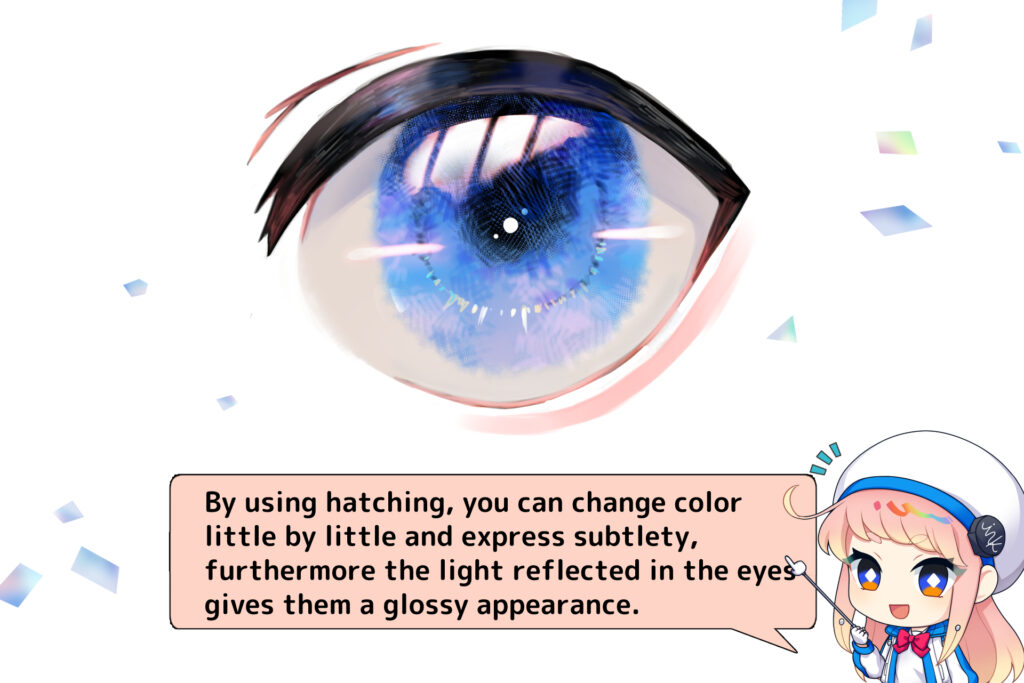
In contrast to vivid colors, the use of dark colors with little difference between colors can create a glossy appearance in the eyes.
Procedures for painting eyes with a transparent look
Although it is not as realistic as real eyes, it is abstract, but by adding subtle color changes with hatching and reflections, it becomes a pair of delicate, transparent eyes.
- Continue lessons on painting up to the Basic painting of eyes section of this article. Delete the outline of the iris.
- Use cross-hatching to blend the boundary between the white parts and colored parts. Paint in the boundaries of the pupil and highlights so that the clear boundaries are not so noticeable.
- After roughly drawing the shape of the reflected light in white, use an eraser to shape it like the bars of a window. Adding color to the boundary of the highlight will help you to express the translucent quality of the light.
- Finally, add highlights to the entire eyeball and the pattern of the iris in white, and you’re done!
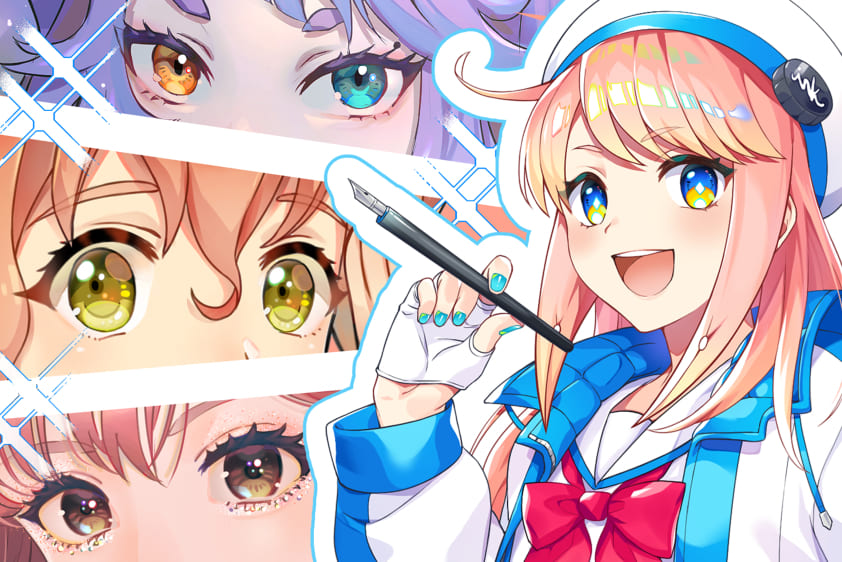
Review of how to paint the eye
The impression of the eyes will change greatly depending on how you draw the pupil, iris, shadow and light, and how much detail you add.
Let’s review the key points for drawing the eyes.
- Pay attention to the shape and location of the pupil and iris.
- For the shadow, be aware of the shape of the sphere and draw it along the shape of the eyeball.
- For the highlight, draw it in a location close to the light source.
- Try to make the pupil and light symmetrical.
- By increasing the volume of reflections and reflected light, the quality of picture can be upgraded.
- Be conscious of parts other than the eyes, such as the eyelashes and mucous membranes, and try to achieve a natural finish.
The way of painting introduced here is just one example, and there are as many ways of painting eyes as the number of people who draw pictures. After mastering the basic painting, why not try to find your own way of painting eyes!
Pickup Articles
Category Related Articles