This article is based on the knowledge and techniques honed by the instructors (illustrators and manga artists) of the illustration and manga class, egaco through their commercial production and other activities. If you are interested in learning more about what you want to draw, we recommend you to take individual instruction lessons at egaco.
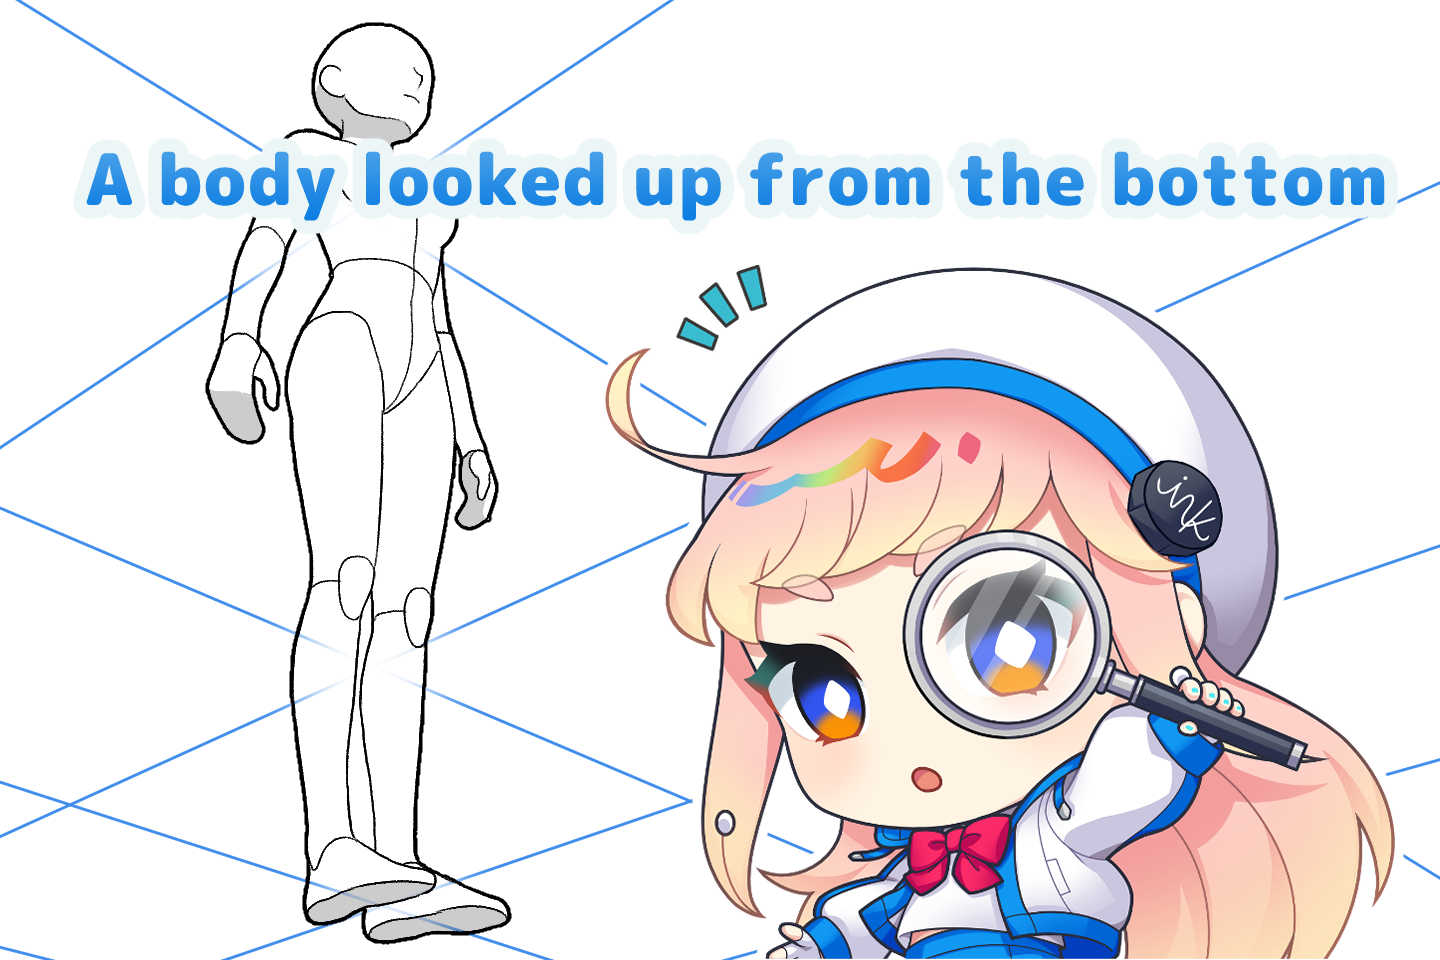
It’s difficult to draw the body when looking up a person from the bottom, isn’t it?
Thee body looked up from the bottom is different from the one when looking at the figure from the front, so it is important to express the sense of depth and perspective of the body.
In this article, we will go over the basics such as how the body looks like when looking up it from the bottom and the rules for drawing it,
as well as more advanced topics such as tips for drawing poses,
we will also introduce methods for covering up your weaknesses if you are not good at drawing angled structure looked up from the bottom.
Let’s understand the rules of a composition looked up from the bottom for drawing the human body!
Basic Rule 1: when drawing a composition looked up from the bottom, make the foreground larger and the background smaller
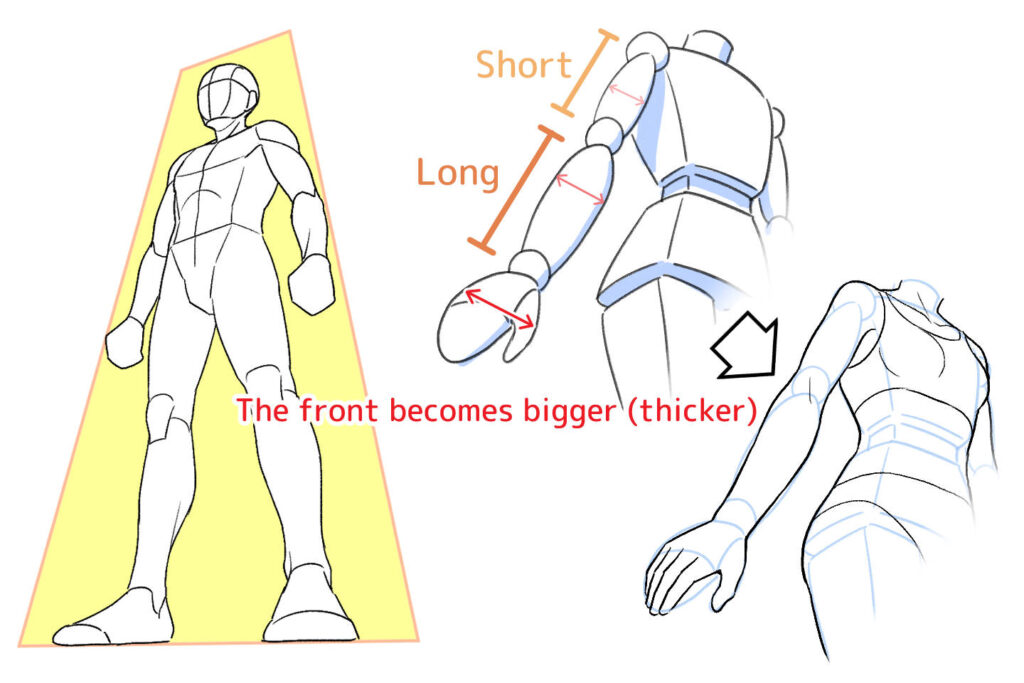
Because an aori composition (hereafter referred to as a composition “looked up from the bottom”) is a composition that looks up at the subject from the bottom, the objects that are lower down appear larger, and the objects that are higher up appear smaller.
In addition, in a composition viewed from below, each part of the body appears to be compressed vertically, so the parts that are far away or leaning forward appear shorter and more compressed.
Also, when the body is divided into parts and sliced up, the way the overlapping (thickness) parts appear changes depending on the relationship between the foreground and background, and the thickness of the parts.
Basically, the further up (the further away) you go, the greater the overlap becomes.
Basic Rule 2: the way a body looked up from the bottom appears is determined by the visual angle
There are different ways of drawing a figure looked up from the bottom, and these vary depending on the visual angle.
So what is the visual angle?
Let’s compare the way a body looks in each visual angle, using the same pose and the composition looked up from the bottom.
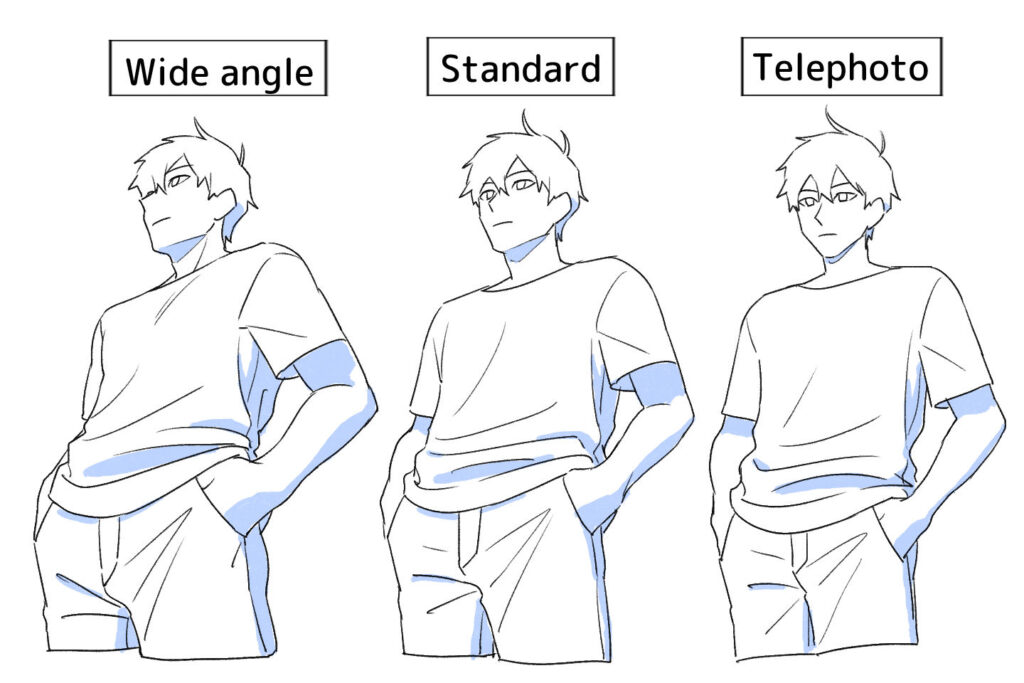
All of these compositions are the body looked up from the bottom; but with a wide-angle shot, the foreground appears larger and the background smaller, while with a telephoto shot, the size differences between the body parts don’t seem to be that great.
A wide-angle shot is also referred to as having a strong sense of perspective, and is effective when you want to create powerfulness with a composition looked up from the bottom.
In order to draw with a fixed angle of view, it is important to understand and use perspective.
Basic Rule 3: when drawing the human body with a composition looked up from the bottom, it is important to understand perspective.
In order to avoid distorting the skeleton, be aware of perspective.
Perspective is a guide line for drawing three-dimensional objects correctly.
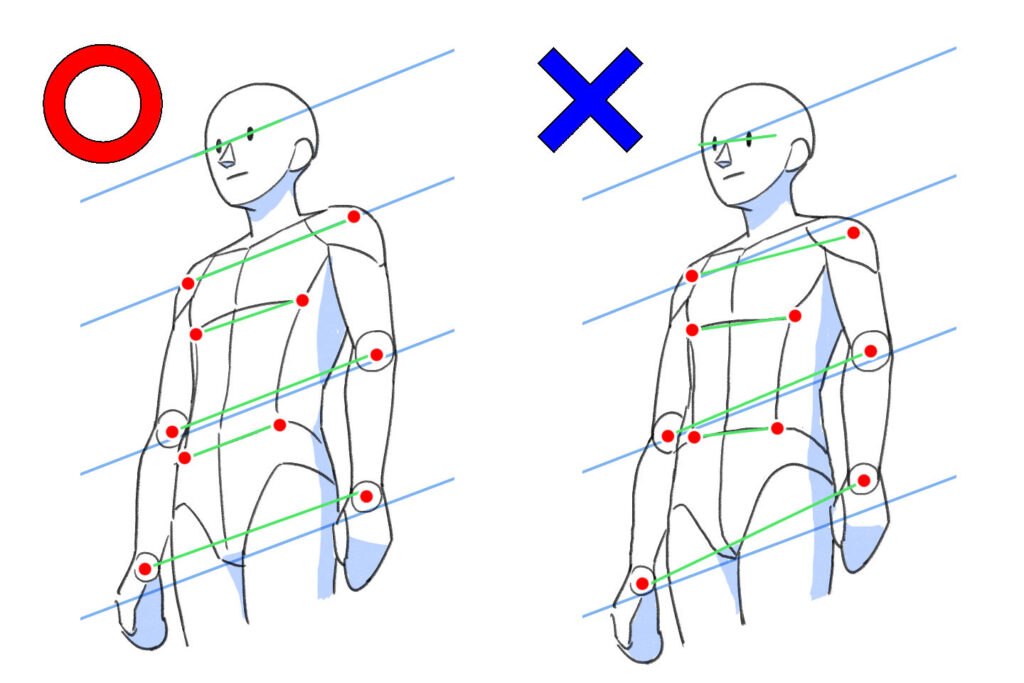
When looking at the human body from the front, it is symmetrical on both sides, and in normal cases, the position of the left and right parts will be the same height unless the pose is changed.
However, when looked from different angles such as a picture looked up from the bottom or a bird’s-eye view, the height of each of the symmetrical parts will change in accordance with a certain rule.
Basically, when drawing a figure looked up from the bottom, remember that the position of the parts in the foreground will be raised.
How to draw a tentative picture of the body using perspective
There are two main types of perspective for drawing a body looked up from the bottom.
Wide-angle perspective with a near vanishing point
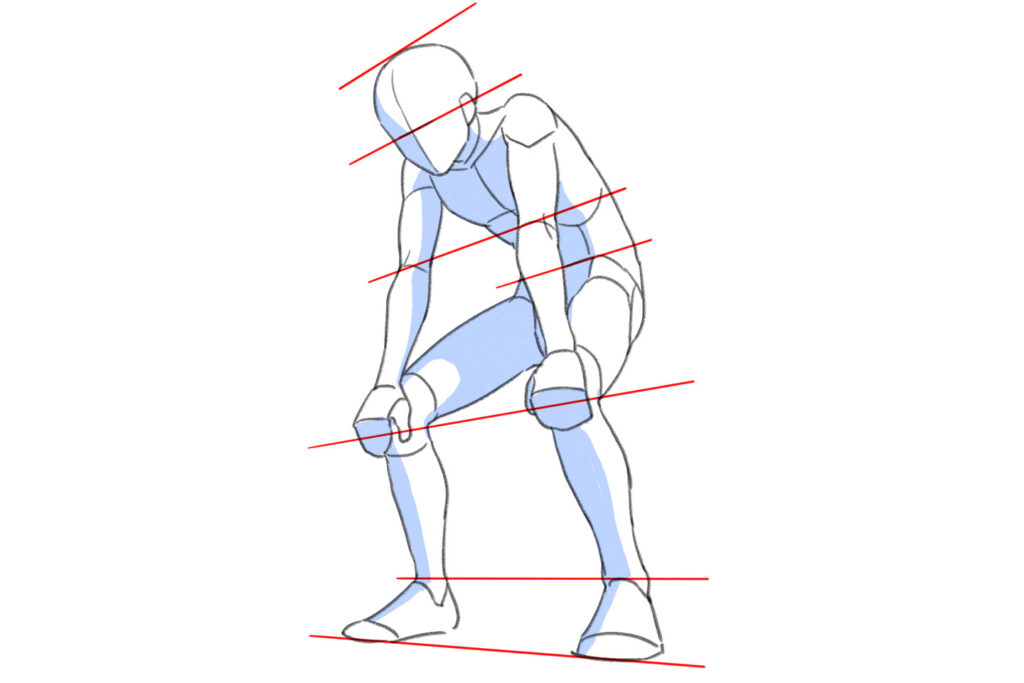
This is a perspective drawing with a standard to wide-angle field of view, where the parts in front (below) of the body appear larger, and the parts in the distance (background) appear smaller.
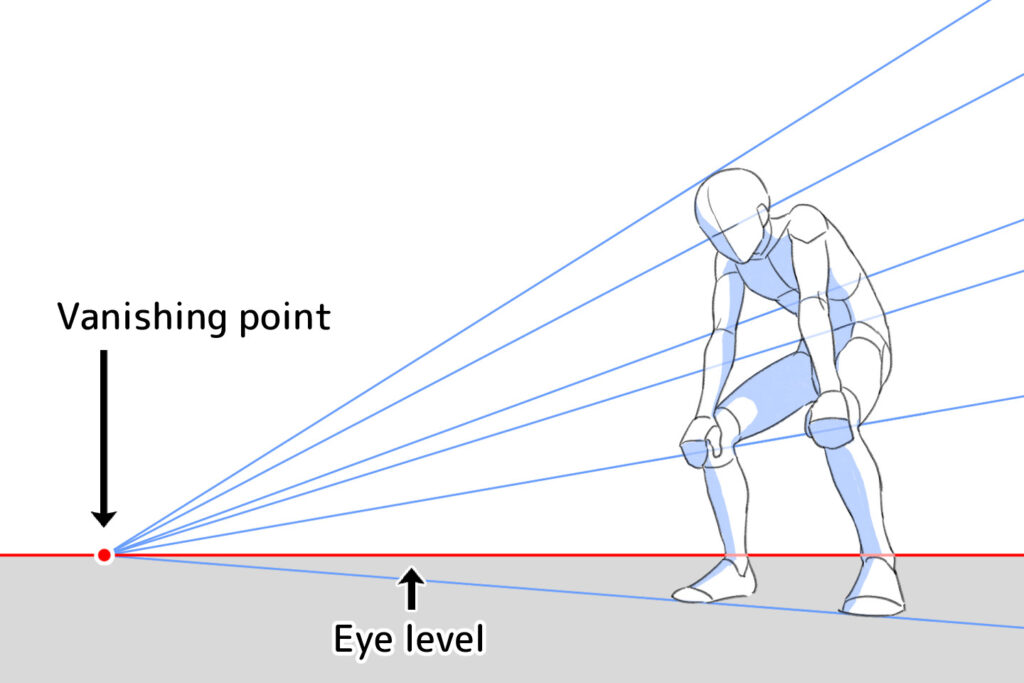
In this case, the vanishing point is close to the character, and the perspective appears fan-shaped, with a strong angle.
If you know how to draw perspective lines, you can easily add impact to your poses.
Telephoto perspective with a distant vanishing point
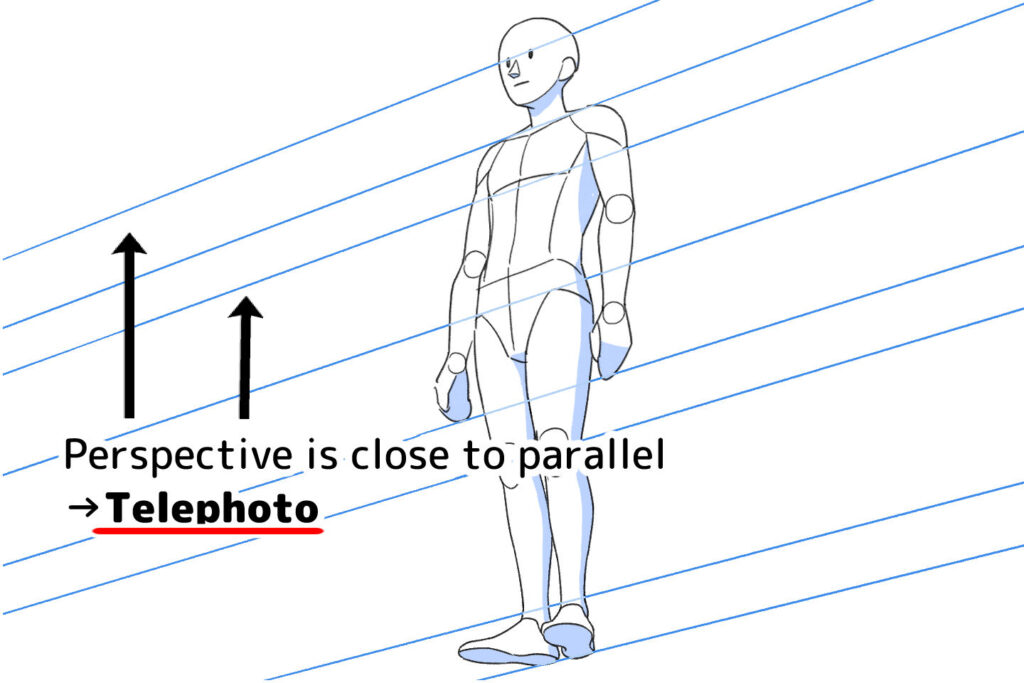
This is a perspective drawing with a viewing angle similar to that of a telephoto lens. The vanishing point of the perspective is located quite far from the character.
Because the lines are almost parallel, it is easy for beginners to handle and align, but
it is difficult to create a sense of depth, and thus the finished pose lacks impact.
Let’s be aware of a space
This is an advanced technique for those who are already familiar with drawing a body looked up from the bottom.
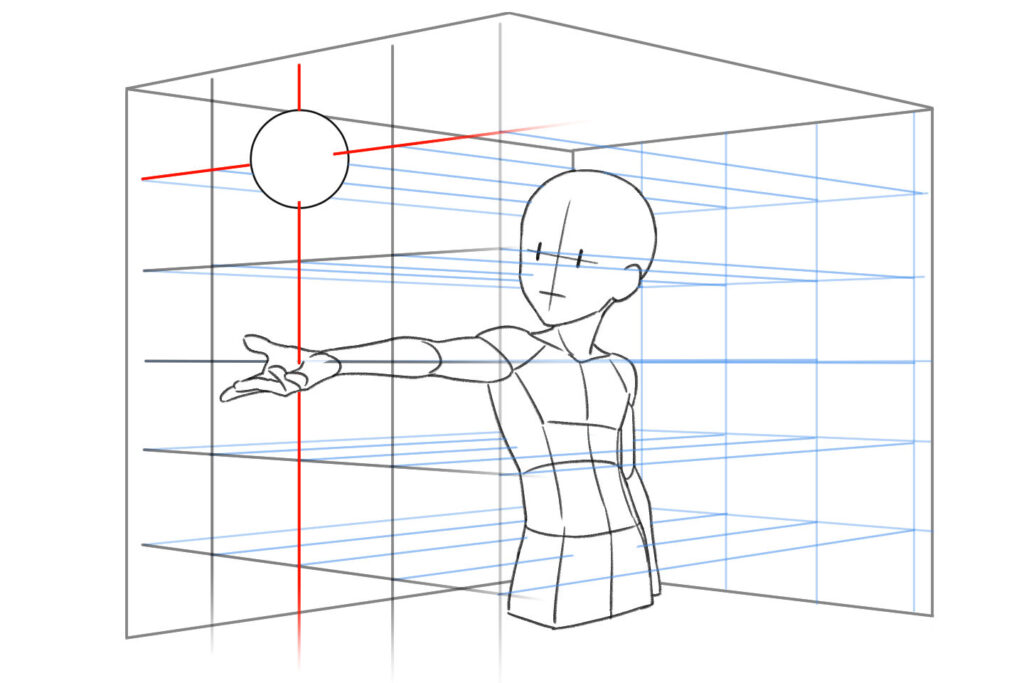
If it is difficult to grasp the sense of depth and distance in the character’s pose, try drawing a grid like a jungle gym in the vertical and horizontal directions, imagining the surroundings as a square room when the character is standing.
Because the way things look changes depending on whether you’re looking at them from the front or from the bottom, drawing a grid in the space makes it easier to understand the positioning of things when the angle changes.
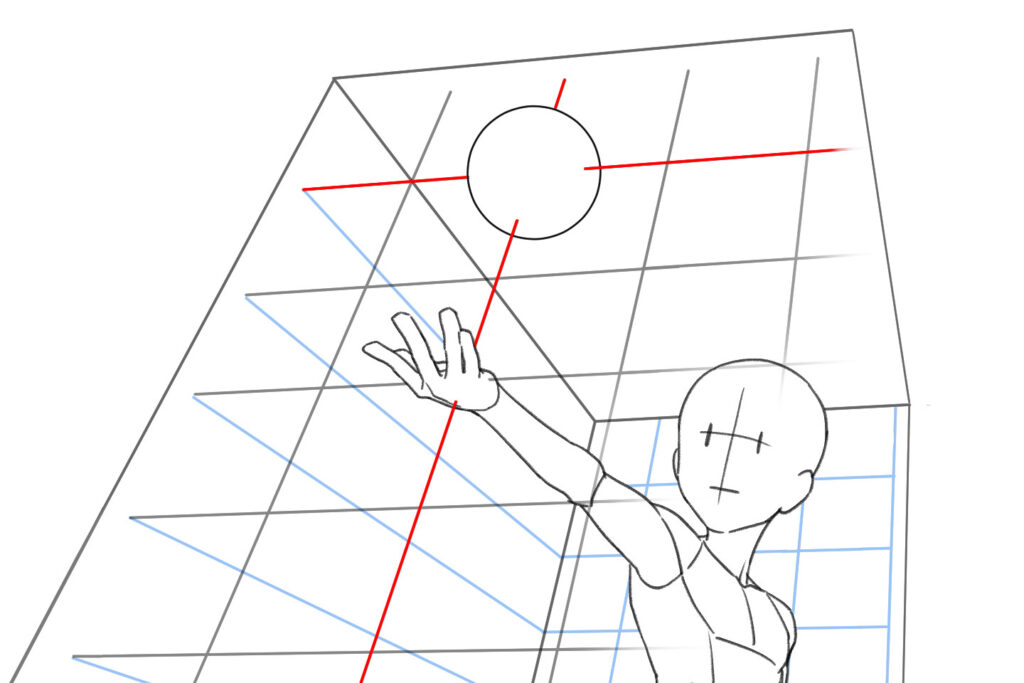
In the image above, the ball is on top of a straight arm, but when you look at it from the front, you can see it’s directly above the hand, whereas when you look at it slantingly from the bottom, you can see that the ball is not directly above the hand on the screen.
When drawing a complex pose, the body parts are not necessarily symmetrical and positioned on the fixed perspective lines, so if you tried to draw it in this way with an awareness of the space, it becomes easier to grasp the relative positions of each part.
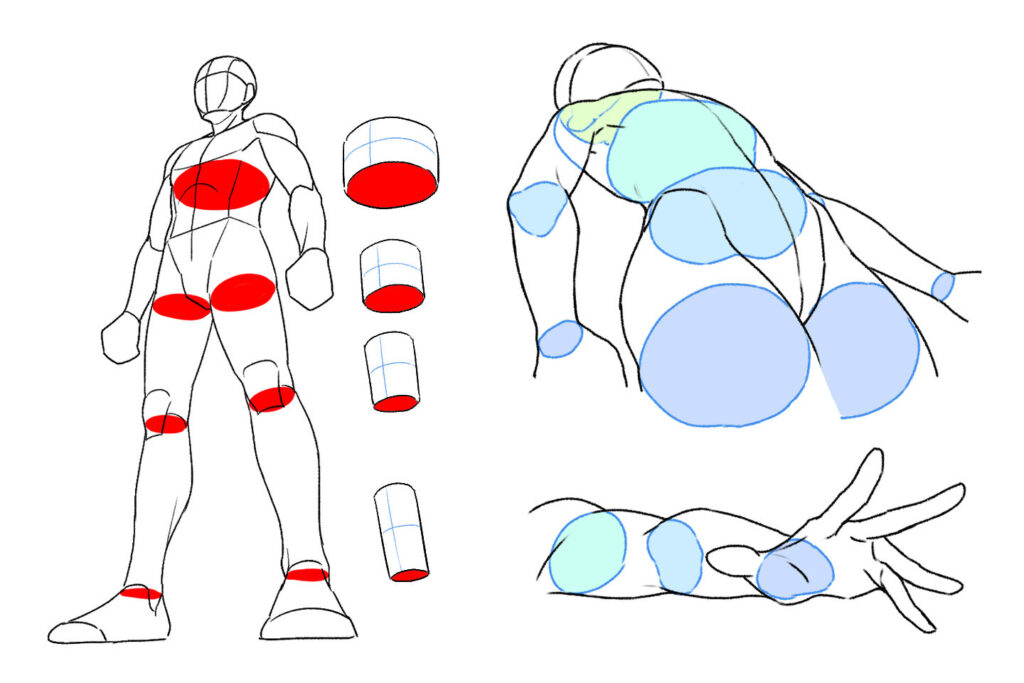
Basic Rule 4: if you’re drawing the body in a composition looked up from the bottom, remember the three-dimensionality of the body!
With a composition looked up from the bottom, it’s easy to see whether the shape of the body is accurately drawn or not.
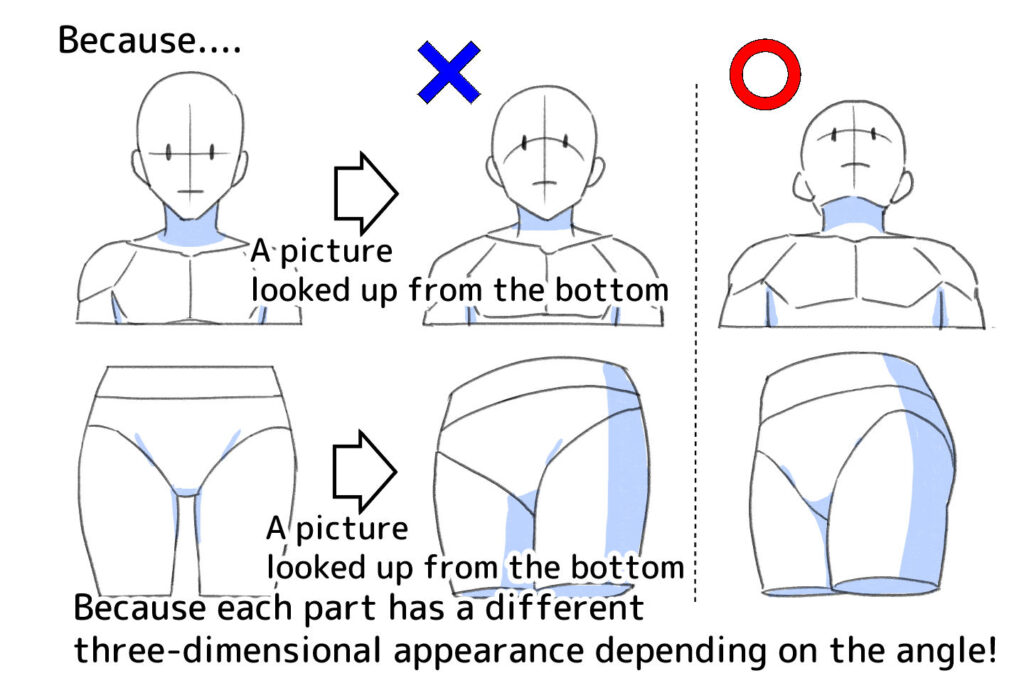
The above diagram shows examples of what is and isn’t OK when drawing parts of the body using a composition looked up from the bottom.
Although it is easier to understand the three-dimensionality of the body by replacing it with a cube or a pillar, the actual body has a slightly more complex shape.
In a composition looked up from the bottom, it is easy to show such complexity; therefore, the level of understanding of the three-dimensionality will clearly appear, not just the silhouette of the body. If your drawing is distorted from the well-balanced front-facing or diagonally facing body, it is better to draw the correct shape of the body first.
Tips for drawing tentative pictures when using a composition looked up from the bottom
If you’re not used to drawing bodies with angles such as a picture looked up from the bottom or a bird’s-eye view, it’s a good idea to get used to drawing three-dimensional bodies by drawing a basic shape first, and then adding flesh.
Once you’ve got a rough idea of the three-dimensional shape, we recommend that you learn to add flesh more accurately through sketching and croquis.
Let’s overcome your weaknesses when drawing a body using a composition looked up from the bottom
If you are aware that your drawings look slightly distorted, it will be difficult to improve!
Let’s identify the parts you’re not good at, and do some basic practice to improve them, and get the hang of an angle looked up from the bottom.
If you’re not good at expressing the three-dimensionality of a body using a composition looked up from the bottom
This is the way of practice recommended for people like the following:
- I am not good at drawing things in the foreground large or drawing things in the distance small.
- I can’t realize the overlapping of body part.
Let’s get used to drawing with boxes and cylinders
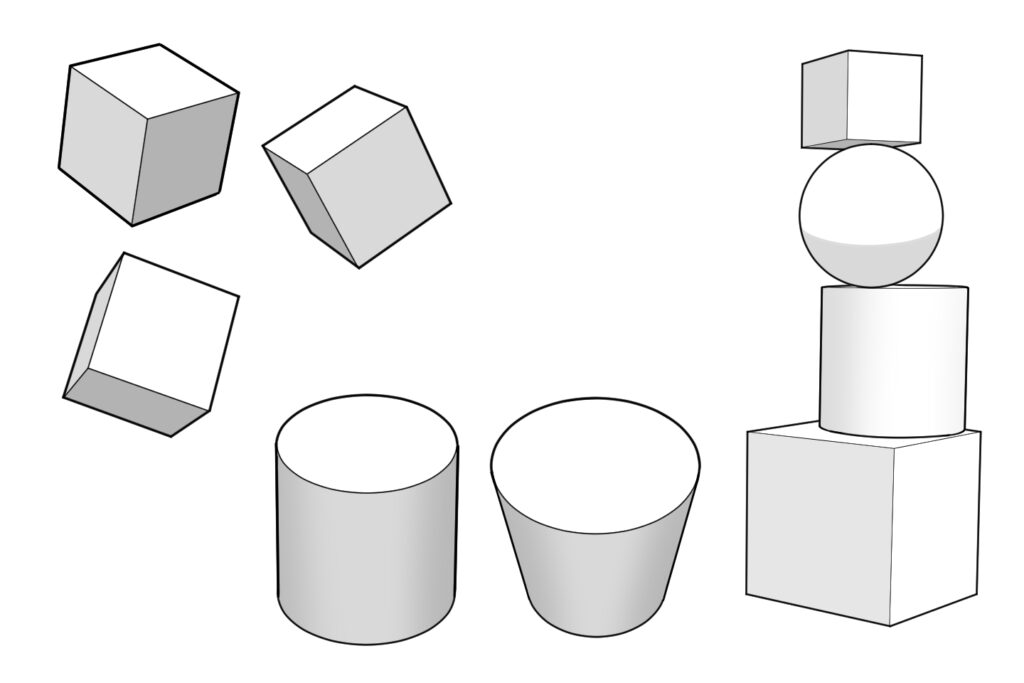
This is the practice method for drawing shapes of the same form and size from different angles of view , or drawing them layered (stacked) together, and combining different shapes.
The human body is a complex three-dimensional shape, so let’s start by getting used to three-dimensional drawings of simple forms, first.
To learn the three-dimensional effect, it is recommended to practice tentative pictures with three-dimensional objects.
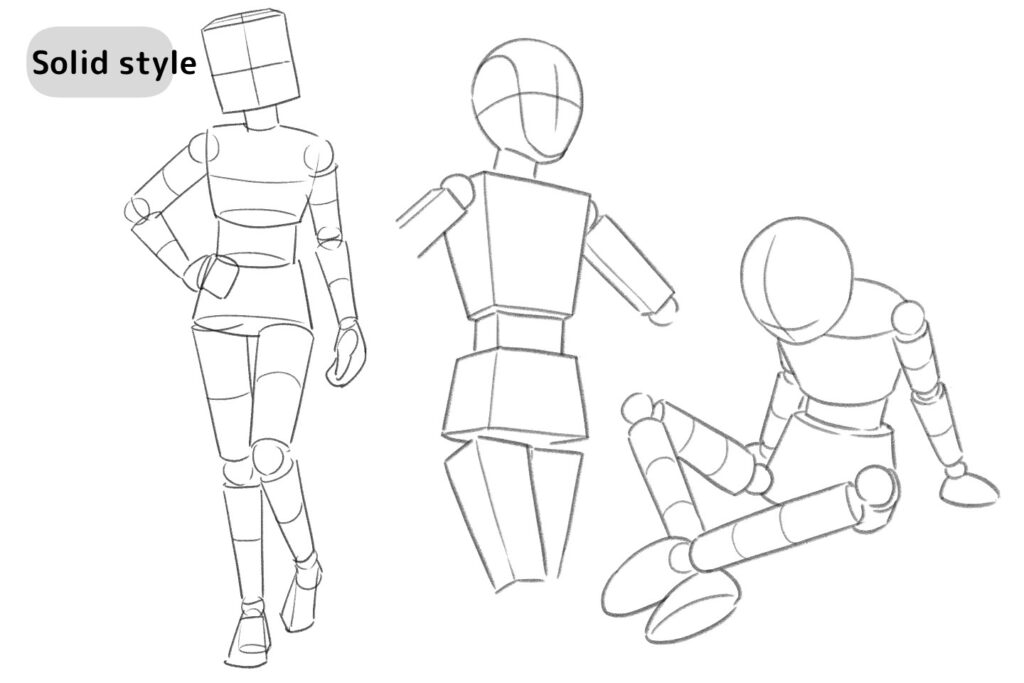
Once you get used to drawing simple three-dimensional objects, you can practice drawing a rough sketch that combines three-dimensional shapes similar to actual body shapes to give the body a three-dimensional appearance.
The below article introduce it as “three-dimensional rough sketch”:
If you are not good at getting a sense of perspective when drawing a picture looked up from the bottom
This is the way of practice recommended for people like the following:
- Even with basic poses, it doesn’t look like they’re standing straight
- I can’t draw it at the angle I want to
Let’s learn the basics of perspective
First, let’s start by learning the basics of perspective and how to use it correctly.
Once you’ve learned how to draw perspective, why not try drawing simple shapes using perspective.
Let’s practice drawing a three-dimensional rough sketch using perspective.
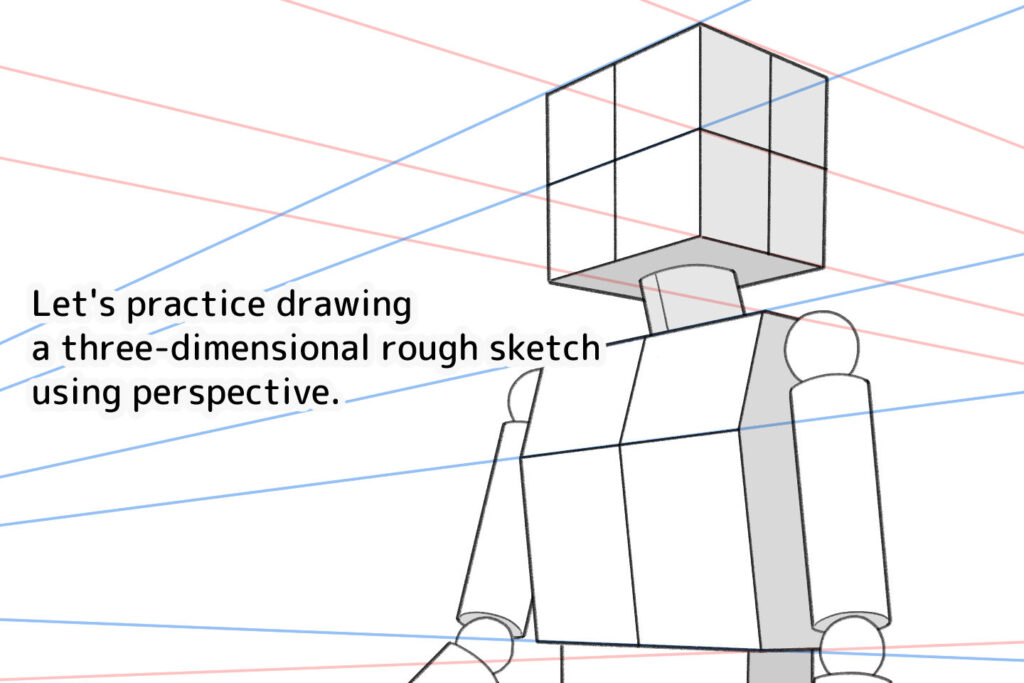
Let’s practice drawing a three-dimensional rough sketch, which are made up of solid shapes, using perspective.
If you add flesh from the top of the finished three-dimensional rough sketch, it will be easier to grasp the solid body of the composition looked up from the bottom.
If you add flesh to the solid body you have created, it will be easier to understand the structure of the solid body that is drawn based on the composition looked up from the bottom.
If you are not good at adding flesh to the solid body of the composition looked up from the bottom.
If you’ve got somehow the sense of three-dimensionality, but find it difficult to draw complex shapes, it might be a good idea to study how to flesh on a sketch in more detail.
We recommend to learn the complex way of fleshing out through sketching.
Also, if you want to learn more about the skeletal structure and muscles of the body, we recommend studying ‘art anatomy’.
Conclusion
The methods of drawing the human body from different angles, such as a picture looked up from the bottom or a bird’s-eye view, are advanced techniques for drawing the human figure,
and it is difficult to express the figure without a good grasp of the basic aspects of body balance.
In addition, it is very important to have a good sense of three-dimensionality; therefore, if you find it difficult, please get used to the sense of three-dimensionality of simple shapes step by step.
In other words, if you practice the basics well, you will be able to draw even difficult angles with good balance.
In the world of drawing, the long way around is the short way home.
Rather than suddenly starting with the difficult parts, let’s clear them one by one in order.
Pickup Articles

Category Related Articles