This article was created by the illustrators and manga artists who teach at the illustration and manga school egaco, based on the knowledge and skills they have honed through commercial production and other work. If you would like to learn more about content that is tailored to what you want to draw, we recommend taking a egaco private lesson.
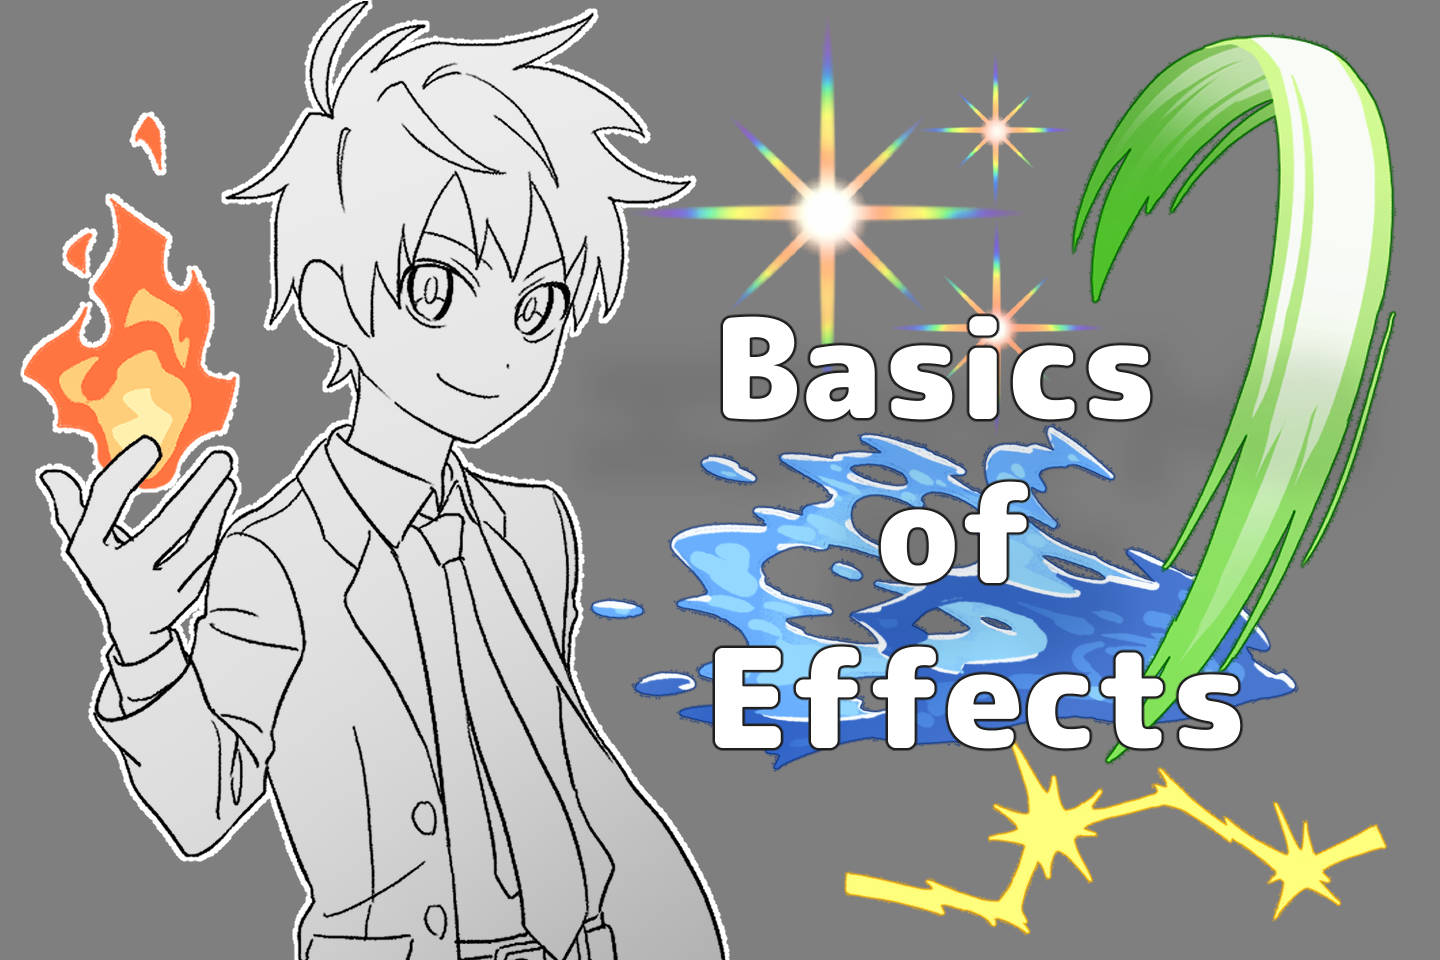
In comic illustration, effects are things like flames, lightning, and glitter.
There are different types of effects, but using effects can make a character look cooler or cuter, and can greatly enhance the appeal of an illustration.
If you want to create an illustration with a higher level of expression, you should definitely try drawing effects!
The process and tips for drawing effects by attribute
How to draw flame effects
Flames should be drawn with a combination of ellipses to create a natural tentative picture.
Draw the outline in curved lines, and draw the flame with a slight break from the flickering tip to create movement.
Procedures for drawing basic flame effects
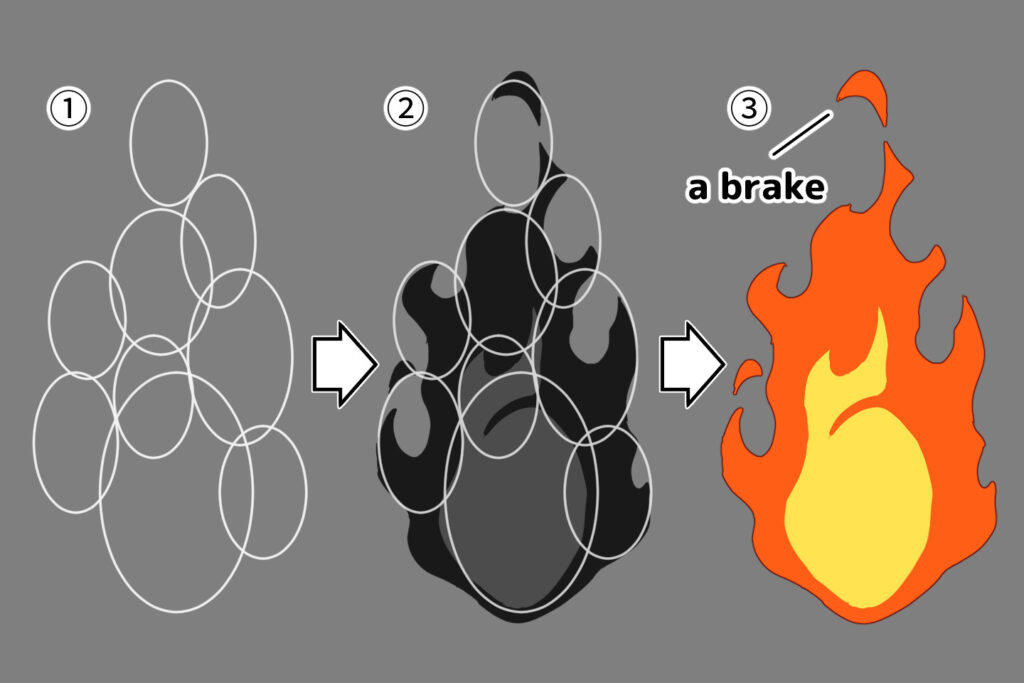
- Let’s create the “Atari (hereafter referred to as “tentative picture”)” of the flame by overlapping long vertical ovals. The trick is to make the oval at the base of the flame larger, and gradually make it smaller toward the tip. The entire “tentative picture” of the flame should be asymmetrical.
- Draw the flame shape along the “tentative picture”. The tip of the flame should be pointed, and the outline should be soft and wobbly. If you draw the flame as it is, it will look hard, so it is OK if it protrudes from the tentative picture in some places.
3. When deciding on a color, create layers of flame color. The root of a red flame will be bright yellow. Draw a flickering flame at the tip of the flame to create movement.
Procedures for drawing flame effects in motion
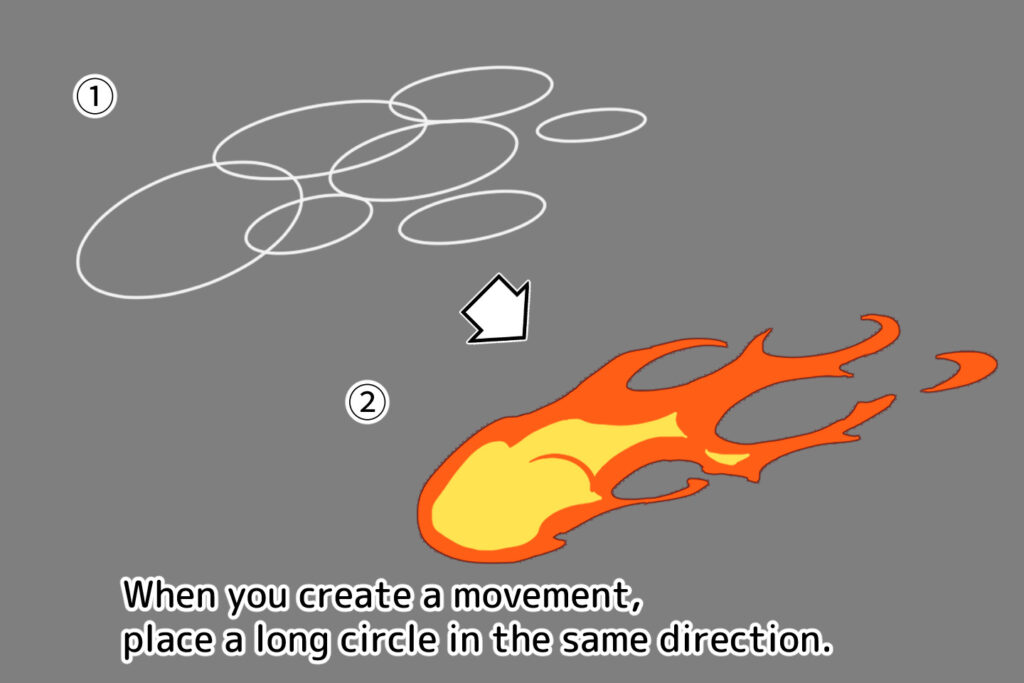
- Place the ellipse long and narrow, facing the moving direction.
- Draw the shape of the flame along the oval tentative picture.
At this point, draw the flickering of the flame also long and narrow, and also draw broken fragments of the flame to give the impression of movement.
Procedures for drawing a vigorous flame
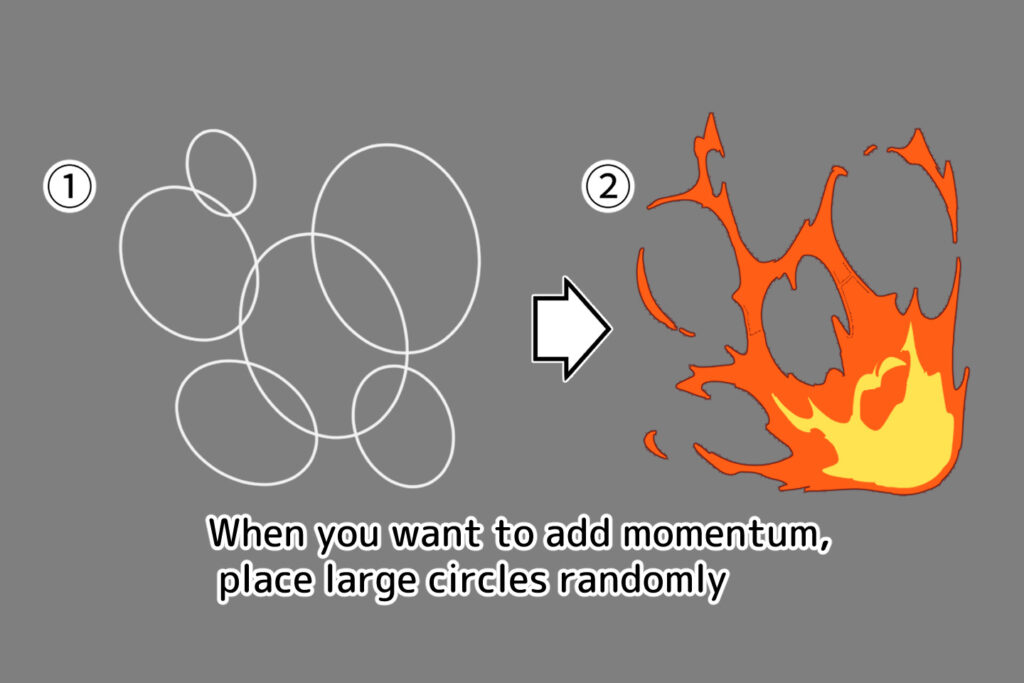
- Place the larger ovals randomly. Orient the ellipses toward the root of the flame.
- Draw the flame shape along the oval “tentative picture”. When drawing a vigorous flame that looks like it is exploding, draw the flickering flame as a spiky silhouette to give it momentum.
How to draw lightning effects – Tips
Drawing a tentative picture using a combination of long and short straight lines makes it look sharp and strong.
It’s a good idea to draw it with a zigzag silhouette rather than an overall straight shape.
Procedures for drawing a basic thunder effect
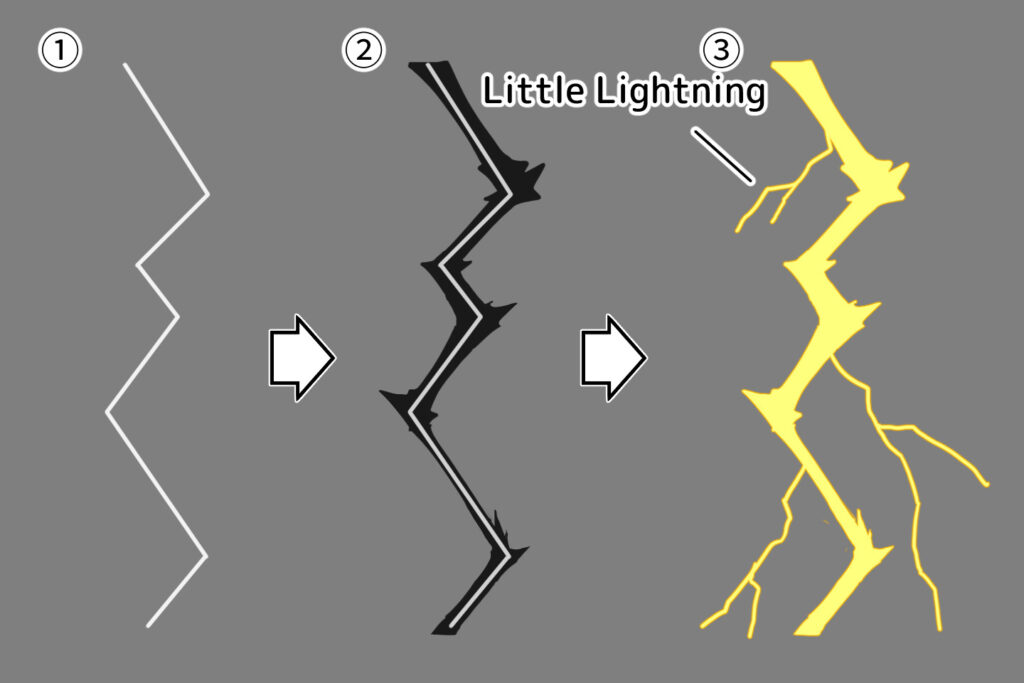
- Draw a zigzag of random length on one side.
2. Draw a lightning bolt shape along the zigzag.
Do not draw the lightning the same thickness, but draw the corners a little thicker and draw sharp points to give the impression of crackling.
3. From the thick lightning bolts, draw small lightning bolts that are thin and zigzag like branches to give a natural shape.
You can also vary the way you express lightnings by drawing zigzag shapes and small bursts of electricity here and there.
Procedures for drawing a crackling thunder effect
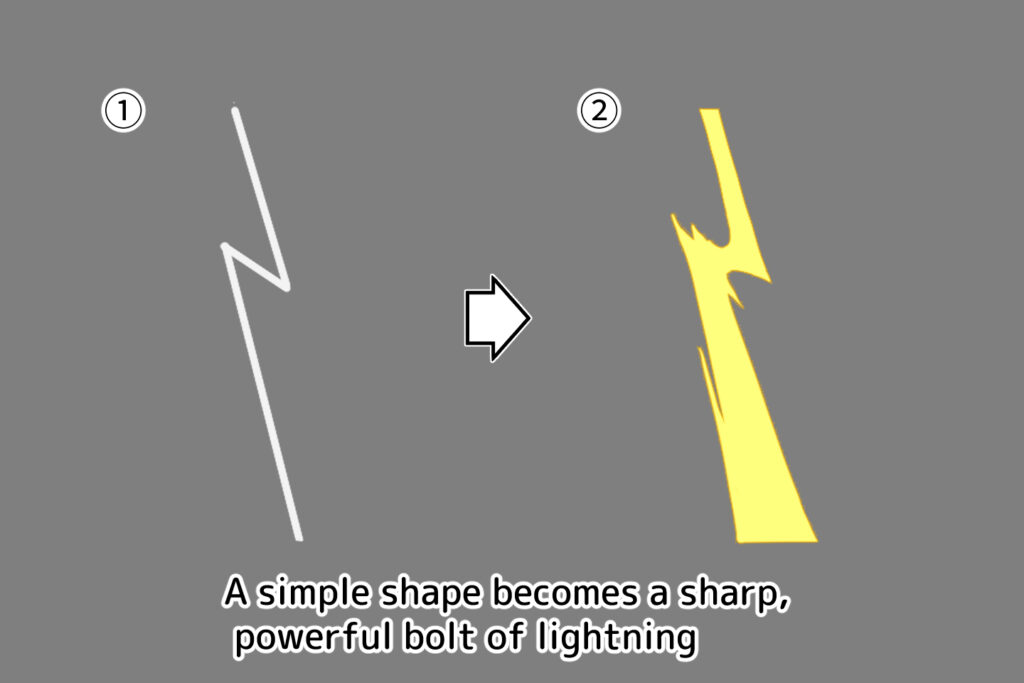
- Make the zigzag of a tentative picture into a simple shape.
- Draw the shape of lightning alongside of the tentative pictutre. The trick is to draw the strong, powerful lightning in bold strokes.
Procedures for drawing a crackling thunder effect
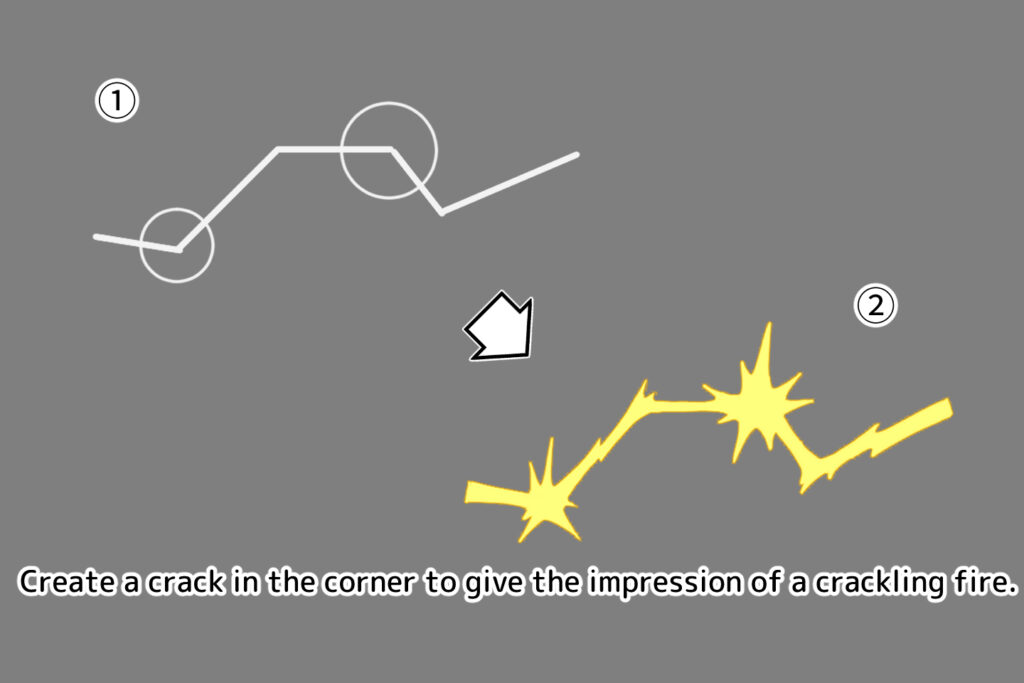
- Draw a tentative picture in zigzag lines, and then draw a tentative picture in circles at the corners.
- And if you draw spikes radiating out from the center of round tentative pictures, it will look like they are bursting, and you can express a crackling sound.
How to draw wind effects – tips and tricks
The wind effect is drawn with long, smooth curves. By drawing a tentative picture of lines in layers, like strands of hair, you can create a wind effect with mass.
Procedures for drawing a basic wind effect
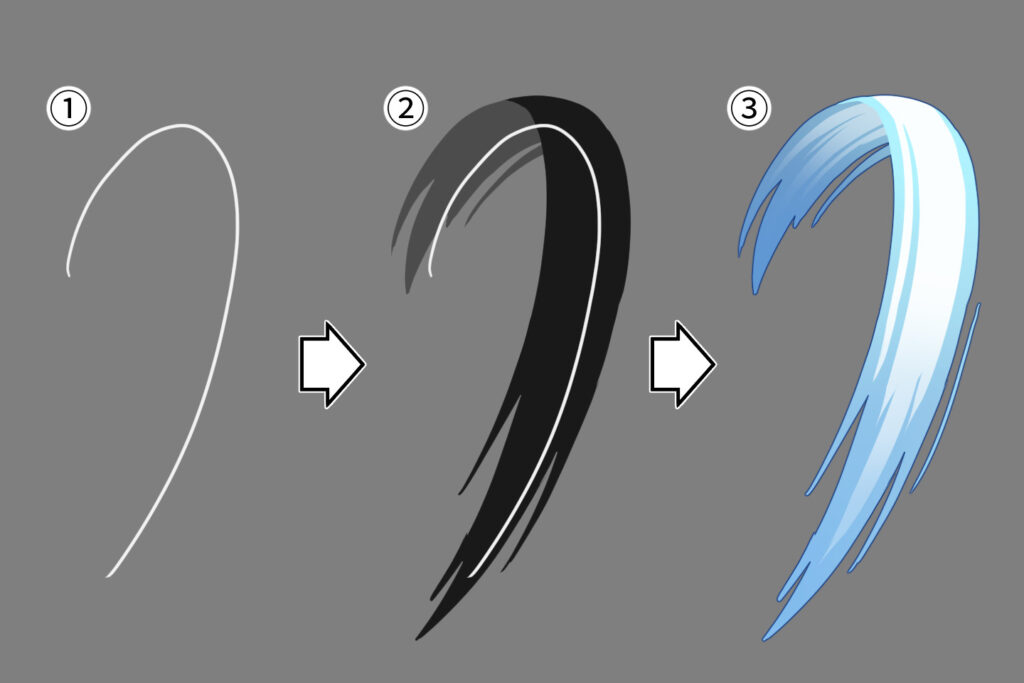
- First, draw a tentative picture like a flow of the wind.
- Draw the shape of the wind by overlapping lines along the tentative picture. If you draw it in the way the tip becomes thin, like a tuft of hair, it will look nice. Also, for areas with strong curves, it is good to draw them like a ribbon being aware that the front and back vary.
- Now it’s time to add color. Make the colors lighter on the inside than on the outside, and add a slightly darker color in the areas where the backside is visible like adding a shade.
You can change the strength of the wind and the atmosphere of the image by changing the curve angle of a tentative picture and the wind line.
How to vary the strength of the wind
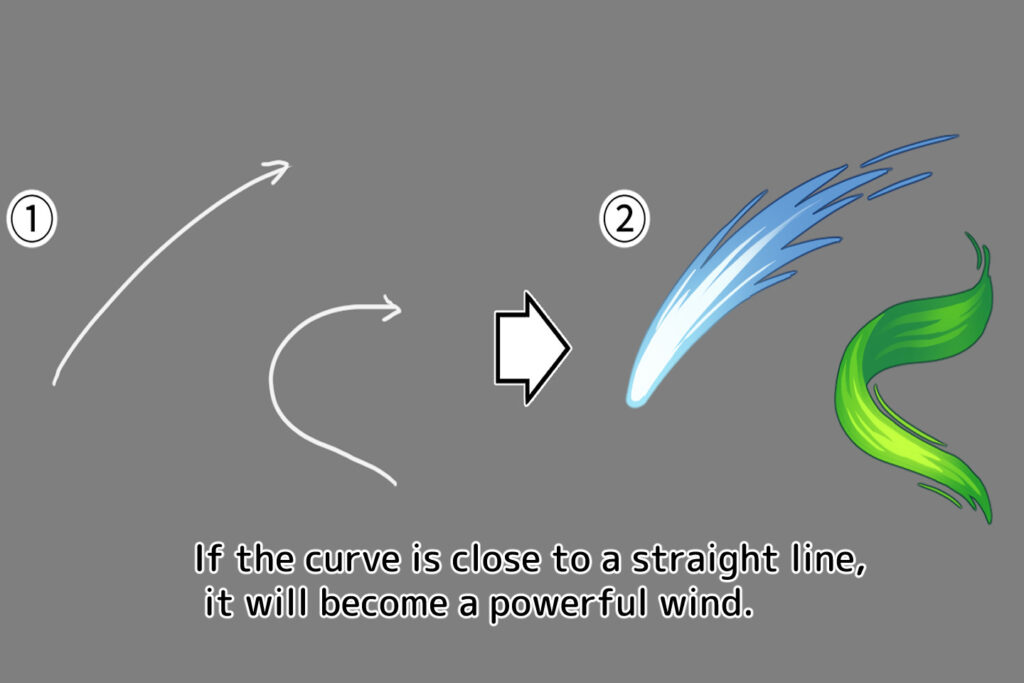
- If the curve of the tentative picture is weak, it looks like the wind is strong.
On the other hand, if you draw a tentative picture with a strong, undulating curve, it will be a gentle breeze. - Add color. The impression will change depending on how you draw the wind lines and what color you use, so try different things to get the wind shape you want.
How to draw a Japanese style wind
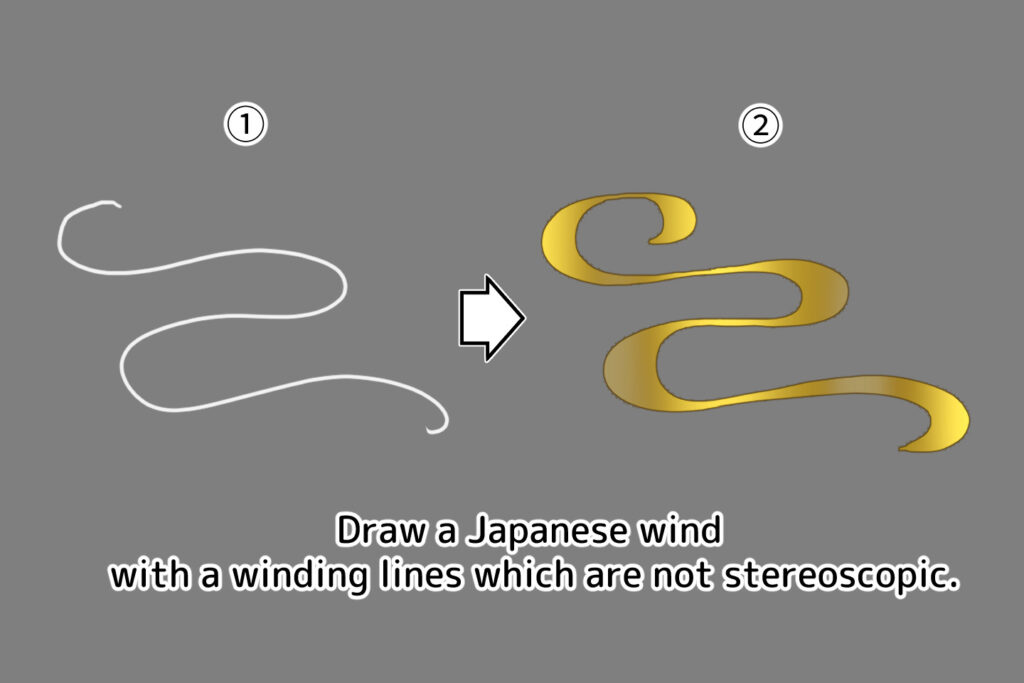
- Draw a tentative picture with strong, sinuous curves. The trick is to make the strong curves look similar.
- Add color. Since many Japanese-style wind expressions are flat, you don’t have to worry about the front and back.
How to draw a water effect – Tips
The shape of water changes greatly depending on the amount and speed of its movement. Slow moving water should be drawn as a combination of ellipses. Fast moving water should be drawn as a combination of long, thin ellipses and it’s better you try to create a flow of movement like a wind effect.
Procedures for drawing a basic water effect

- Like a wind effect, draw the flow of movement with a tentative picture of lines, then add elliptical shapes along the lines. The trick is to make the ellipses longer and thinner for fast-moving parts of the effect, and rounder for slower-moving parts. You can also add some water droplets to give the overall effect a sense of rhythm and make it more dynamic.
- Draw the flow of the water alongside of the tentative picture. This is similar to drawing flame effects; draw the tips of the flicker in a round shape and scatter the water droplets with small circles to create a more water-like shape.
- Add color. By using several colors of the same type of colors for water, you can express light and dark to create a three-dimensional effect.
In addition to scattering the water droplets, creating a mass of water in a part of the image gives the overall effect a sense of rhythm and makes it more dynamic.
How to express the water has gained speed
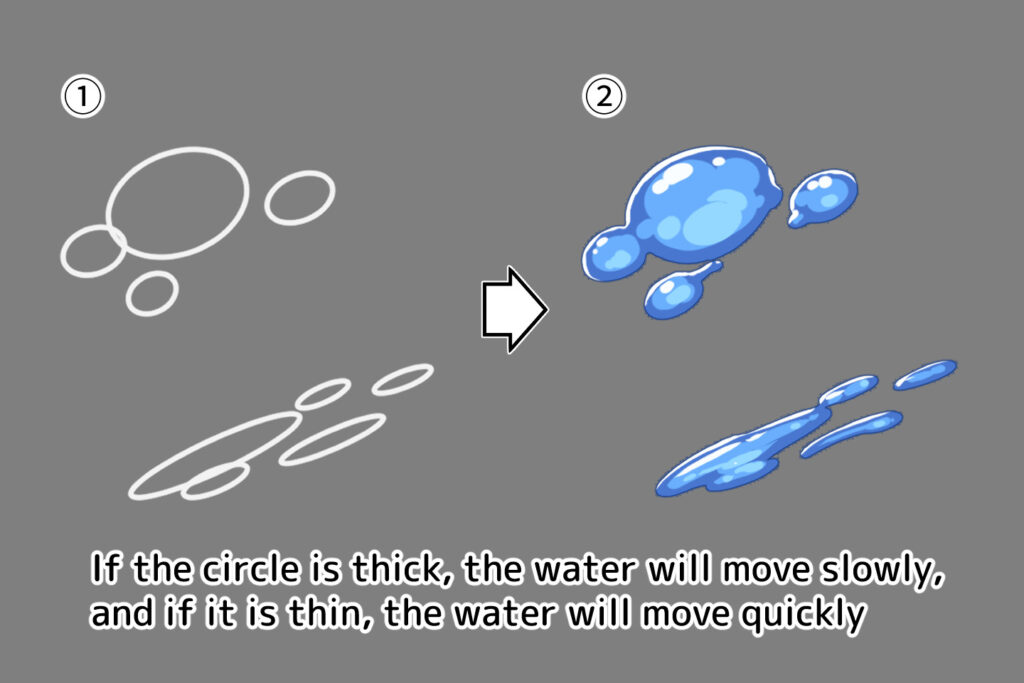
- You can express differences in the speed of movement by changing the circle thickness of the tentative pictures representing the water. Align the direction of the ellipses with the direction of the wind or movement.
- Draw the water according to the tentative pictures.
Procedures for drawing strong water
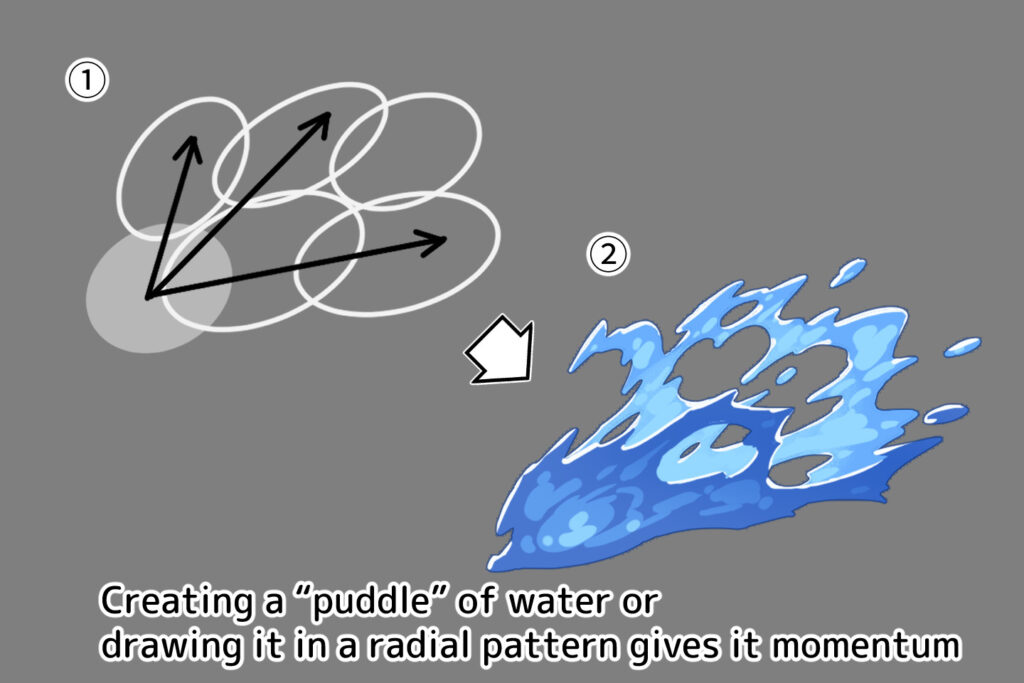
1.By arranging the ellipses of the “puddle” or “tentative picture” so that they radiate from a single point, you can add force and momentum to the movement of the water.
2.Draw the water alongside of the tentative picture. By looping it in places or drawing many drops of water, you can create a more dynamic shape of water.
For those who want to learn more about how to draw water effects, refer to the following articles:
How to draw water effects: You can easily and beautifully draw water surfaces, water droplets, and bubbles digitally.
How to draw smoke and dust effects – Tips and tricks
The effect of billowing smoke and dust is created by a tentative picture which is combined with curves of wind flow and circles of various shapes.
Procedures for drawing basic smoke effects
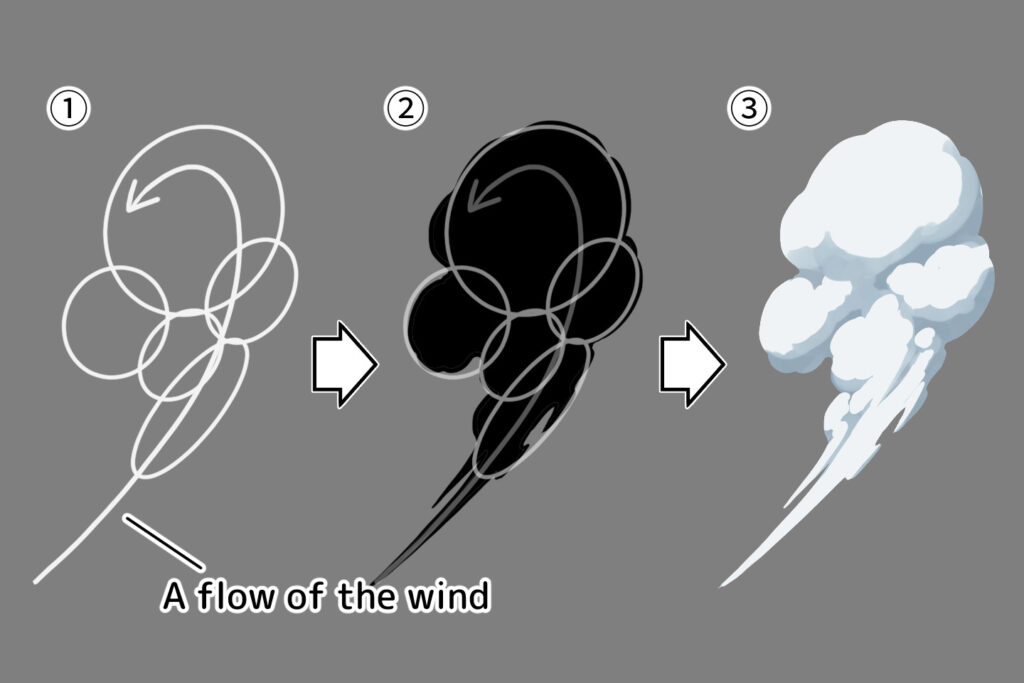
- Draw a tentative picture of the wind flow with curves, and then draw a tentative picture of the smoke with ellipses along the curves. The trick is to make the ellipses different sizes and lengths. Where the wind flow is fast, make the ellipses long and thin, and where it is slow, make them round.
- Draw a shape that looks like wisps of smoke along a tentative picture. Use curves like cirrus clouds where the wind is fast, and draw it in a narrow and long shape.
- Add color. Pay attention to the direction of the light source and paint shadows and light separately.
How to draw a smoke effect that is rising and falling
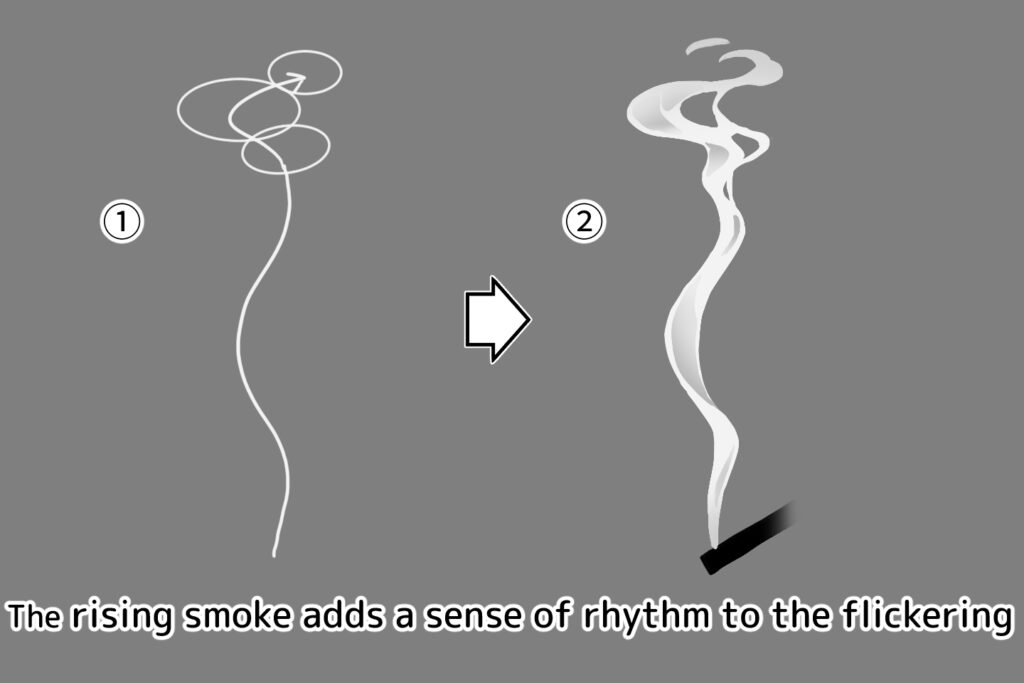
Draw the rising smoke in a curved line. At this point, it is a good idea to make the curve muted at the base and gradually stronger as it rises. If you overlap a tentative picture with ellipses, you can create a shape of smoke with a more wobbly appearance.
Draw the smoke lines along the edges. Imagine several lines that are close together, and then draw smoke that is broken in places, with holes and gaps, to create movement.
Procedures for drawing a dynamic smoke effect
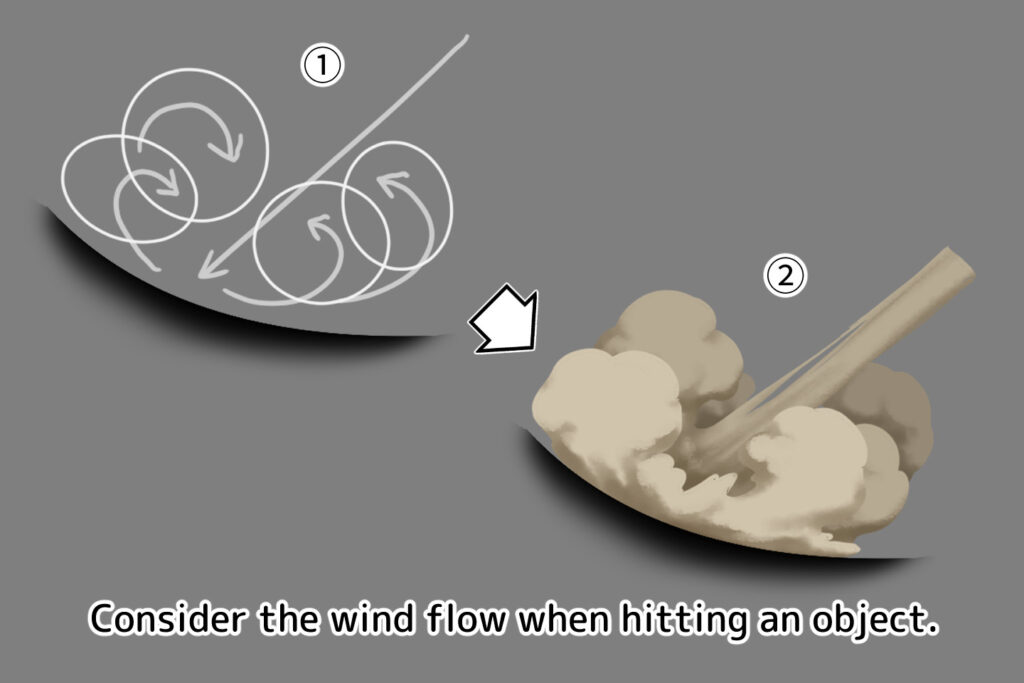
When you draw a tentative picture of the wind flow, thinking about where the wind flows quickly and where the air piles up, you will get a natural shape with movement. Where the wind flows quickly, draw the tentative picture in a straight line, and where the air piles up, draw the tentative picture in a curve or oval.
Draw the shape along the tentative picture. Where the wind is strong, it is okay to draw it in almost a straight line.
The smoke effect changes depending on the direction of the wind; therefore, the trick is to think about where the wind is blowing hard and where the air is accumulating while you are drawing.
How to draw light effects – Tips and tricks
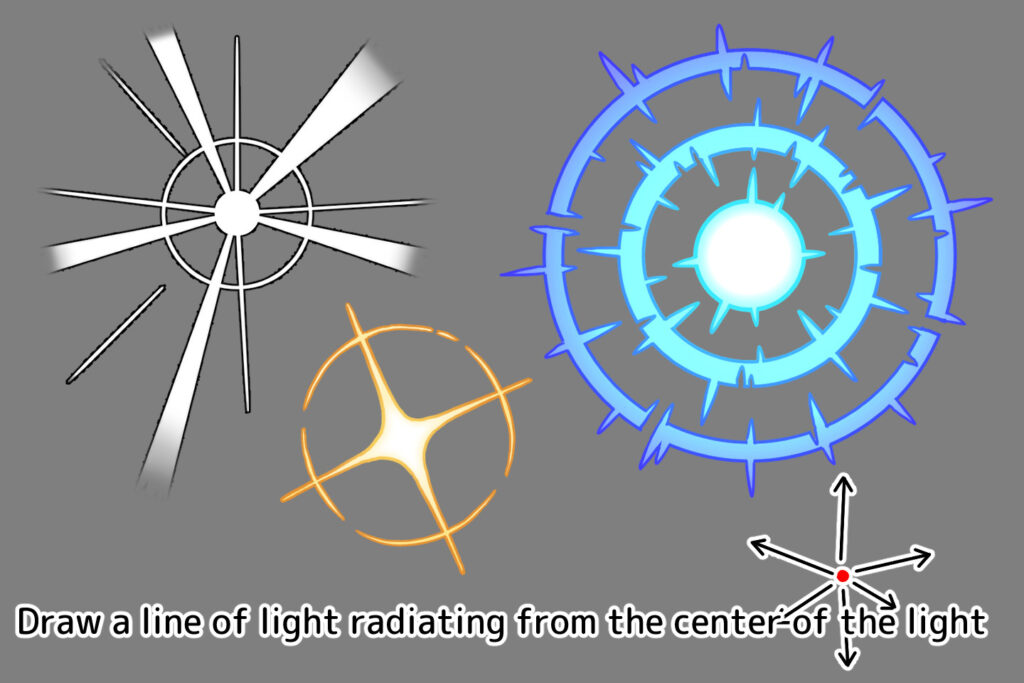
Light effects are also used in fantasy representations such as the sun, electric lights, and other glowing objects, as well as glowing wands and magic circles.
You can draw lines that radiate from the center of the light source, or you can draw circles around the light source with the same center.
If it shines brightly, it is a good idea to draw lots of jagged lines.
Also, because the outline of the light source is hard to see, using a bright color for the outline will make it look more luminous.
How to draw glittering effects – Tips and tricks
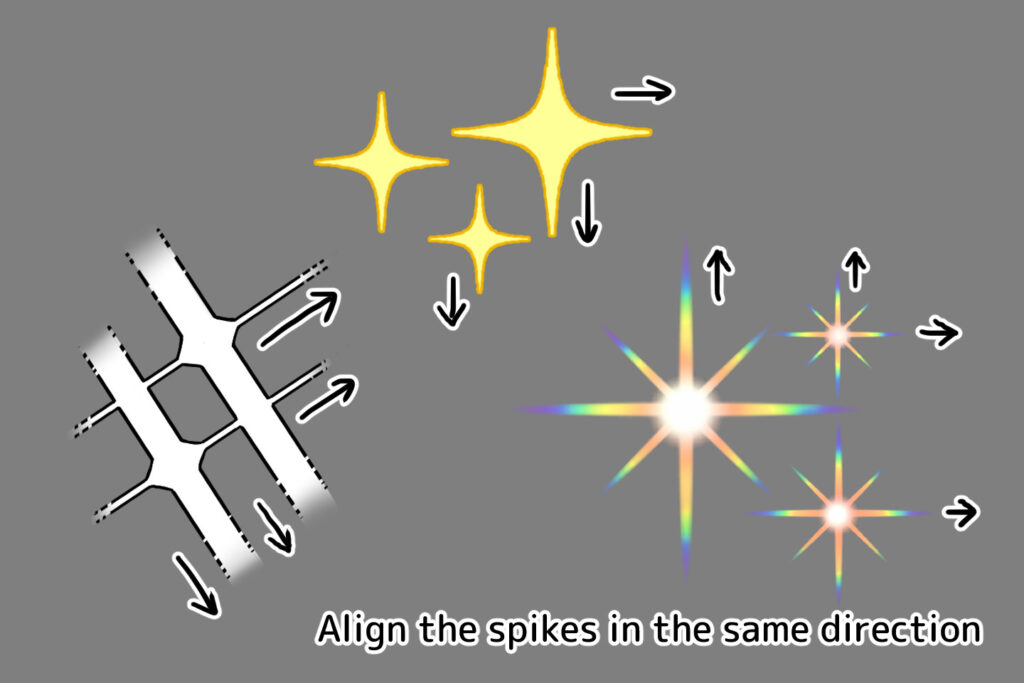
Sparkling effects are effective when you want to make your illustrations look more luxurious or when you want to enhance the attractiveness of your characters.
There are different patterns for glittering effects.
It’s a good idea to draw the shape that fits your characters and world.
It’s also a good idea to keep the direction of the spikes consistent throughout the effect.
How to draw a fluffy effect – Tips and tricks
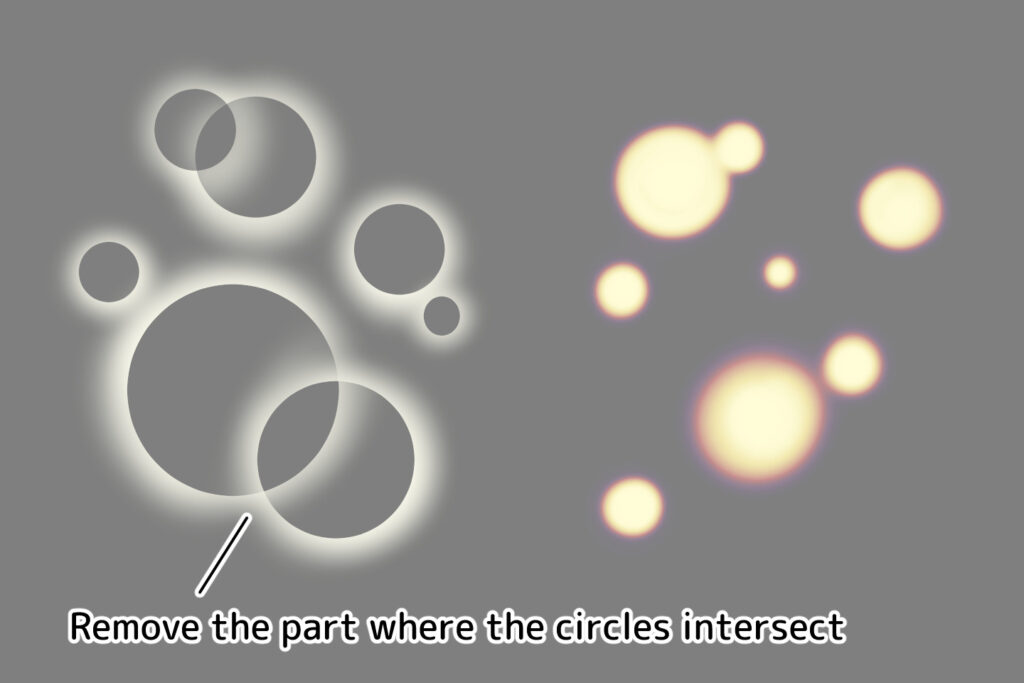
The Fluffy effect is useful for creating a romantic, dreamy or peaceful atmosphere.
You can draw it by combining circles that look like luminous objects of different sizes.
The Fluffy effect can be roughly divided into two types: circles filled with color and rings of which centers were hollowed out.
The basics and tricks of placing effects
Now, when actually drawing the effects, we will explain where to draw them on the character, and what kind of silhouette (overall shape) to draw with.
Let’s add movement to characters using motion lines

This is a method of drawing effects in line with the flow of movement of characters and objects, and is effective when you want to give characters and objects a sense of dynamism.
Let’s create a tremendous impact with Radiation / Concentration type!

This is a method of arranging effects so that they radiate from or converge on a single point.
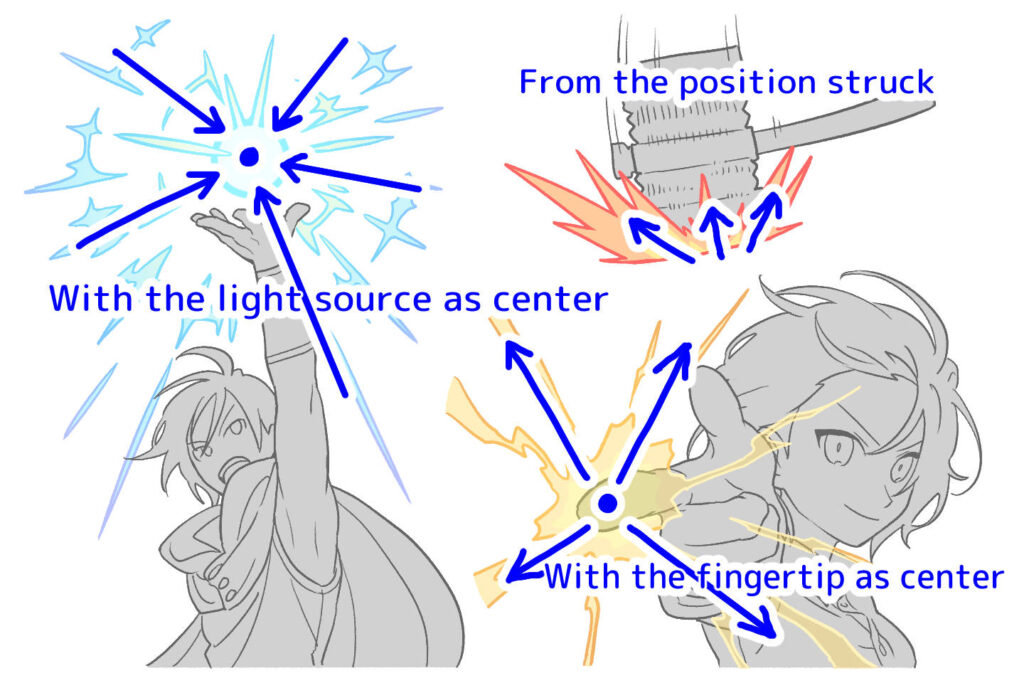
Because radiation has the same effect as the concentrated lines in manga, it can direct the viewer’s eye to the part you want to emphasize, and it is also effective to add power to the composition.
Rounded type for a dynamic look
This is a method of arranging effects in a circular or spiral pattern around the character.
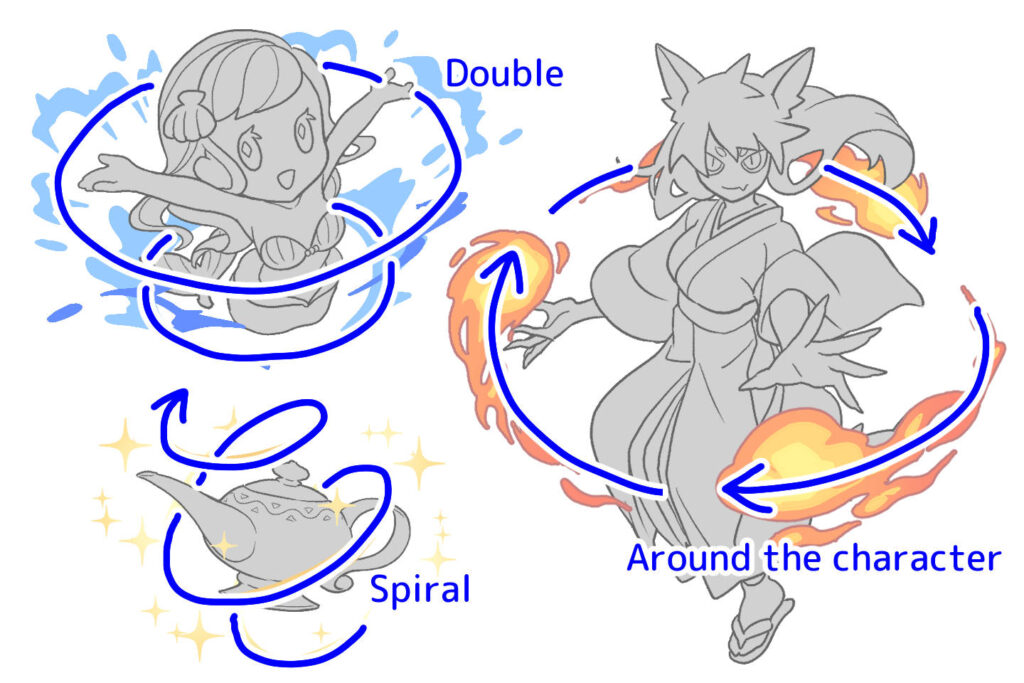
The characters and effects create a sense of depth, making the screen equipped with depth.
Let’s understand the benefits and impacts of effects and use them!
The world of an illustration can be expressed through the characters’ costumes, objects, and backgrounds, but even a single effect can express the world of an illustration.
We will use examples to show why drawing effects can enhance the appeal of an illustration and the benefits of using effects.
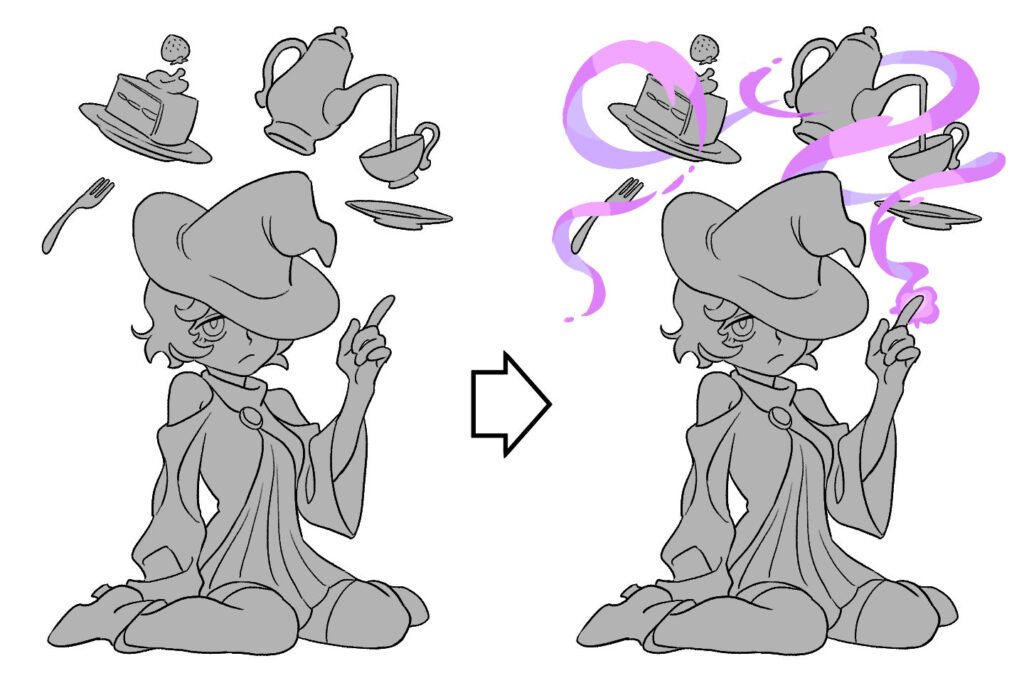
You can create an entire world with effects in an instant.
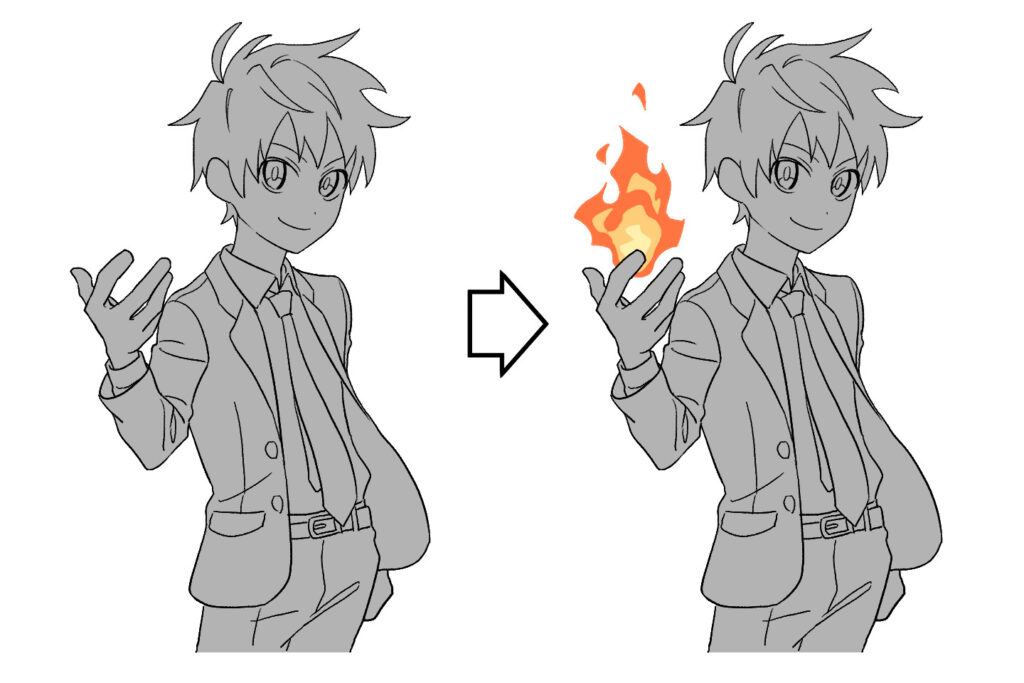
For example, a character who is just wearing a school uniform and striking a pose looks like an ordinary student from a school story, but
If you add a flame effect to their hand, the character’s image will completely change to “a student who fights with flame powers”,
and the world view will change from just a school story to “a world with people with powers”.
Effects provide the character with movement
You can also add a movement to a simple character illustration with a single effect.
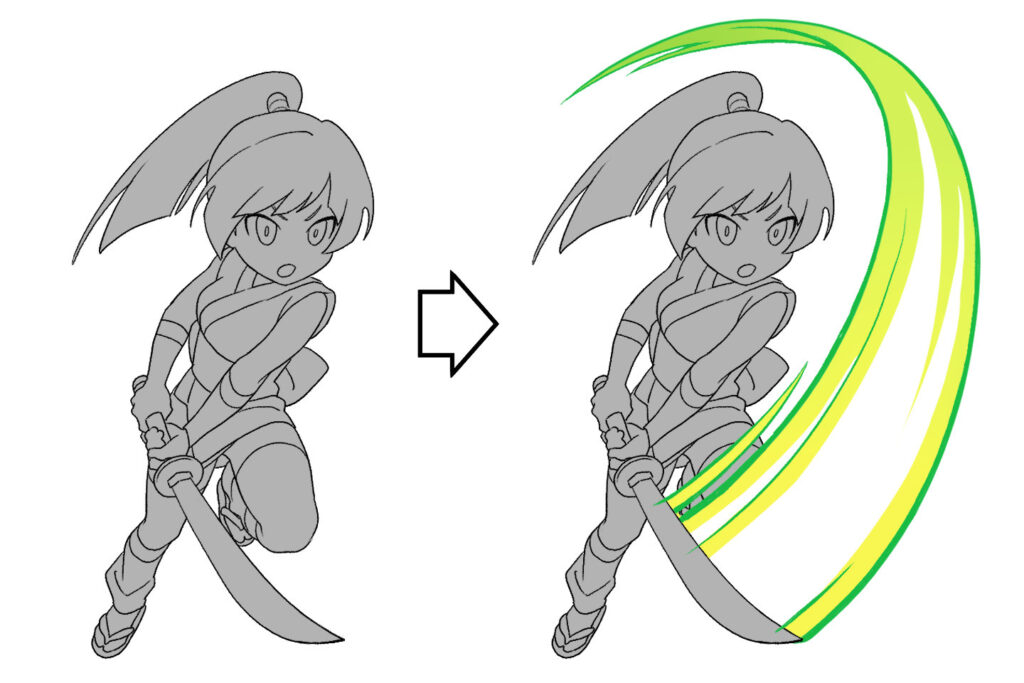
For example, you can make a character illustration which is swinging a sword look more dynamic by adding an effect that shows the path of the sword.
Even a still pose can look more dynamic with an effect!
You can also create a lively image by adding movement to the effect itself, even if the pose looks still.
An illustration with movement will be more powerful and impressive than a still illustration.
Make your effects look even cooler with digital techniques!
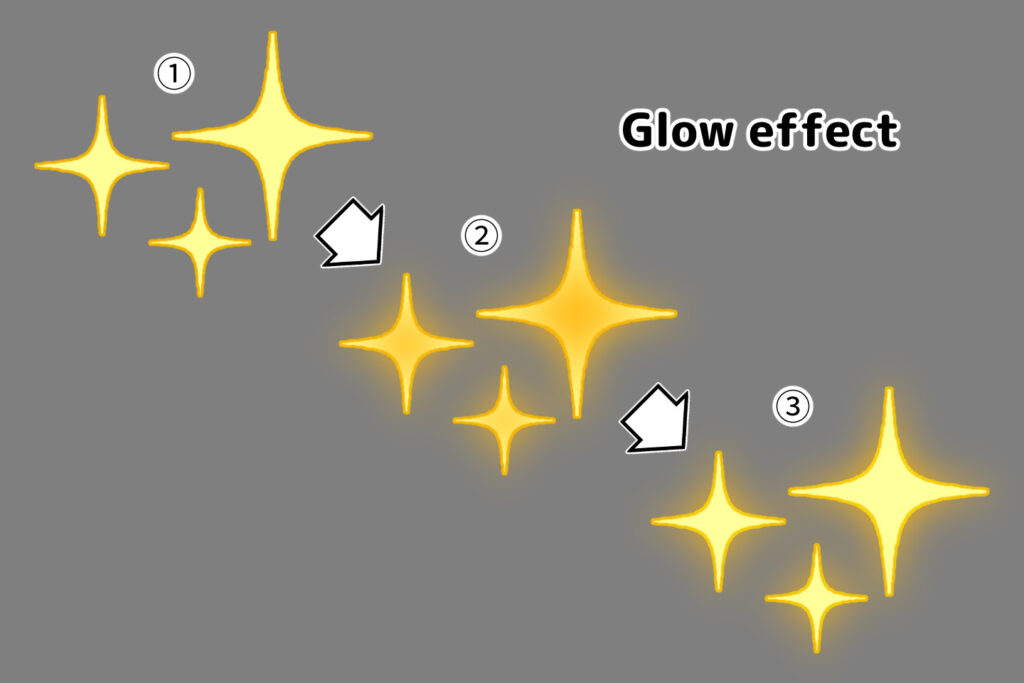
Lighting effects such as fire, thunder, light and glitter effects can be enhanced with digital techniques such as the glow effect to make them appear more luminous.
The Glow effect is an effect that makes things (materials) that you want to make glow look more glowing by duplicating them, changing their color, layering and blurring them, and changing the composite mode, as shown in the procedure below.
There are many different types of effects, and each one is drawn differently, so you may find it difficult to draw them.
However, by drawing effects in your character illustrations, you can expand the world of your illustrations and give your characters more movement, allowing you to draw more attractive illustrations.
If you find it difficult, or want to improve your skills but don’t know how to do it, we also recommend learning at the Illustration and Manga School egaco. With individual guidance from professional illustrators and manga artists, you can master effects and draw upgraded illustrations!


Pickup Articles
Category Related Articles