This article was created by the illustrators and manga artists who teach at the illustration and manga school, egaco, based on the knowledge and skills they have honed through commercial production and other work. If you would like to learn more about content that is tailored to what you want to draw, we recommend taking a private lesson at egaco.
When you want to draw a cool male character or a boyish girl, have you ever had trouble drawing short hair?
I think there are many people who, when they try to draw it, end up with the same hairstyle over and over again and can’t draw different hairstyles for varied characters.
The trick to drawing short hair well is to be aware of the hair whorl.
If you are aware of where the hair grows, you can draw a convincing flow of hair for any length of short hair.
Let’s understand the structure of short hair before drawing! Basic knowledge of illustrating short hair
First, let’s understand the structure of short hair!
The structure of short hair differs depending on the length of the hair.
When depicting real hair in manga or illustrations, it is important to think about it
simply first.
It is easier to grasp the image if it is simplified, and once you have mastered the basics, you can make it as complicated as you like.
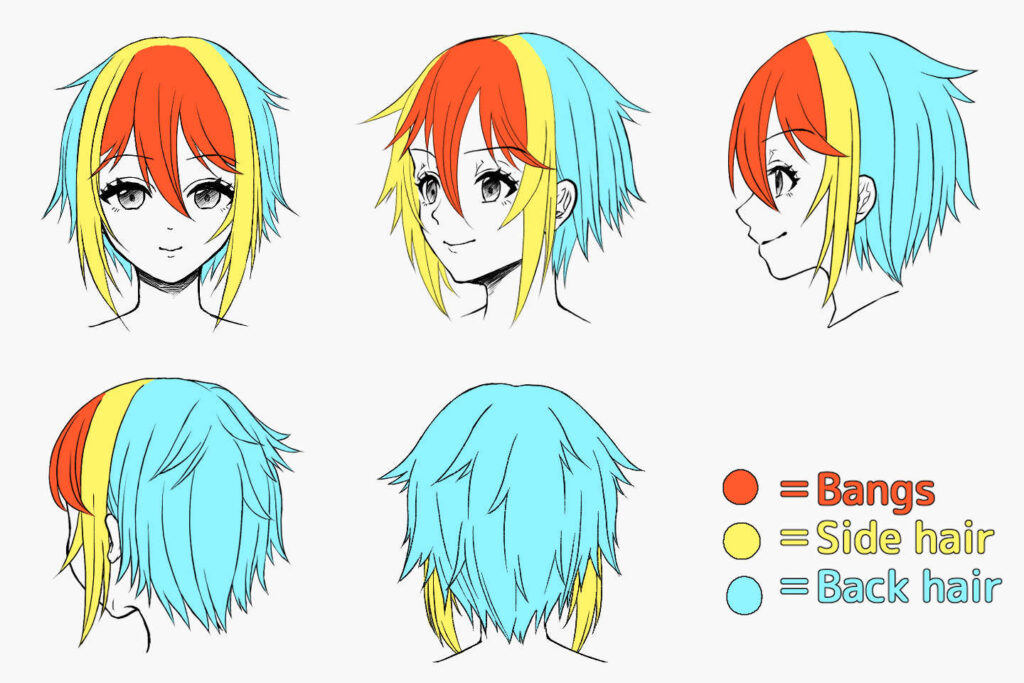
First, divide the hair into three parts: bangs, side hair, and back hair.
Bangs: the part at the forehead. If the hair is parted in the middle, it may be combined with the side hair.
The side hair: the part between the corner of the eye and the front base of the ear. This part is often used to give the impression of the character’s face.
Even in situations where a character who usually wears their hair down ties his/her hair up, it can often make the character look completely different unless the side hair left down.
Back hair: the part from the ears to the back.
This is the part that projects the character-like atmosphere with whole silhouette. Even if the angle of the face changes, by drawing with the silhouette as the main focus, you can give the impression that the character looks the same from any angle.
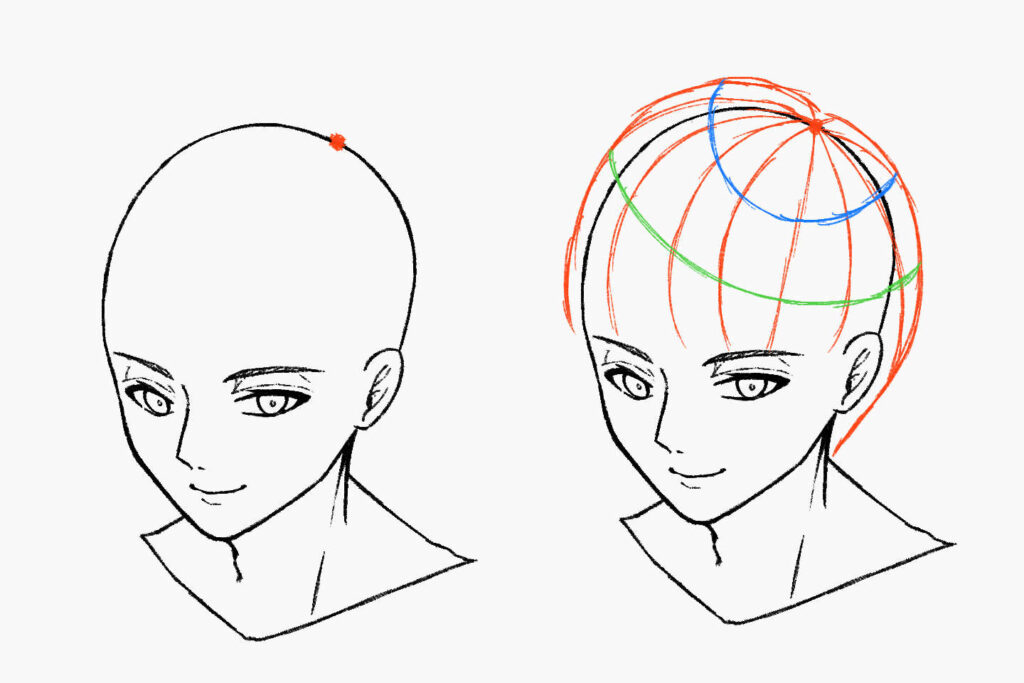
Once you have divided the hair into these three parts, you can start drawing being aware of the structure of the hair that is flowing from the hair whorl along the shape of the head.
Important points taught by the instructor

Imagine a watermelon pattern and draw it along the shape of the head.
Once you have divided the hair into these three parts, you can start drawing, being aware of the structure of the hair that is flowing from the hair whorl along the shape of the head. If it’s difficult to imagine the hair flowing from the hair whorl along the shape of the head, it may be easier to imagine a watermelon pattern. You can also make a model to help you visualize the structure, for example, by sticking thin notes on a round object like a ping-pong ball, or drawing lines with a marker pen, and then observing it.
How to draw a very short hair
This is a hairstyle that is often seen on characters both girls and boys who play serious sports. Unlike long hair, it is not divided into parts such as bangs, side hair and back hair.

The image that the hair is overlapping like this
Set the hair whorl, and then create the layers by drawing short hairs from there, imagining them overlapping.
This is quite difficult to imagine, so it’s easier to imagine the banana bunches overlapping.
Important points taught by the instructor
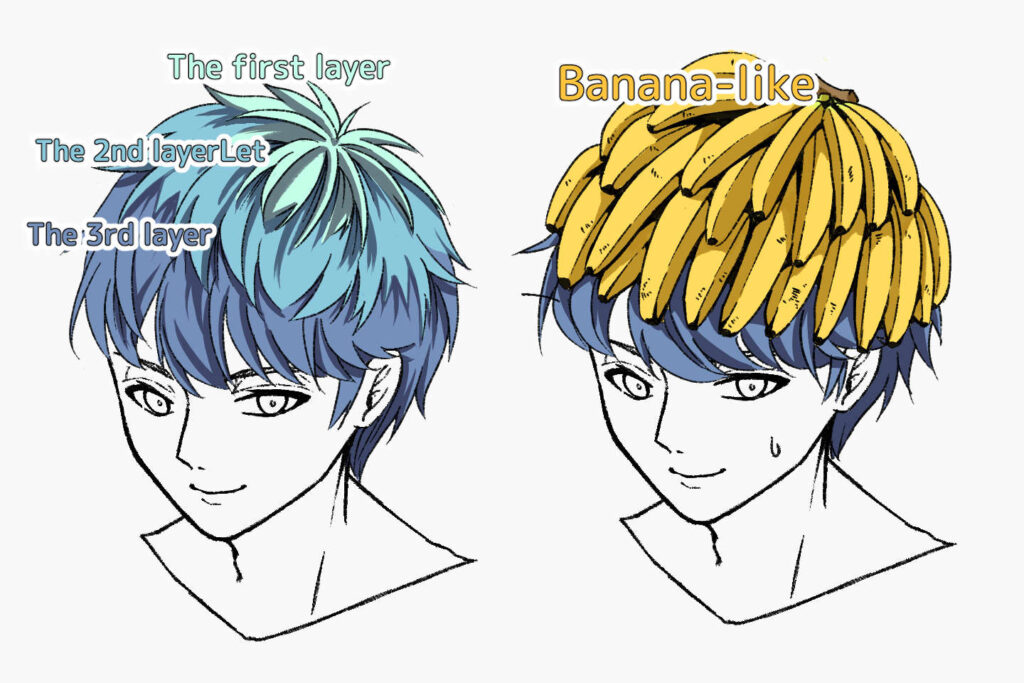
Draw them with the image of the banana bunches overlapping.
Now you can draw! The steps and tips of drawing short hair
Let’s image the structure of short hair we have explained and start drawing.
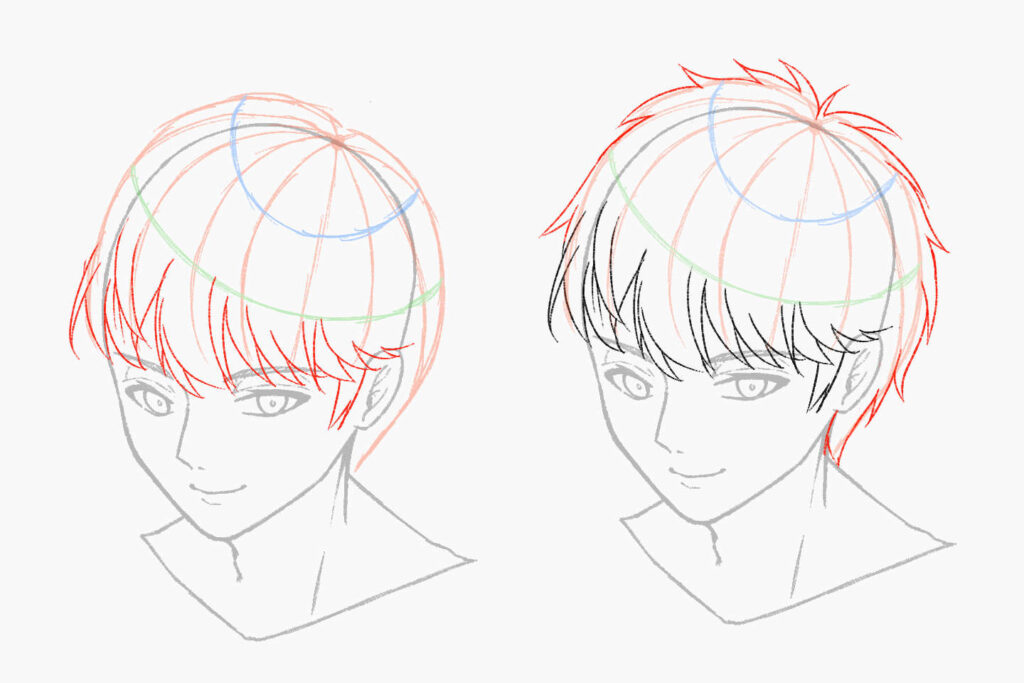
How to draw longish short hair
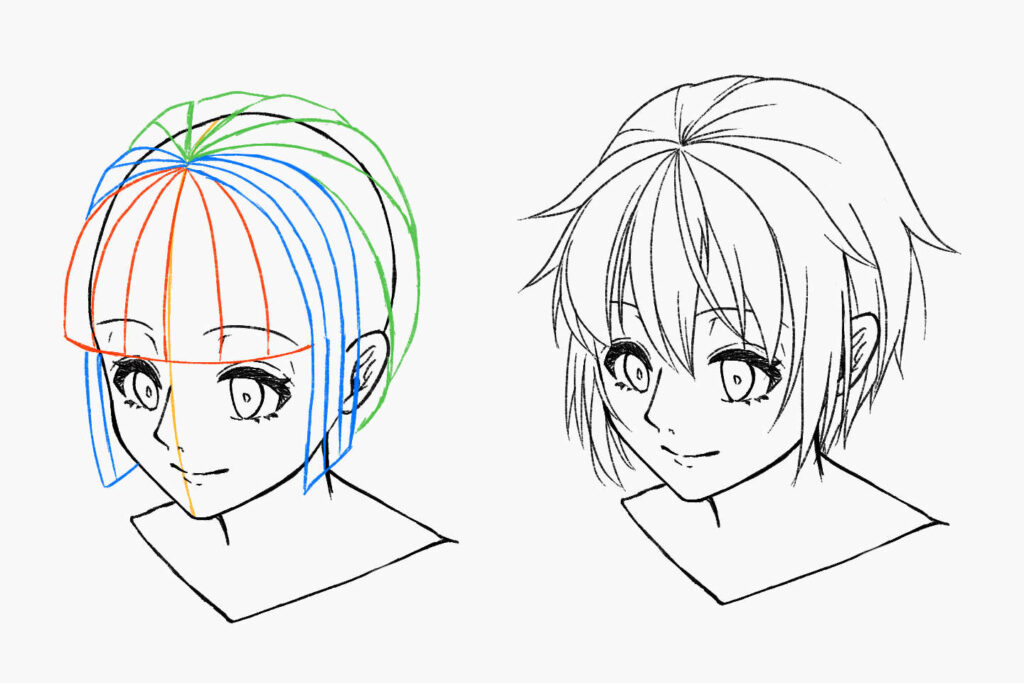
Decide on the hair whorl first, then divide the hair into sections.
After adding the hair flow from the hair whorl, draw the hair strands along the flow.
STEP 1: Decide on the hair whorl and draw a rough sketch of the hair.
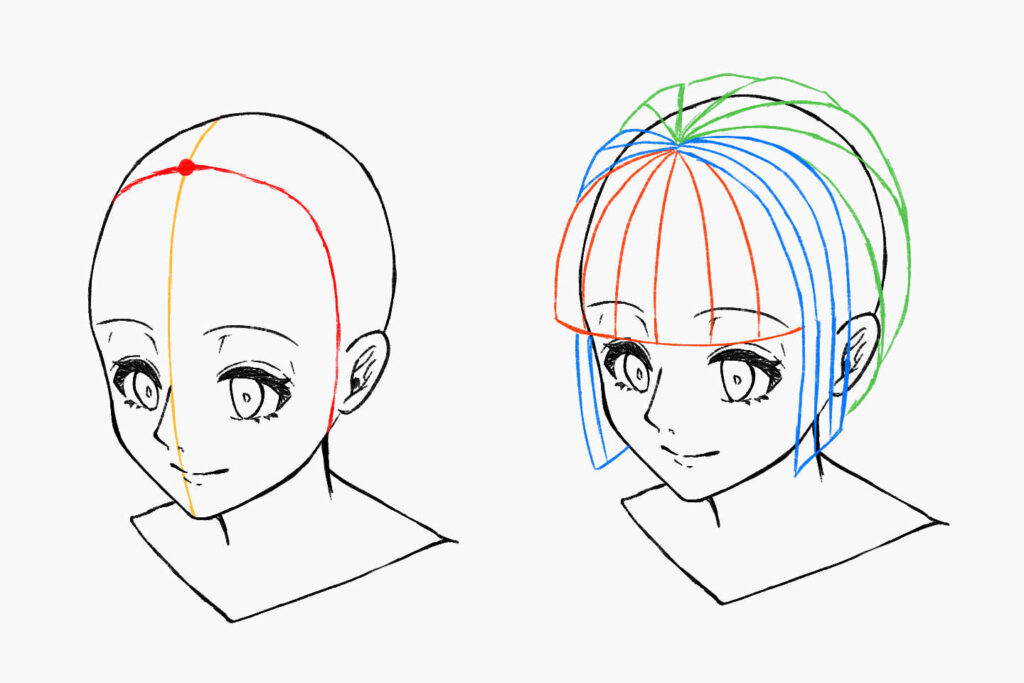
Decide on the hair whorl and draw the rough sketch of the hair.
If you don’t have any particular preference, set it to right above the area a little bit in front of the ear base when looked from the side as shown by the red line.
Next, draw the lines for dividing the parts of hair that is starting from the hair whorl, and also draw the flow of the hair along the head.
Imagine the pattern of a watermelon when drawing.
The important points taught by instructor
The tips for drawing longish short hair
If you draw the hair so that it sticks tightly to the scalp, it will look like a character with a little hair. At this point, draw the outline of the hair a little larger than the scalp.
STEP 2: Draw the hair strands by part
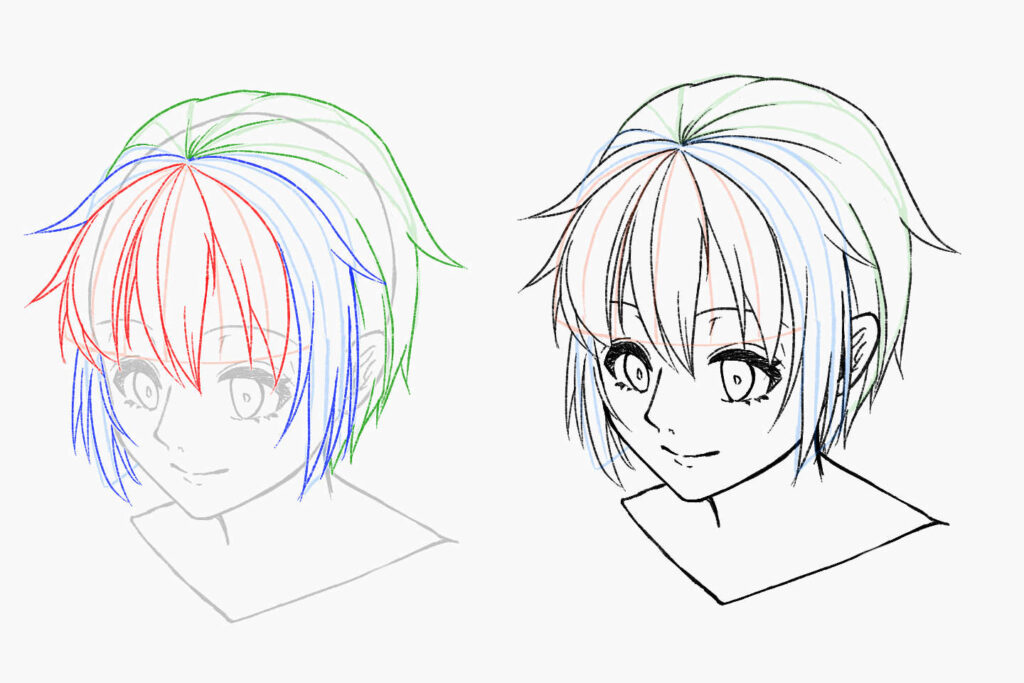
Let’s draw in the hair. First, draw in the large tufts of hair along the rough sketch.
The tufts themselves can be large, but the tips of the hair should branch out randomly, thickening and thinning.
Be careful not to pay to much attention to the hair tips. If you did, the overall silhouette might be ruined or the parts where the tips of the hair branch out deviate from the hair flow too much.
STEP 3: Draw the short and fine hair
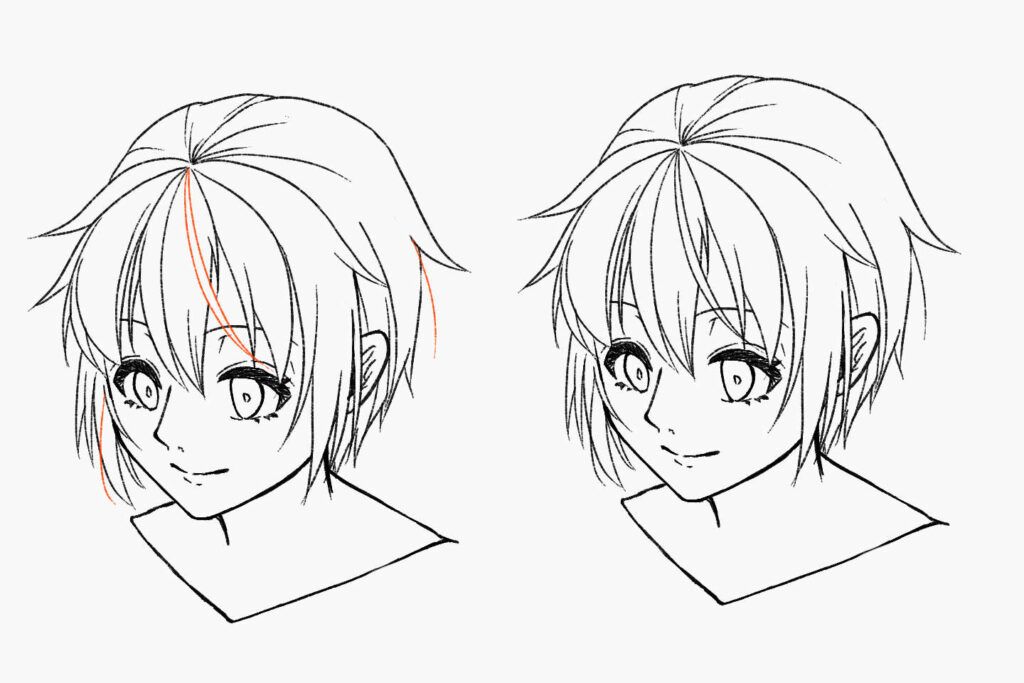
Once you have drawn the whole bundle of hair, add the short and fine hair at the end.
Please draw the short and fine hair in small numbers, around three to five hairs.
The important points taught by instructor
Tips for drawing the short and fine hair.
When drawing the short and fine hair, if you draw them slightly off-center so that the silhouette doesn’t change much, it will give a more random feel and you will be able to create a natural-looking short hair.
How to draw a very short hair
After setting the hair whorl, carefully draw the hair so that it looks like short hairs are growing out of it in layers.
STEP 1: Decide on the hair whorl, and draw the rough sketch of the hair
First, for the location of the hair whorl, set it slightly behind compared to the case when the hair is long.
When looked from the side, it should be set slightly behind the ears.
Starting from the hair whorl, draw a tentative picture where you want the hair to be layered remembering the image of the banana tufts overlapping.
Draw the flow of hair roughly from the hair whorl toward the tentative picture, you can complete the hair’s rough sketch.
STEP 2: Draw the bangs and outline
Next, draw the bangs and outline, and then draw in the hair strands.
If the hair is short, draw the bangs and outline first.
If you draw too many short, bouncy hairs for the outline, it will look too spiky.
Draw the bouncy parts and the parts that just trace the outline of the head, leaving some space between them.
Important points taught by the instructor
The tips for drawing very short hair
If you make the hair flow gradually along the neck from the back of the head toward the neck, it will look more beautiful.
STEP 3: Let’s draw the layers of hair
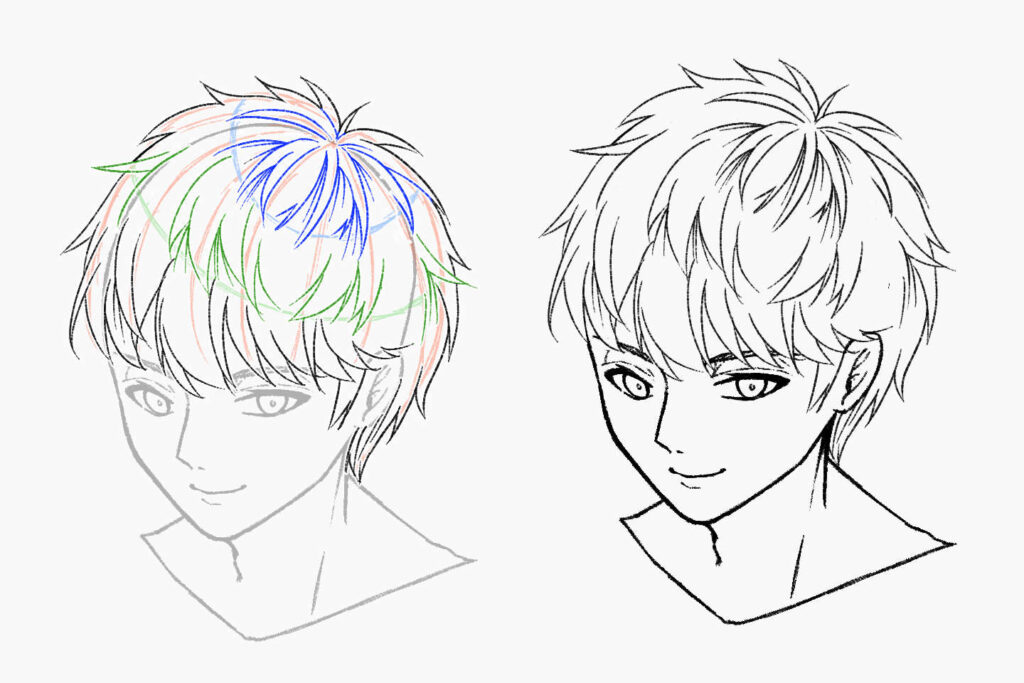
Let’s draw the layers of hair.
After drawing the outline, we will draw the inner hair.
While checking the three-dimensionality of the hair with the rough sketch, let’s draw the hair from the area close to the hair whorl.
The hair looks natural if you draw with the image of overlapping several thicker short and fine hairs.
Important points taught by the instructor
Let’s adjust the details
You can also create a sense of randomness by drawing parts that connect to the outline, or by adding short and fine hair that extend beyond the outline. If you adjust the overall picture so that it is not too detailed, you will be finished.
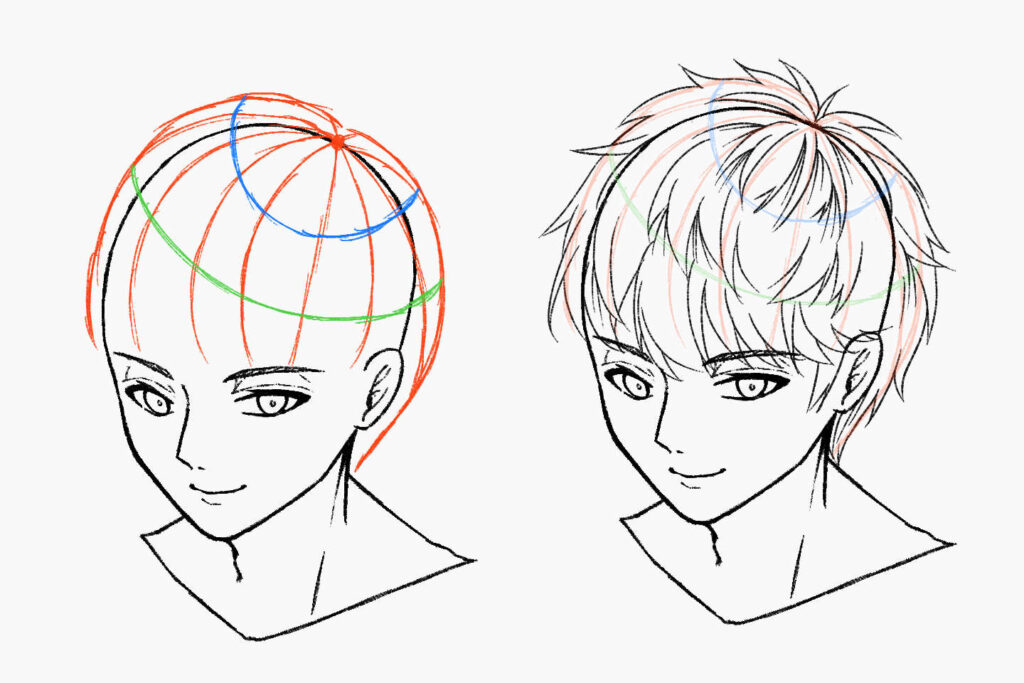
How to draw wavy short hair
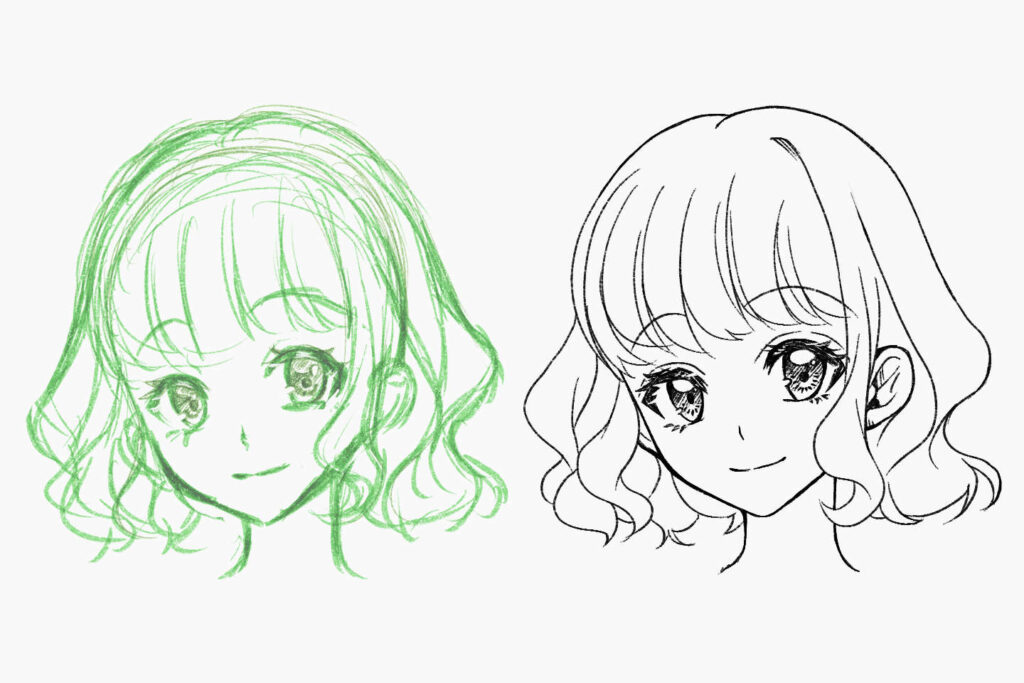
Up to the point of dividing the hair into sections, the method is the same as for long hair, but there are some differences in the way the hair is drawn afterwards.
STEP 1: Divide the hair into sections and draw the general flow of the hair
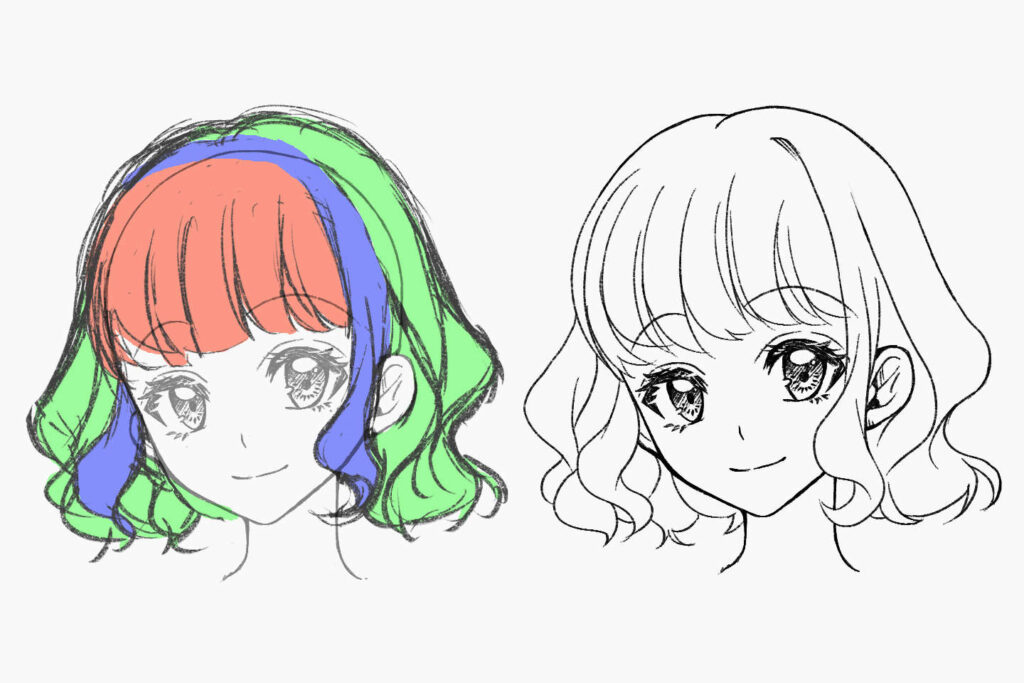
Once you have roughly divided the hair into sections, draw the flow of the hair from the hair whorl. Rather than drawing a line that follows the shape of the head, draw a line that gently undulates.
Important points taught by the instructor
Let’s draw with a thicker line than usual
At this point, draw the rough sketch with a slightly thicker line than usual. If you don’t draw the curls with a big, sweeping curve on purpose, you’ll tend to draw them small and detailed forever. First, create the silhouette with a big, sweeping curve.
STEP 2: Add thin hair strands
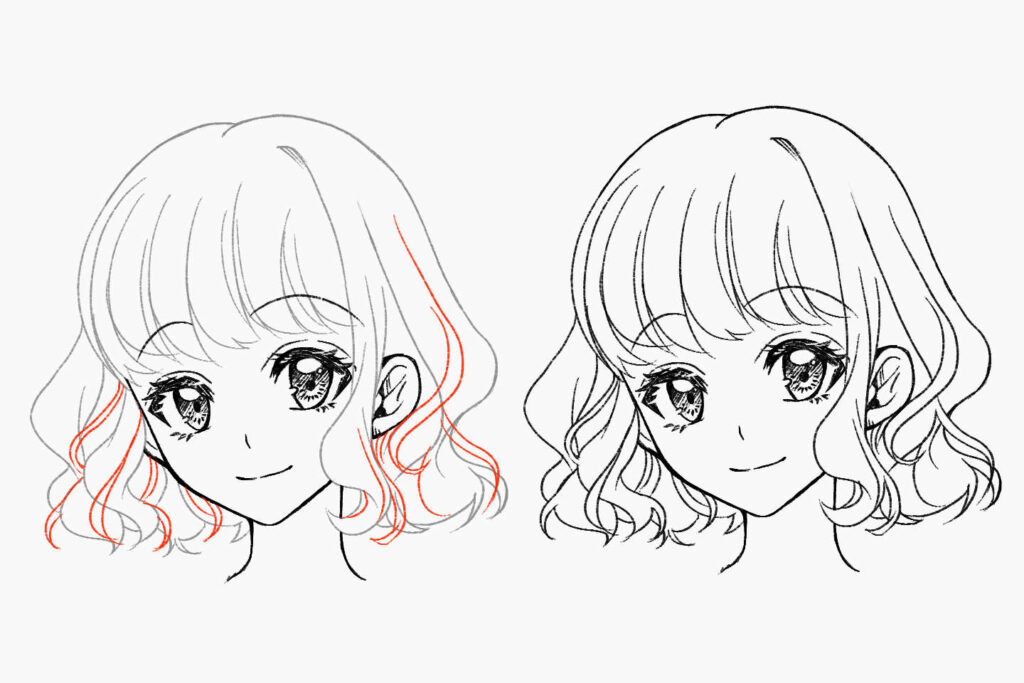
After drawing the thick tufts of hair, draw the finer tufts that branch off from them.
Let’s gradually increase the density while checking the appearance.
The hair should be increased so that the overall silhouette is not distorted, and the drawing is complete.
How to draw boy’s and girl’s hair in a different way
Many people may have the image that boys‘ hair should be rough and stiff and girls’ hair should be soft.
To put it simply, it depends on the type of picture and hairstyle.
Short hair for male characters
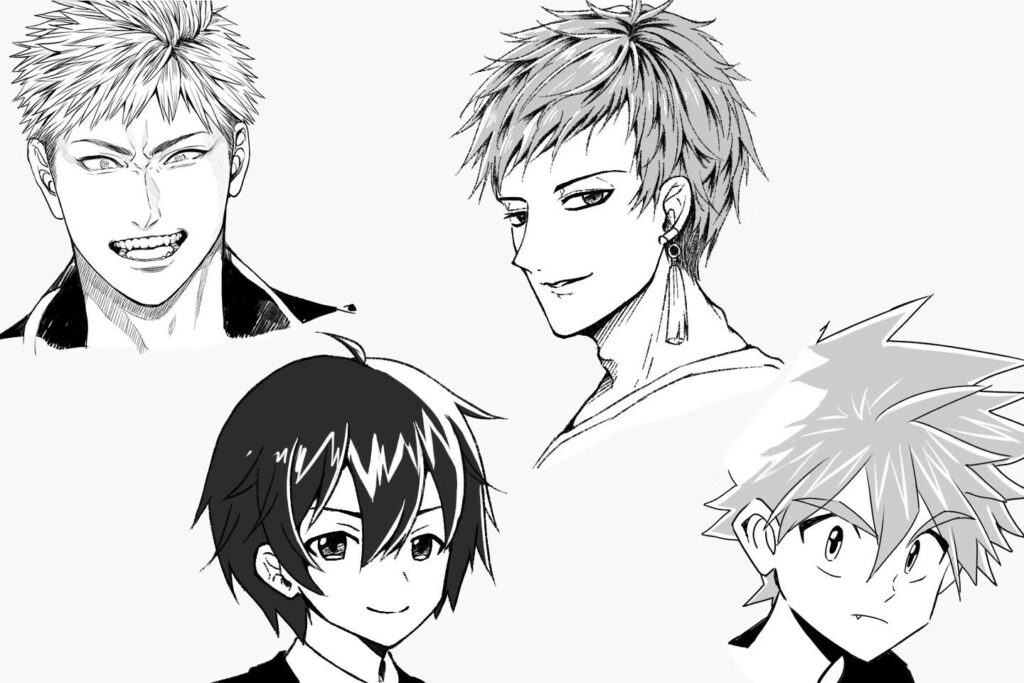
Men’s very short hair is often drawn as straight, wire-like hair, whether it’s in a realistic-style illustration for a young adult magazine, a boy’s manga, or a battle manga for elementary school students.
Short hair which is drawn as soft is almost always the case in illustrations for so-called women’s contents, such as otome (young girl) games and girl’s manga.
In illustrations for women, there is little difference between men and women in terms of hair quality.
Also, many of the manga illustrations that are popular among the general public and male characters who are the main characters in light novels that don’t show too much individuality tend to have long hair and are often drawn with soft-looking hair.
Short hairs for female characters
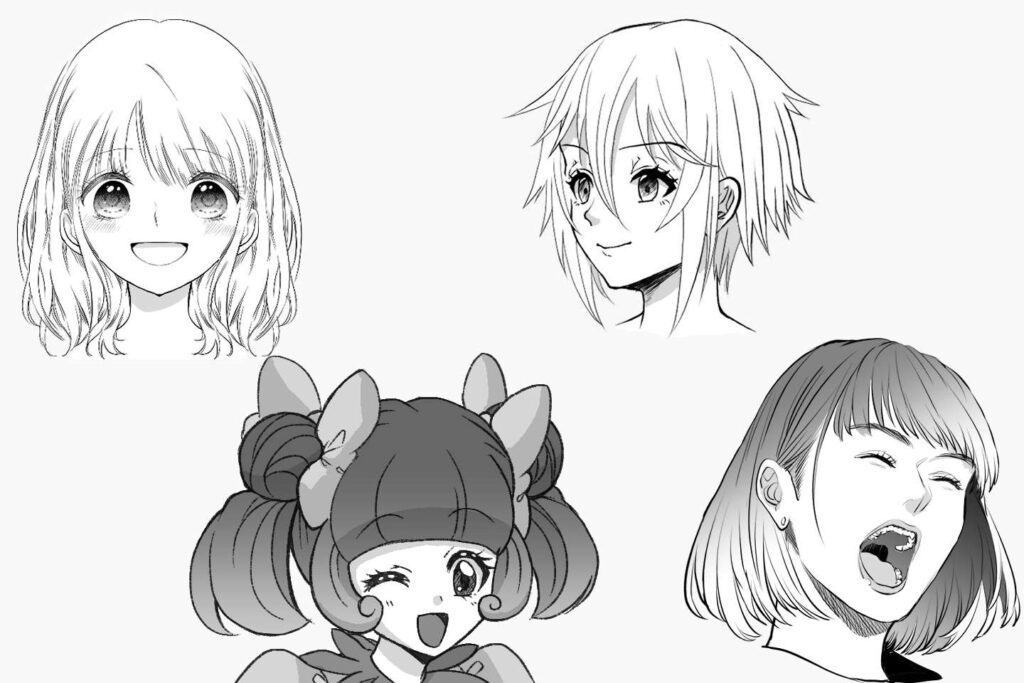
Also, female characters are often drawn with soft-looking hair, regardless of the type of illustration or work.
However, in anime aimed at younger audiences, the characters are often drawn with their overall form rather than the texture of their hair, so the hair is expressed as if it were a three-dimensional object rather than soft.
Let’s try to find an expression that suits the illustration you want to draw.
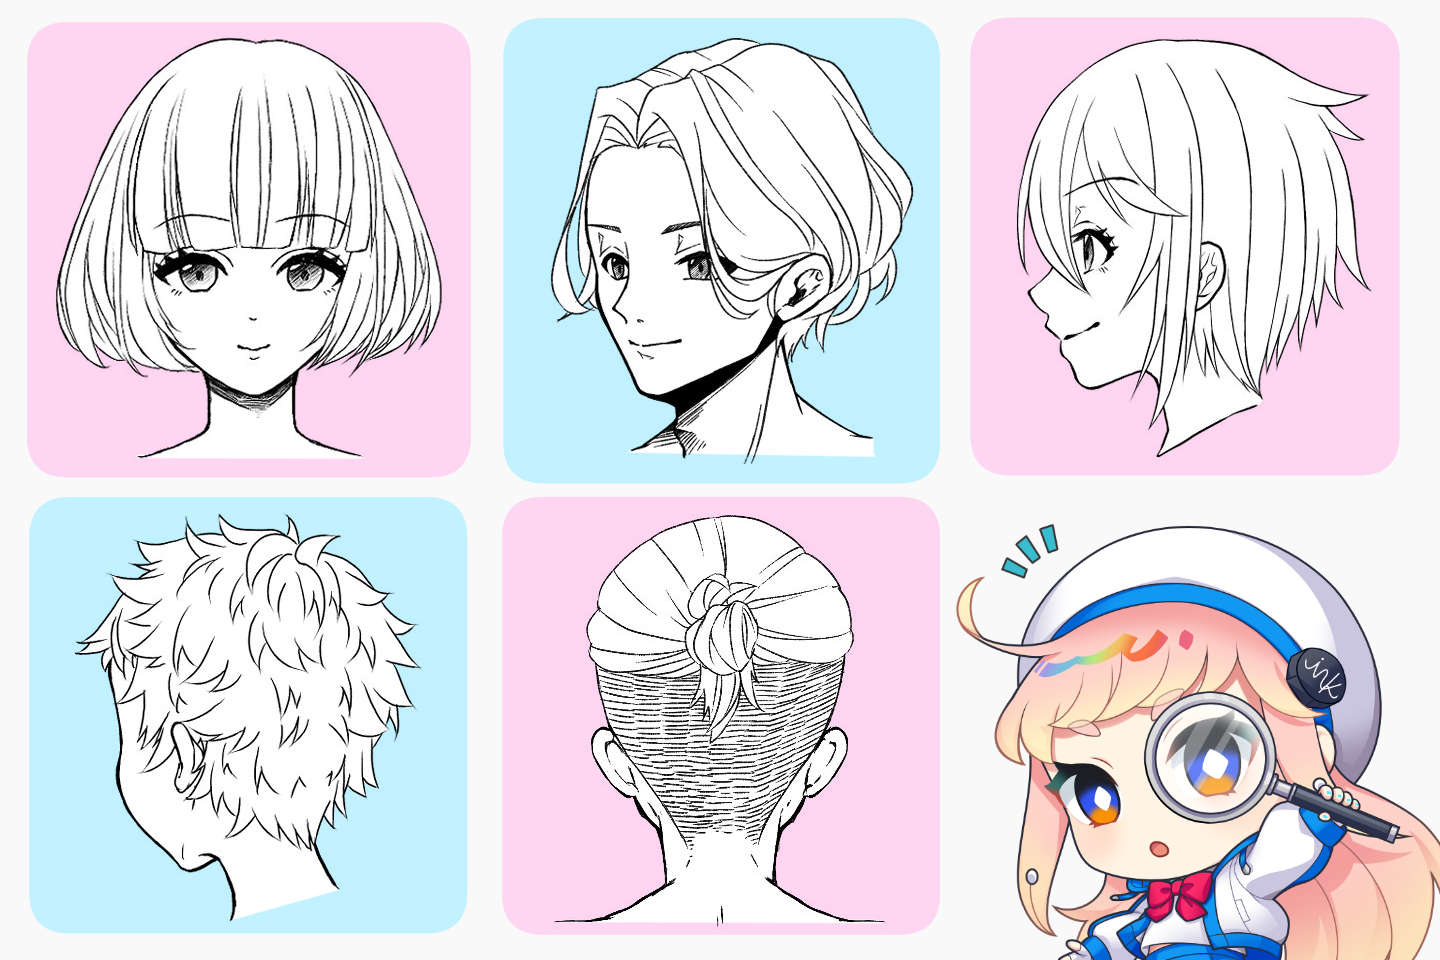
A list of short hairstyles and how to draw them
Finally, we will introduce various types of short hairstyles and how to draw them as examples.
There are also short hairstyles for men, so please try to find one that suits the character you want to draw.
Examples for drawing girl’s short hair
Modern, stylish short haircut
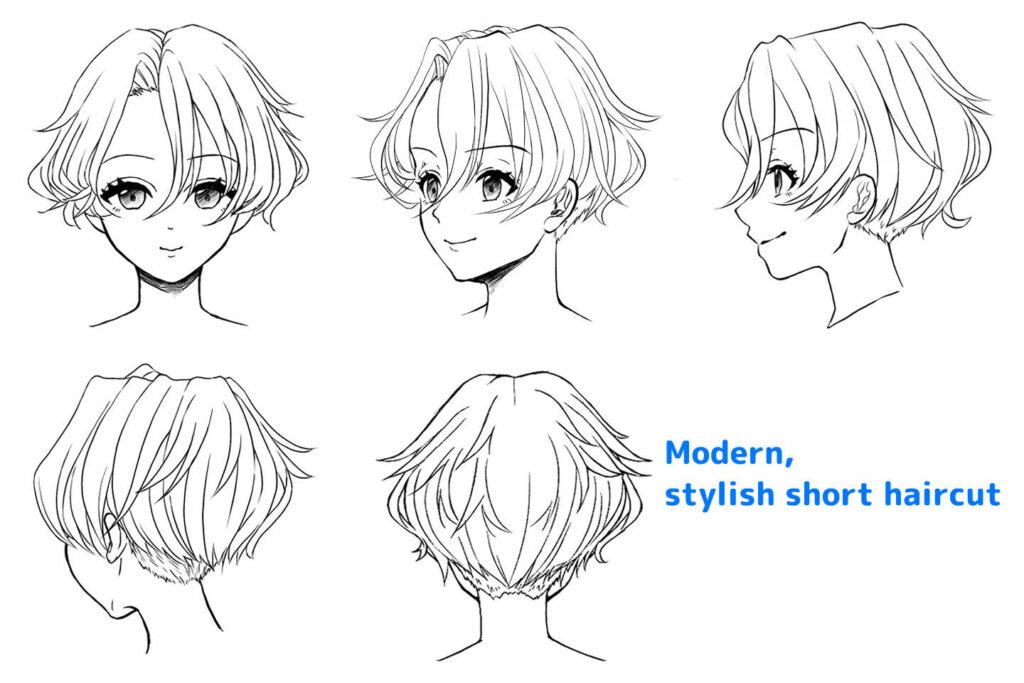
The key is to create a bulge of hair around the ears.
From there, draw the hairline on the back of the neck (the part that is cut very short) in fine jagged lines.
Also, try to keep the silhouette of the hair as a whole as similar as possible to the front view, even for the few hairs that are sticking out.
Bob hair
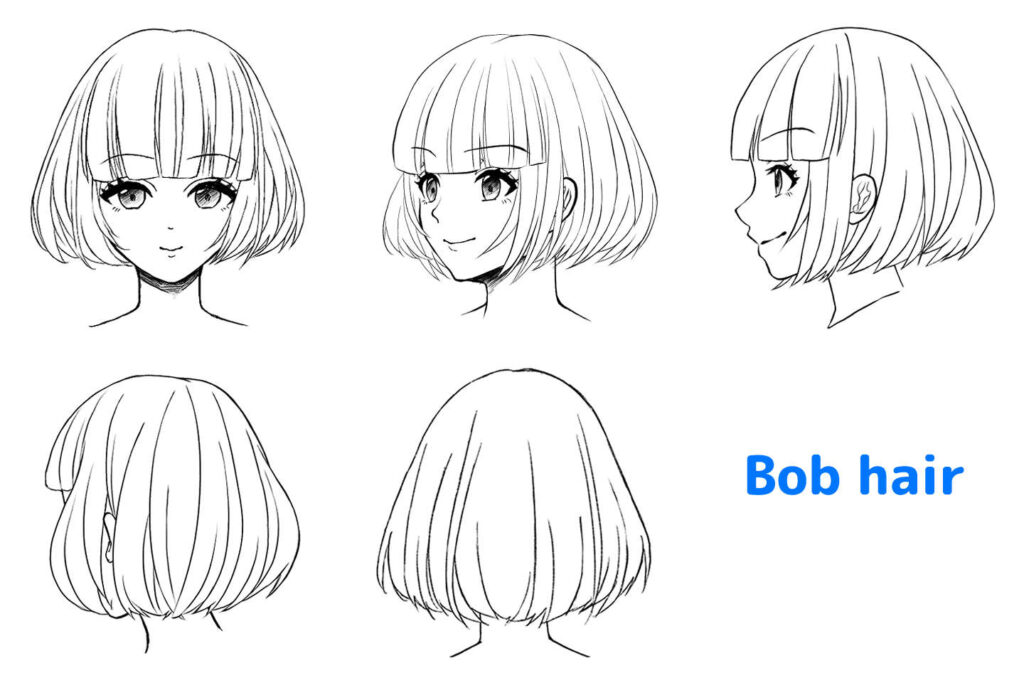
This hairstyle is good for practicing drawing looked from different directions and angles of hair.
When looked from the front, make sure that the hair has a rice ball-like shape with the weight of the hair being concentrated at the bottom.
Even when looking from other angles, if you draw it so that the image of the center of gravity being at the bottom is not broken, it will look like bob hair neatly.
Very short hair
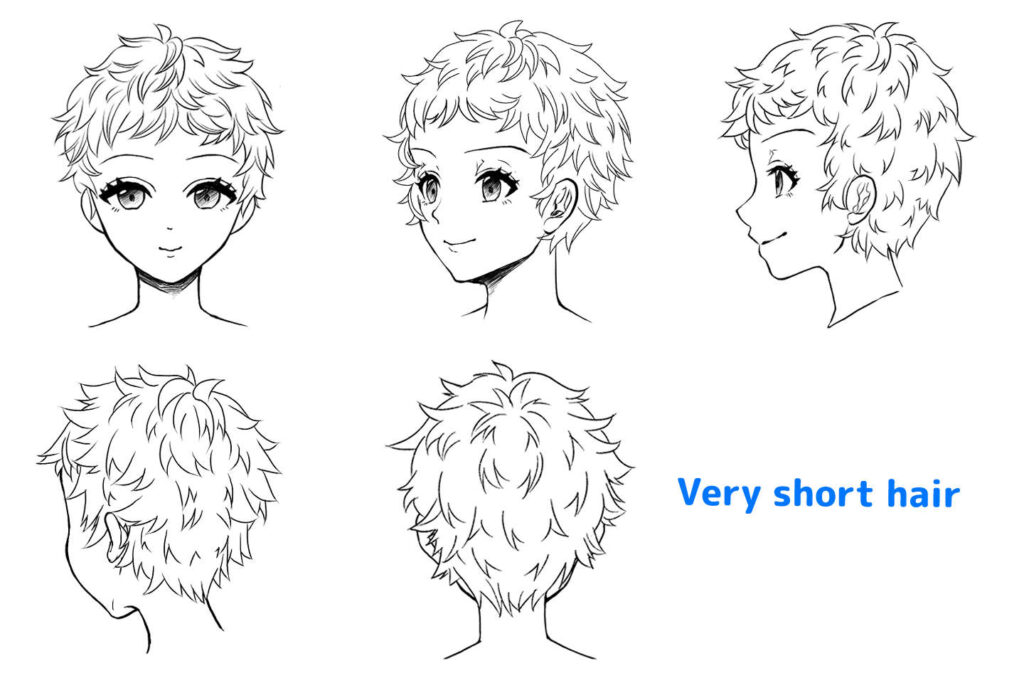
This hairstyle is often seen on characters with lively personalities or characters whose hair has been cut short for some reason.
Draw the overall outline along the head, and then draw the hair that is bouncing out from the hair whorl.
This hairstyle is very difficult to draw because the shape changes noticeably when the angle changes.
When drawing the bangs, be careful not to draw them all the way down to the eyebrows.
If you did it, it is easy to end up with an illustration in which the bangs look longer when the angle changes.
M-shaped bangs and short hairstyle with hairs that are bouncing outwards
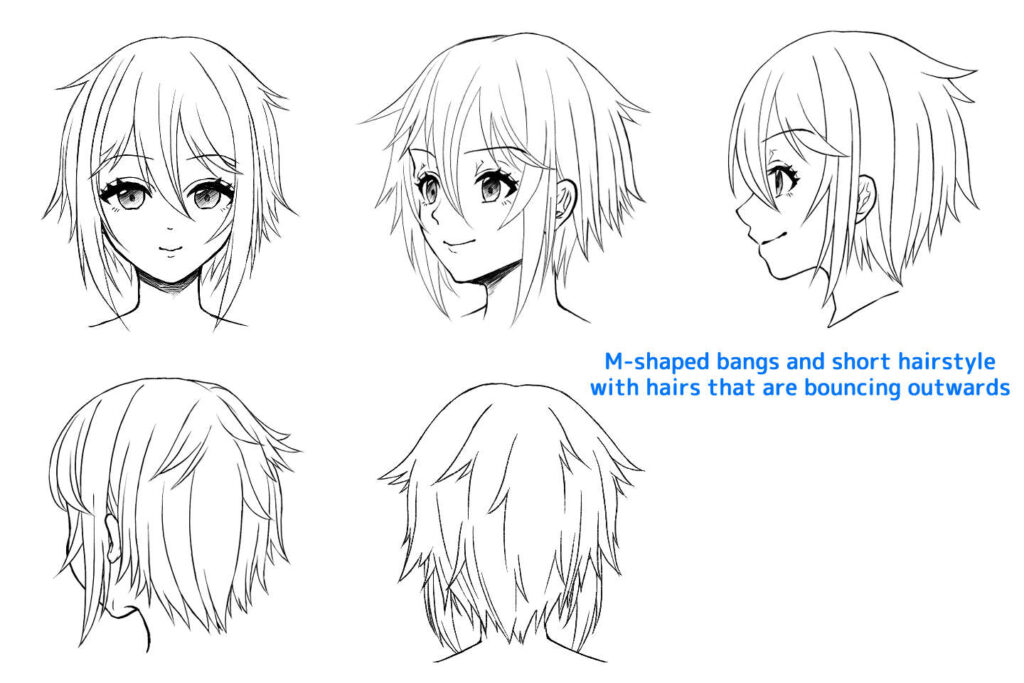
This is a hairstyle you often see in fantasy works.
Think about how it is structured all around, and draw it.
Think about various possibilities, such as drawing the hair so that it has the same silhouette from any angle, and then there is also hairs that are bouncing to diagonally or to the back.
It is easier to understand if you refer to things such as character’s figures that can be seen from various angles.
The hair with knots and its center of gravity at the bottom, short arched bangs
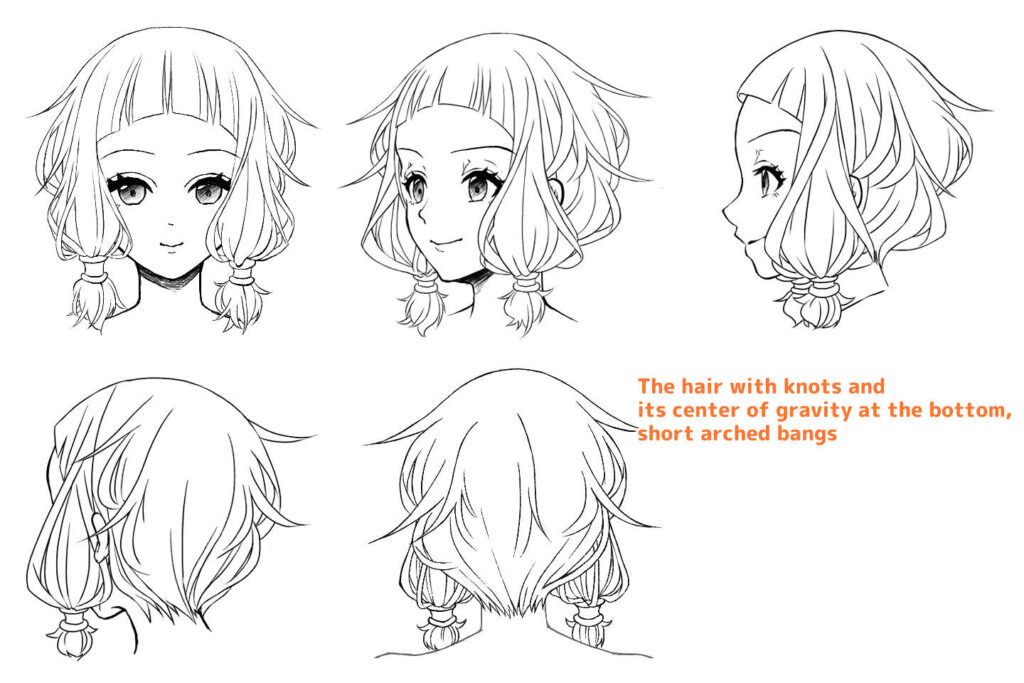
This is a hairstyle with hair that flares out just above the knot, as seen in fantasy works.
There are also many patterns that the back hair is tied in this way.
When drawing the short, arched bangs, if you keep in mind deciding on how far the bangs from above the eyebrow, and that the center line of the face is the shortest and getting longer towards the both sides, you can naturally create a three-dimensional look.
As with bob hair, the overall silhouette is important for this hairstyle, so be aware that it looks like a drop shape from any angle.
Examples of short hair for boys
Up bangs
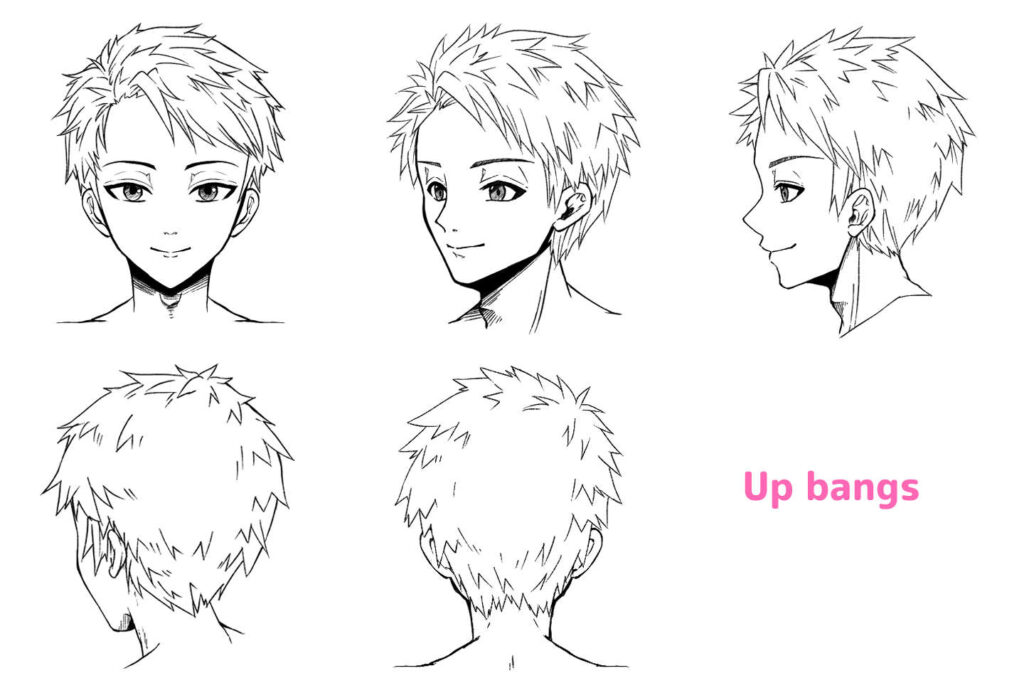
This hairstyle is the one that the bangs are slightly lifted to reveal the forehead.
The characteristic of this hairstyle is that the outline is drawn long up to the forehead, when seen in profile or as seen diagonally.
For short back hair, draw the silhouette from the hair whorl, and then add hair that is bouncing up from the hair whorl for a natural finish.
If the hair whorl is on one side, be careful to draw it so that the hair whorl is in the same place when seen from the front or from behind.
Mushroom cut
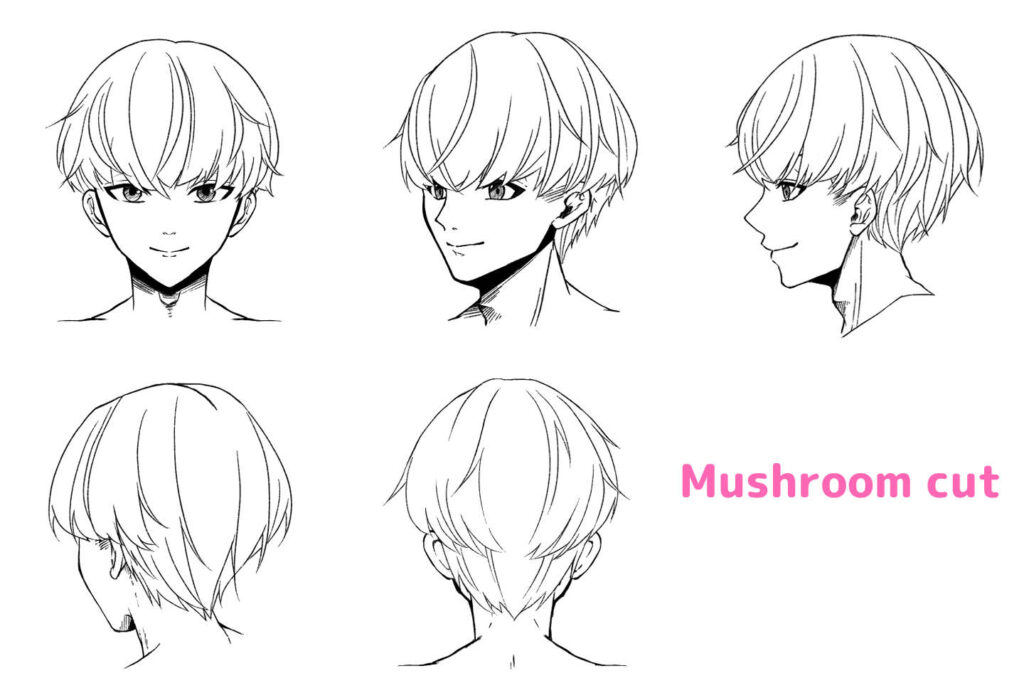
Mush is an abbreviation for mushroom cut in Japan.
When it first became popular in the 1960s, it was the hairstyle that wrapped around the whole head.
In recent years, the mainstream style is to create a bulge above the ears, combined with a side-shaved cut, and to cut the hair short around the base of the neck.
It gives the impression of being unique, stylish, cute, mysterious, etc., and is a men’s hairstyle that is popular among women.
If you make it completely mushroom-shaped, it may look too unique, so creating a casual look by making the hair stand up in places will give it a more casual feel.
Make sure to draw the part that is cut like bob at the back of the head and the part that is shorter along the neck in a different way.
Also, it’s better not to make the sideburns too prominent so that the overall silhouette will look more beautiful.
Asymmetric hair
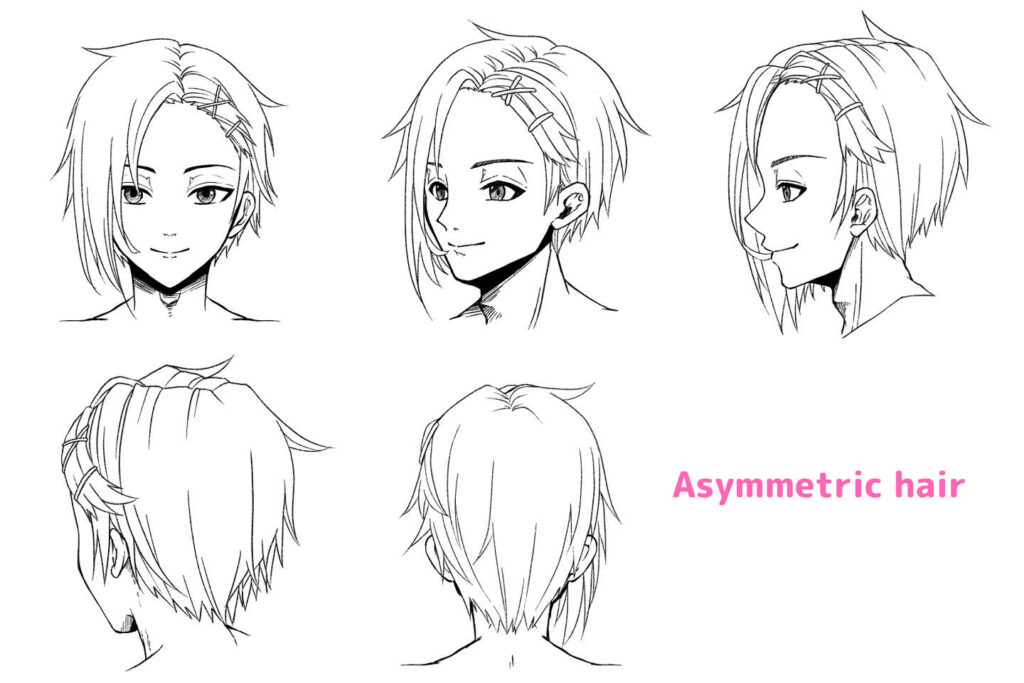
This is a hairstyle having different lengths on the left and right sides.
In actual asymmetric hair, the parting is around 8:2, with more hair on one side, or one side is sometimes shaved off.
In two-dimensional asymmetric hair, the pattern is often one side longer in the side hair.
Since only the side hair is longer, there is usually not much difference in the length of the back hair.
Also, characters with long bangs on one side that hide one eye, commonly known as mekakure (one or both eyes are hidden) characters, are also classified as having asymmetric hair.
The key to drawing asymmetric hair from various angles is to understand from which direction the longer hair will be visible when drawing it.
In the illustration above, if you look at it from an angle behind, you can’t see the long hair because it’s hidden by the neck and head, so it just looks like short hair changing the impression of the character.
For illustrations where you don’t want to change the impression too much, it’s good to exaggerate the fact that there is long hair by drawing it fluttering in the wind on purpose.
Boy’s manga-like pointy hair
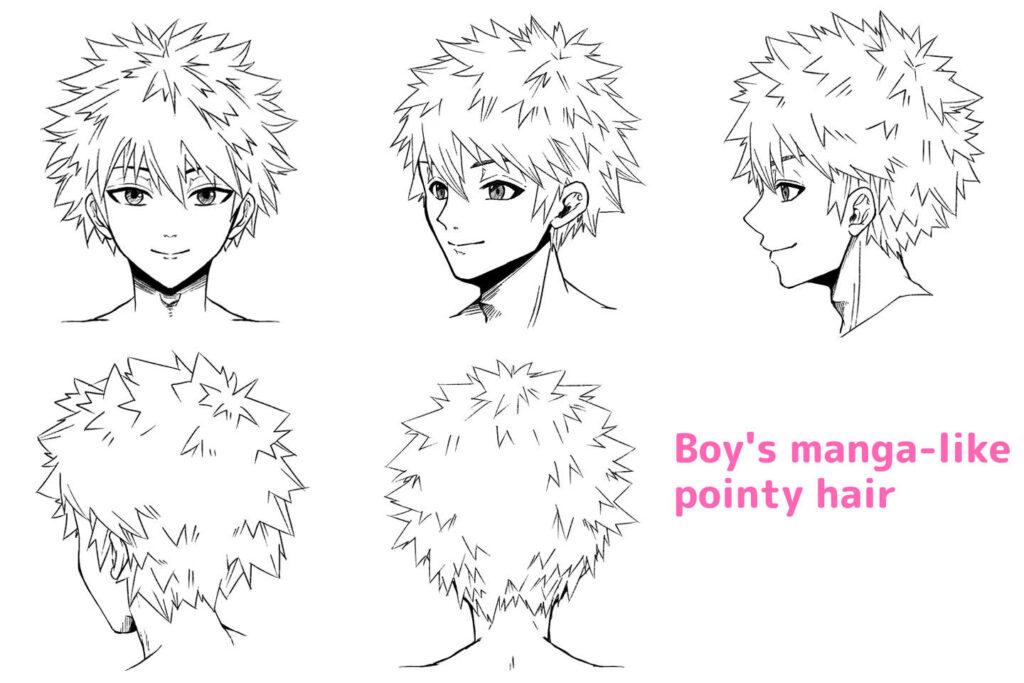
This is a hairstyle with hair sticking up in all directions, as seen in boy’s manga and others.
Draw the overall silhouette so that it looks like the speech balloon of a manga character when they shout, with the hair bouncing outwards from the center of the head.
Assuming that the hair whorl is at the top of the head, draw the hair spreading outwards from there roughly.
If you draw it so that it looks painful to touch all over, it will have a stronger impression of deformation.
Sweptback hair
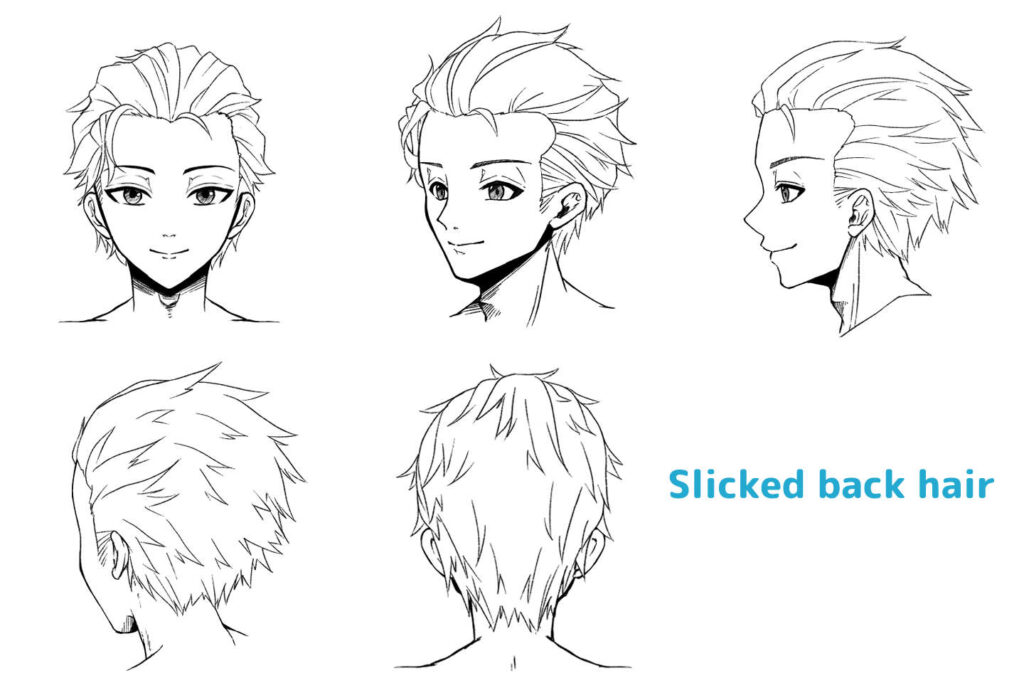
This is the hairstyle that is brushed back all the hair from the bangs to the side hair.
This hairstyle is for people who have advanced technique, because you have to be well aware of the shape of the head when drawing it.
Draw the overall silhouette first, then draw the flow of the hair and the straggling short and fine hair.
In this hairstyle, the hair is as if they’re brushed back, so draw fewer hair on the top of the head.
Also, as the hair tends to gather at the back of the head, be careful to draw the silhouette correctly.
Hair divided at the center, lightly permed hair
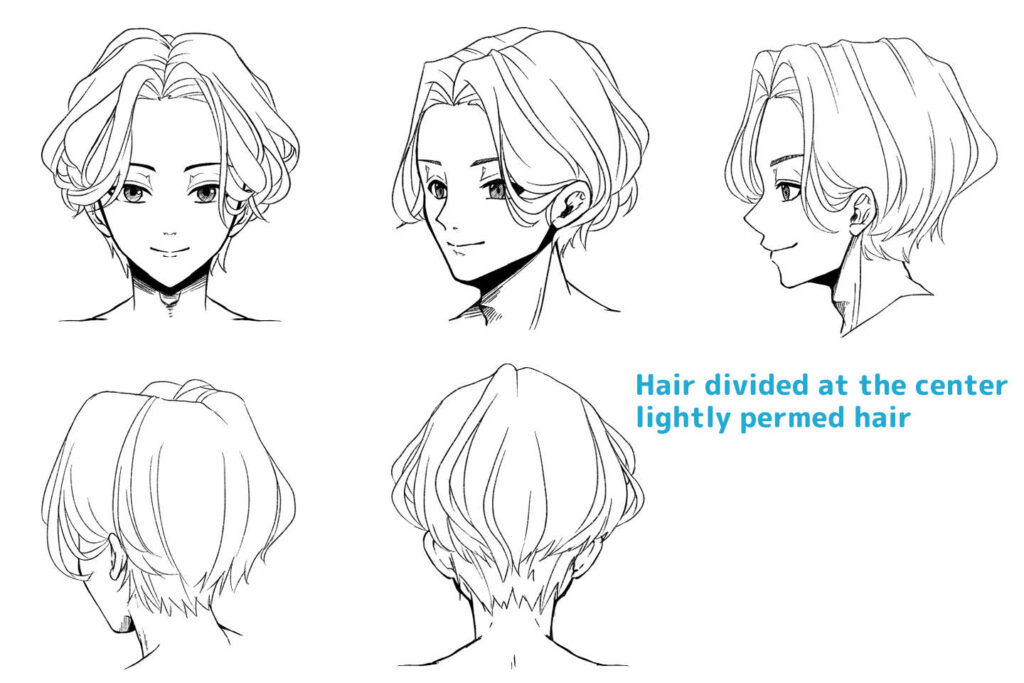
Hair divided at the center refers to the bangs parted at the center.
Lightly-permed means a perm that gives the hair a wavy, naturally curly look, and the hairstyle shown above is a combination of the two.
If you create the silhouette so that the shape looks like that of a diamond, it will look beautiful.
If you draw the wavy hair too much to create a random look, it may end up looking messy like spaghetti.
Try to draw the hair as simply as possible except for distinctive features such as the hair which is placed on the ears.
Man bun hair, shaved sides
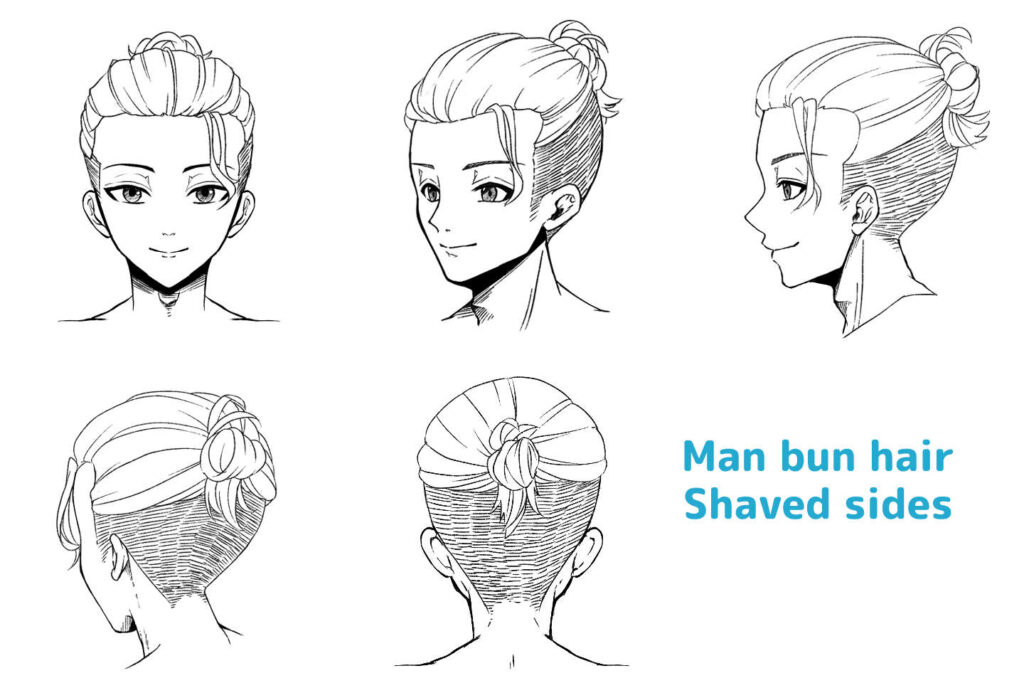
Man bun hair is a hairstyle often seen on foreign athletes and the like.
In Japan, it is often depicted as the hairstyle of characters in delinquent-youth manga or sexy male characters.
The key to making it look sexy is to draw the hair freely playing around such as slightly drooping bangs or the back of the hair tied up.
It is better to tie up the hair at the top of the head tightly, without drawing any straggling short and fine hair.
The way the shaved part of hair is drawn is just one example.
There are various ways to draw it, including filling it in with black, pasting a Screen-tone, or using colors.
Straight center-parted hairstyle,Shaved sides hairstyle
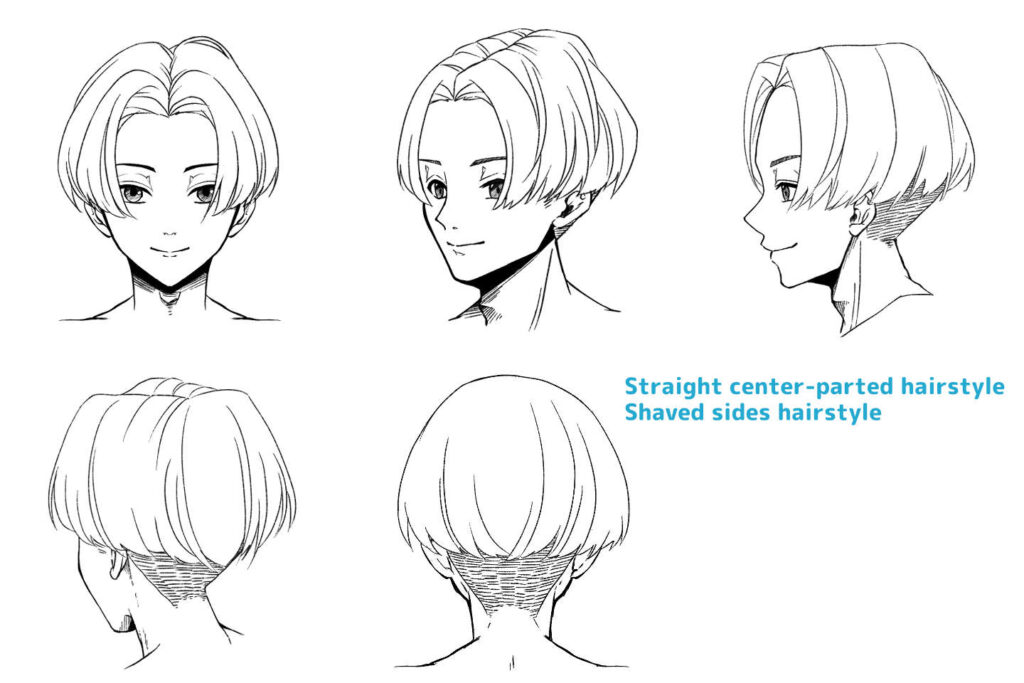
This hairstyle caught people’s attention these days as popular hair among K-POP artists. In Japan, it is a familiar hairstyle that has appeared in various works regardless of genre including girl’s manga and boy’s manga.
The latest trend is to form a round silhouette above the ears, with the whole head being a short bob haircut.
The ears are about half visible, therefore, draw them so that they can be seen clearly even when the character is facing backwards or diagonally backwards.
Let’s draw a character with the short hair you have in your mind!
Have you got an image of the ideal short hair?
If you’re already familiar with short hairs, try practicing different combinations of short hairs by dividing the hair into parts for the bangs, side hair, and back hair from the list of hair styles.
If you have a specific character in mind and are wondering “How should I draw it from this angle…?” or “I want to come up with my own original short hair”, please feel free to consult with the instructor at a free trial lesson of the Illustration and Manga school, egaco.
Pickup Articles
Category Related Articles