This article was created by the illustrators and manga artists who teach at the illustration and manga school, egaco, based on the knowledge and skills they have honed through commercial production and other work. If you would like to learn more about content that is tailored to what you want to draw, we recommend taking a private lesson at egaco.
You will see lots of trees in parks, schools and fantasy worlds, so it’s no exaggeration to say that they are essential for backgrounds.
If you draw pictures, you will probably find yourself drawing trees in the background of your illustrations many times, not just in landscape paintings.
However, unlike buildings and other man-made objects, trees are natural objects, so they can be difficult to capture, and you may find yourself worrying that you can’t get the shape right or that the tree doesn’t look like a tree.
The reason you can’t draw trees well is because you don’t have a proper understanding of the structure and shape of trees.
Here, we will analyze the structure of trees and explain how to draw them with tricks and tips in a way that looks like a tree without taking too much time.
First, let’s learn the kinds and features of trees and get a clear image
If you start drawing with a vague image, it will look unnatural and won’t look like a tree.
You should know what kind of tree you want to draw and what its characteristics are, so that you can get a clearer image.
Conifers
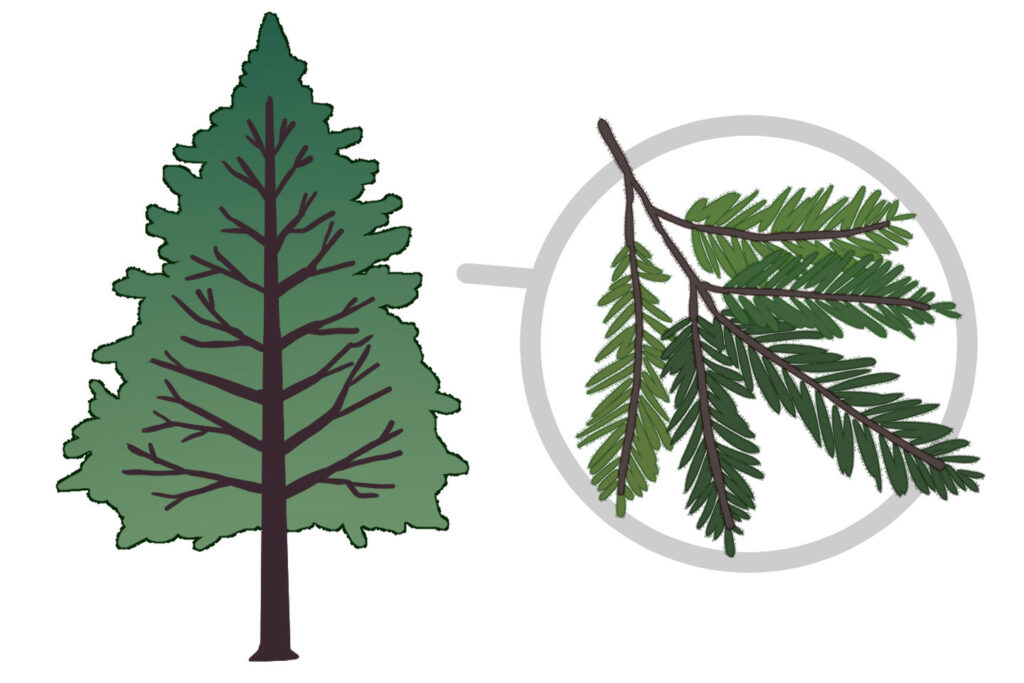
These are trees such as firs and pines that have needle-like leaves, and the majority of them are evergreen trees that keep their leaves on even in winter.
They grow straight up, and are characterized by their silhouette, which looks like an isosceles triangle.
This is because the tree trunk grows straight without bending, and from there, thin branches grow out in a radial pattern.
Many of them have an optimal growth temperature that is low, and they can withstand arid, dry areas well, so they are often found in cold regions.
Broad-leaved trees
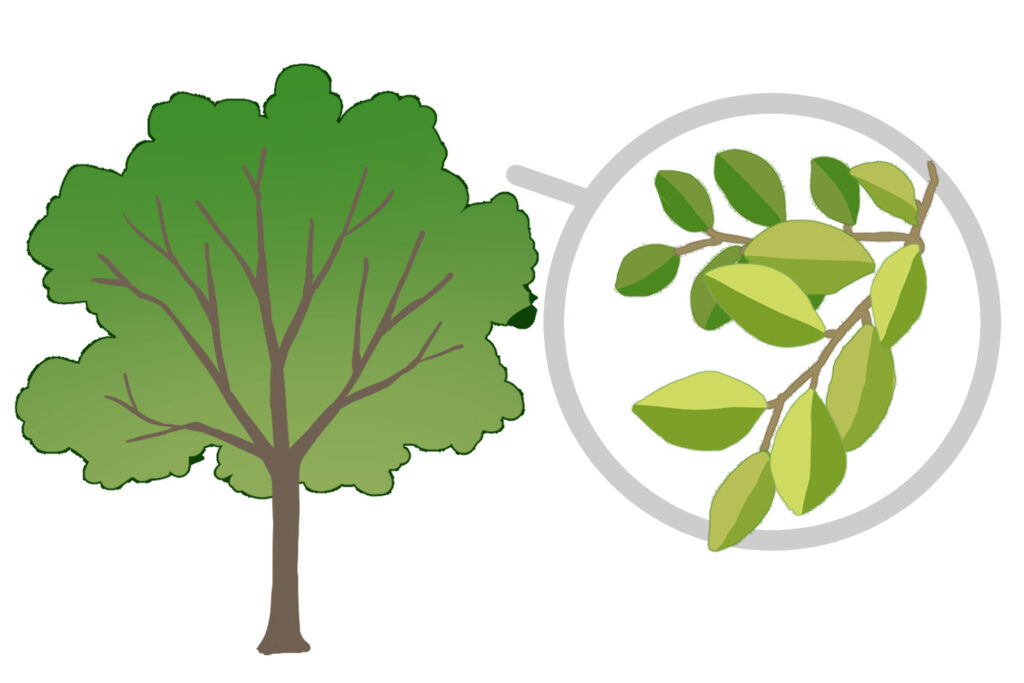
This refers to trees such as cherry and zelkova, which have broad, flat leaves, and are classified as deciduous trees, which loose their leaves in autumn, etc.
They have a characteristic rounded silhouette, with a spread both horizontally and vertically.
This is because the tree trunk repeatedly branches out and extends in various directions.
Although dicotyledonous plants (so-shiyo-shokubutsu) are by far the most common, monocotyledonous plants (tanshi-yoshokubutsu) such as the palm family and agave family are also included in this broad category of broad-leaved trees.
As Japanese people live in a country with four seasons and a climate that is not particularly warm or cold, many of them will probably think of broad-leaved trees when they think of trees.
Monocotyledonous plants (tanshi-yoshokubutsu)
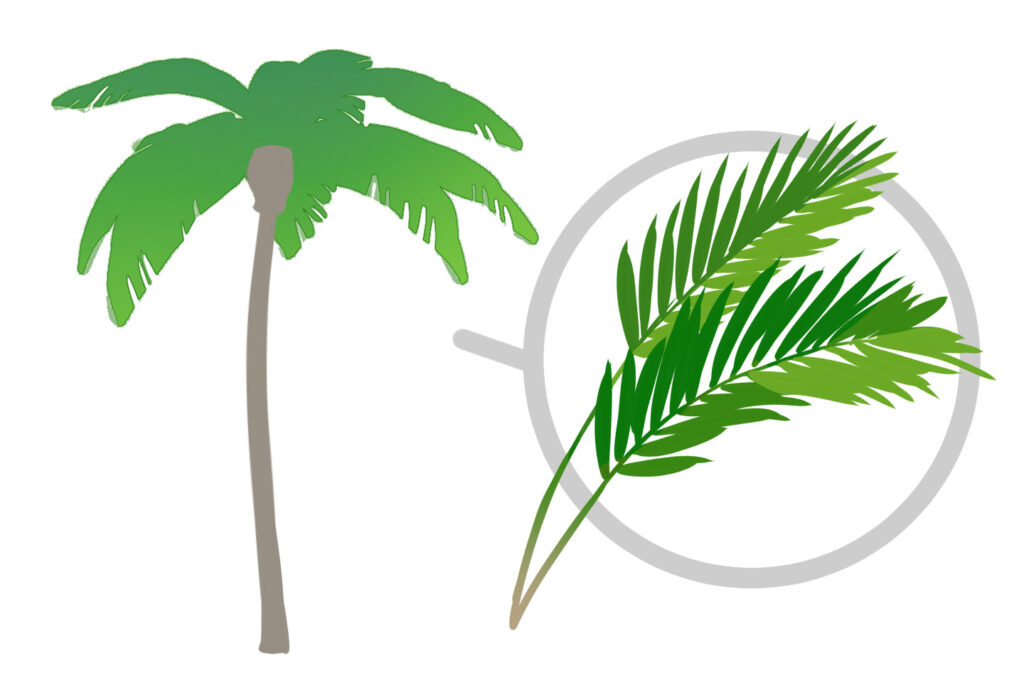
The common characteristics of these plants are that their leaves are long and narrow, and that they have parallel veins.
The majority of these plants are herbaceous (non-woody plants), with only a few becoming a big tree.
The Poaceae (family of grasses) and Orchidaceae (family of orchids) also belong to this group, but in this article we will focus on the Palms.
As many of these plants are found in tropical regions, monocotyledonous plants are ideal for expressing warm climates in illustrations.
Shrubs
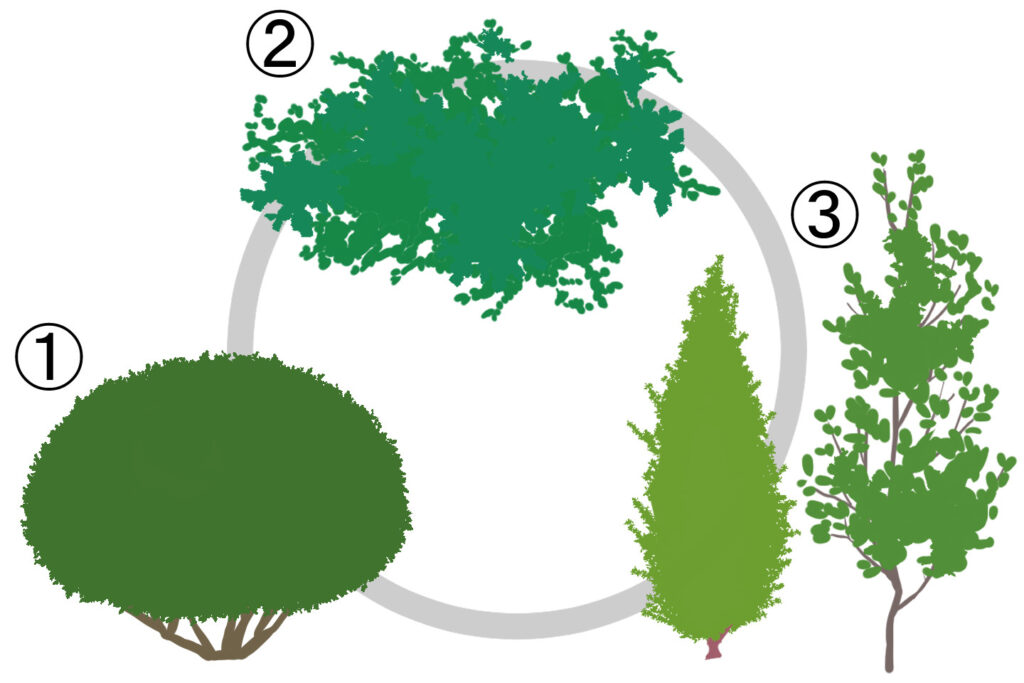
This is a word that refers to the size of a tree, not the kind of tree.
Trees that are five meters or taller are called tall trees, while trees that are three meters or shorter are called shrubs.
There are three types of shrubs, as shown in the image:
- Shrubs that grow in a bulging shape
- Shrubs that grow horizontally rather than vertically
- Shrubs that have a single straight trunk
Hydrangeas and rosemary are also classified as shrubs, but generally speaking, the image of a shrub is that of a hedge (a boundary line made from plants to separate properties).
Let’s learn the steps on how to draw trees by kind
How to draw broad-leaved trees
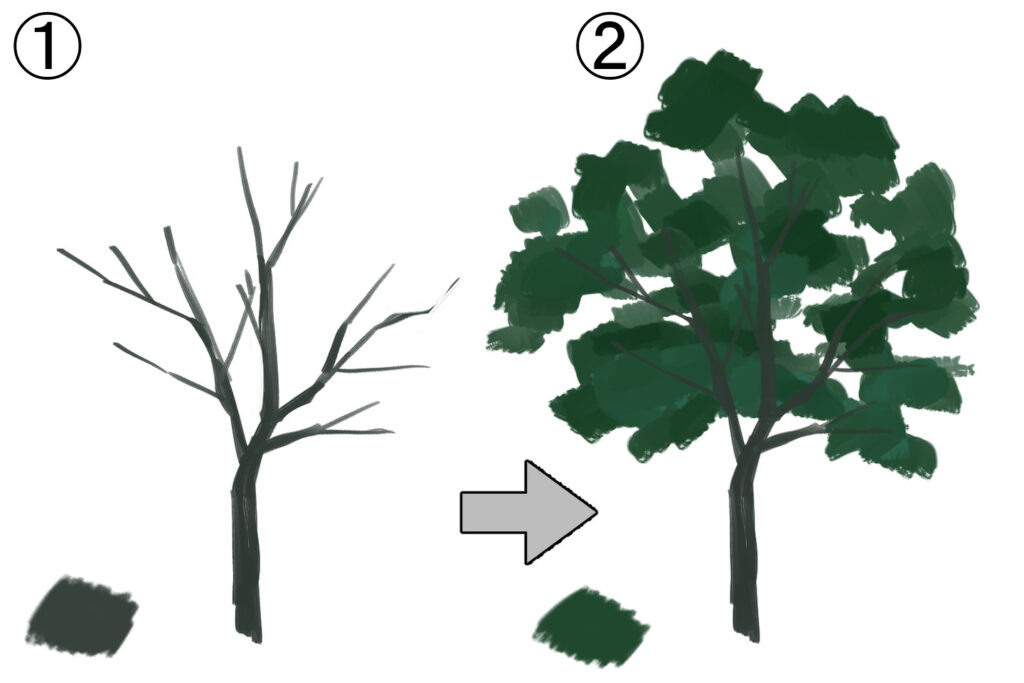
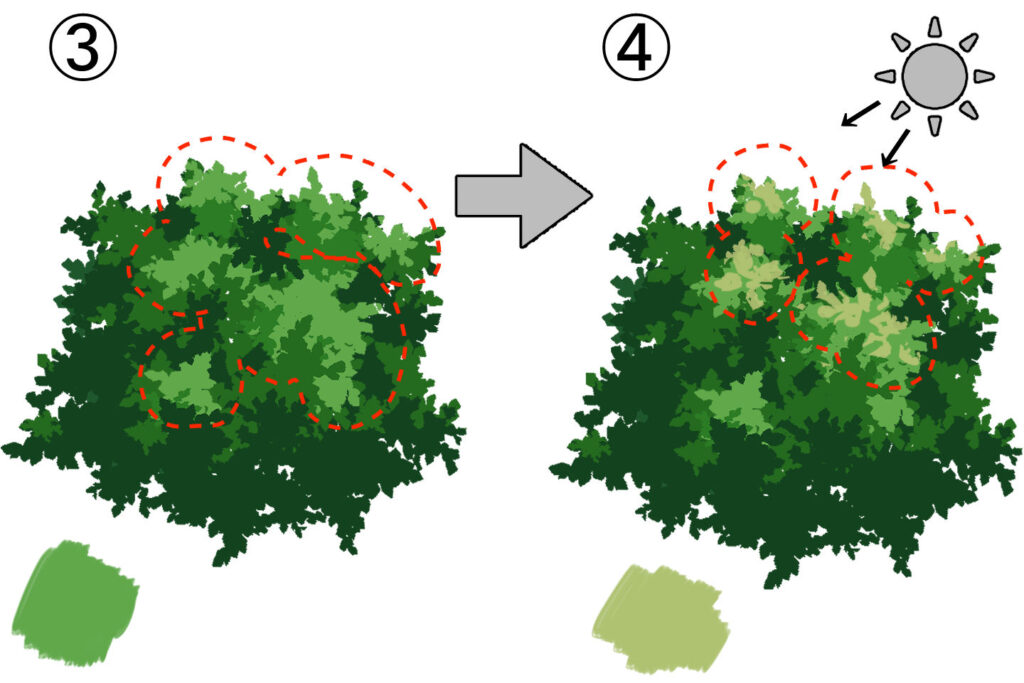
① Start by drawing the trunk and branches.
The height of the ground and branches is lower than you might expect.
②Roughly add leaves to the parts where the branches are growing.
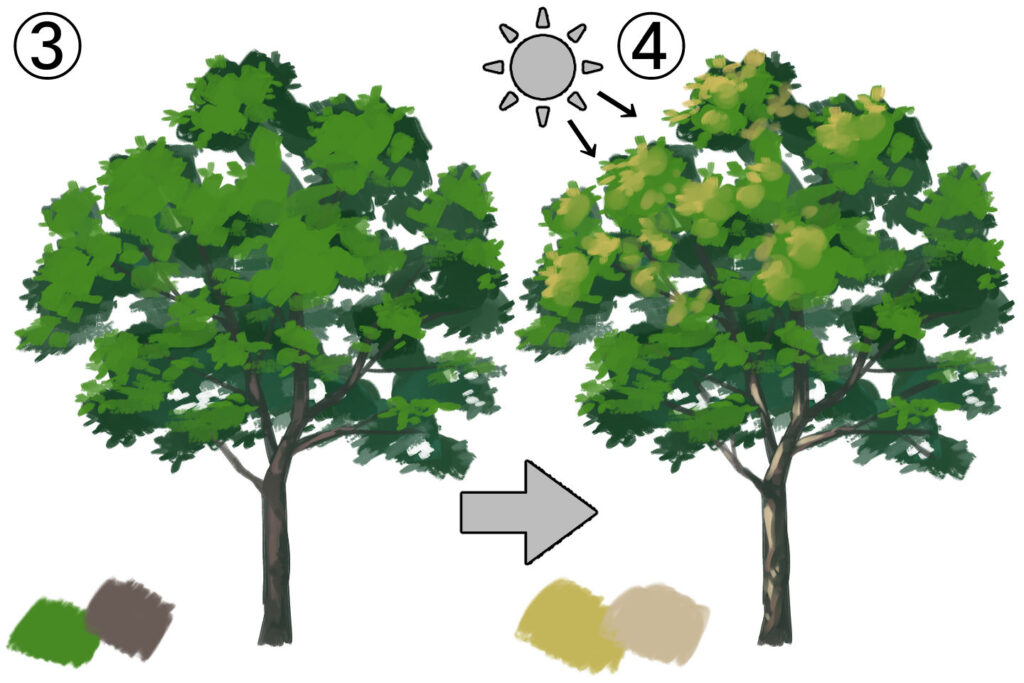
③Place inherent colors in the parts you want to make look like they are in the foreground.
④Add a lighter color to the parts that are being lit by the light.
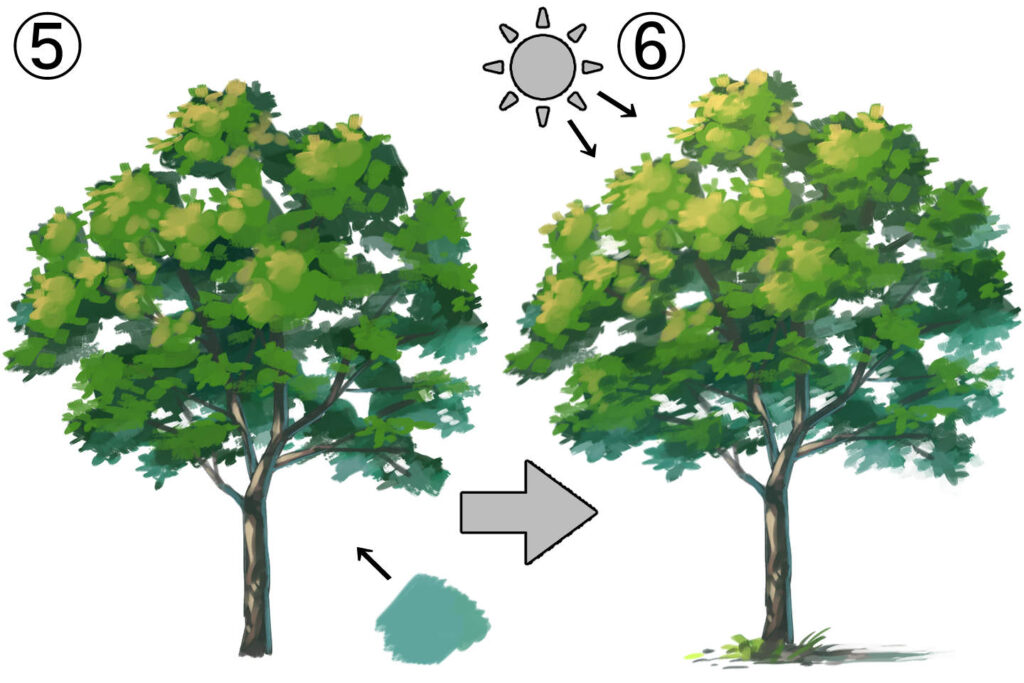
⑤To create a sense of perspective, add reflected light from the opposite side of the light source in a color closer to blue.
⑥Make any final adjustments to the overall shape of the leaves, etc., and you’re done.
Important points taught by the instructor
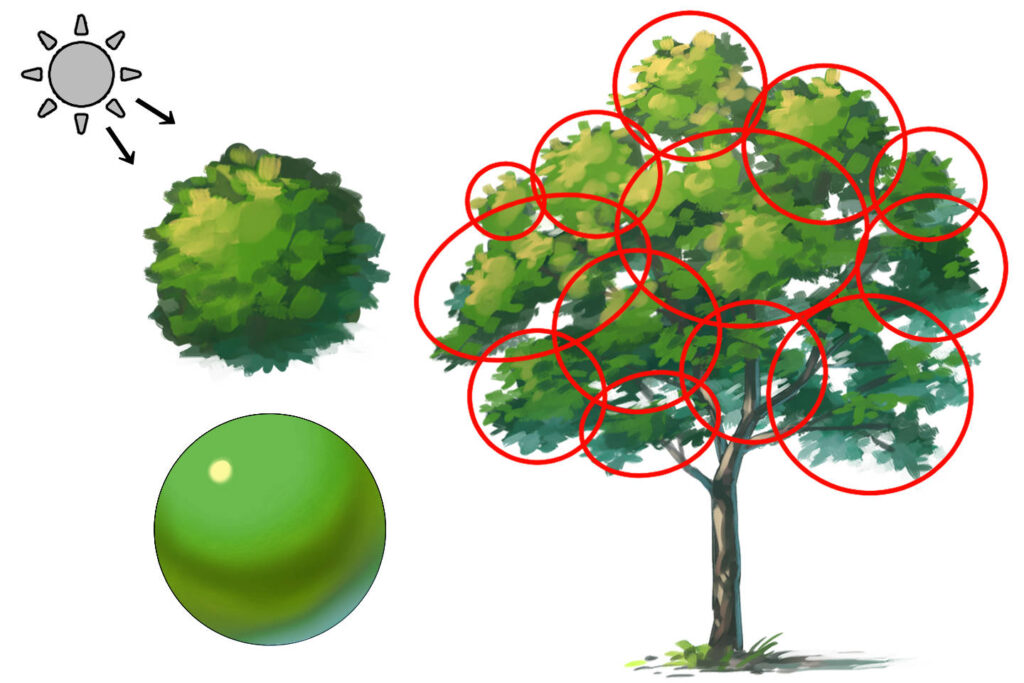
葉の陰影は球体を意識!…Be aware of the shadows of the leaves as if they were spherical!
葉のかたまりの陰影は球体を意識しましょう。分かれた枝ごとに葉がまとまってついているイメージです….Be conscious of the shadows of the leaves as if they were spherical. The image is leaves are clustered together on each separate branch.
How to draw conifers
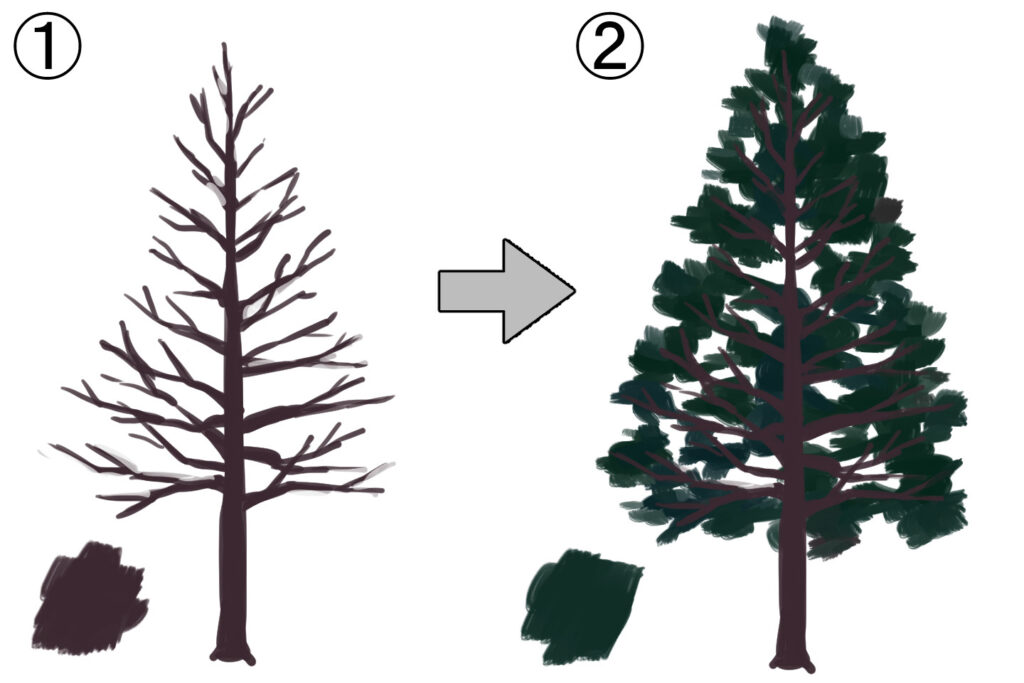
① Start by drawing the trunk and branches.
If the height of the branches is close to the height of the ground, it will look more like a conifer.
② Add leaves roughly, being aware of the triangular silhouette.
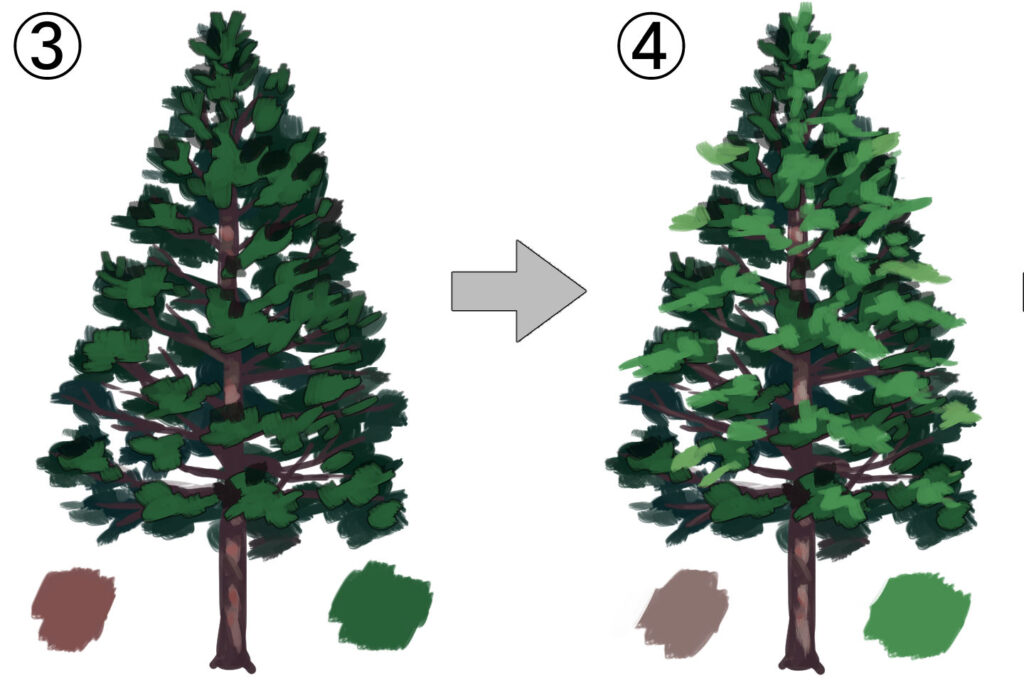
③ Place the inherent color in the area you want to make look like it is sticking out.
④ Add a lighter color to the area that is being illuminated.
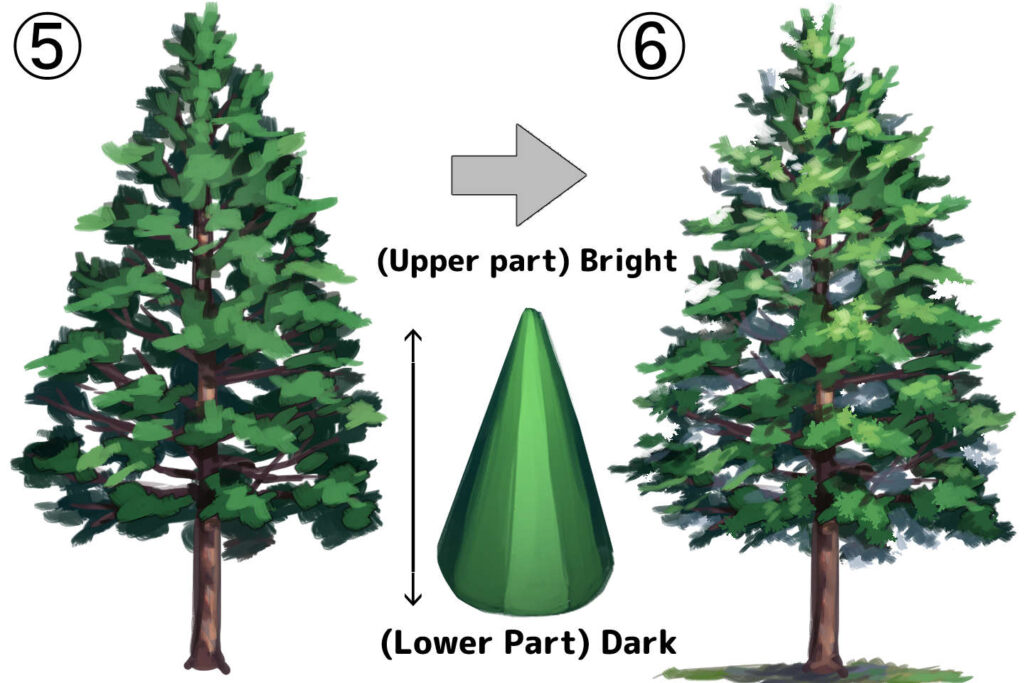
⑤ Broad-leaved trees are similar to a cone shape, and the higher the top of the tree goes, the closer it gets to the light source.
⑥ Make any final adjustments to the overall shape of the leaves, etc., and you’re done.
The important points taught by the instructor
Be aware of the characteristics of the leaves and branches of conifers
The leaves are like bunches of banana-like leaves attached to each separate branch. Be aware that the branches grow downward on the lower level, parallel on the middle level, and upward on the upper level.
How to draw monocots
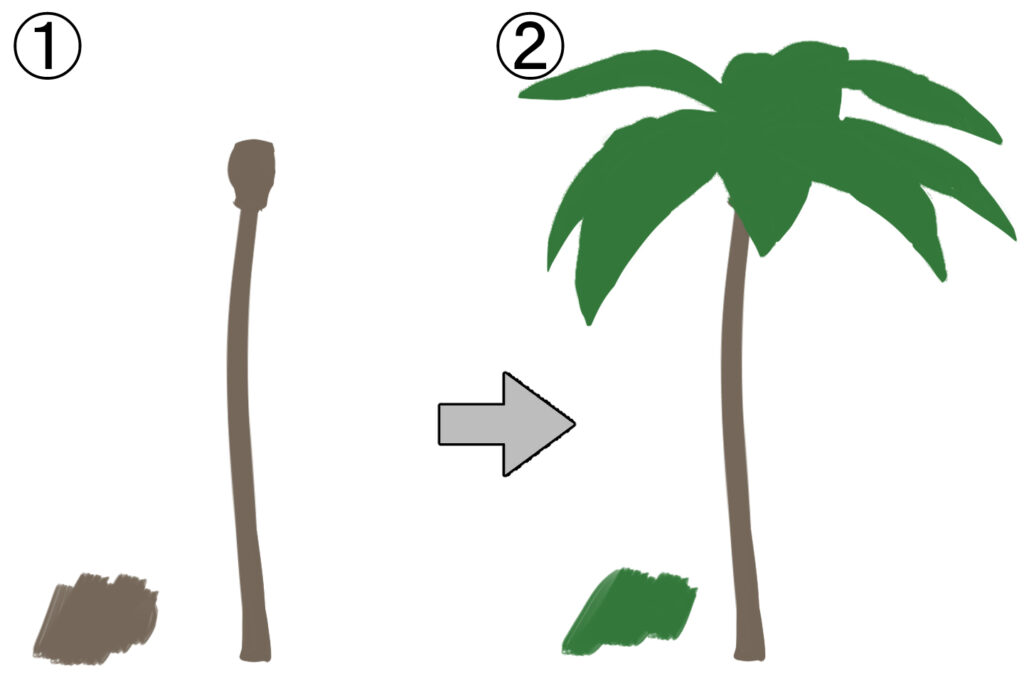
① Draw a long, slightly curved trunk, and draw the top part about twice as thick and knotty as usual.
② From the central trunk, draw the leaves spreading out radially like an umbrella.
Important points taught by the instructor
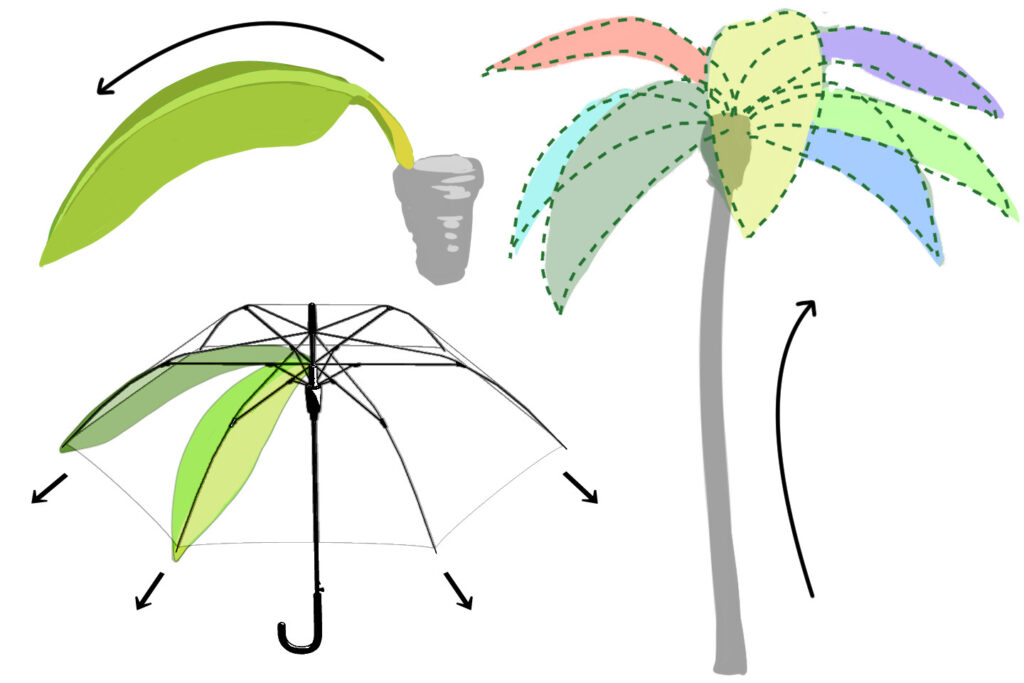
Draw the leaves with the image of them spreading out radially
Like an umbrella, draw the leaves with the image of them spreading out radially. Because the leaves are large, drawing the bending of the leaves due to their weight will make them look more natural.
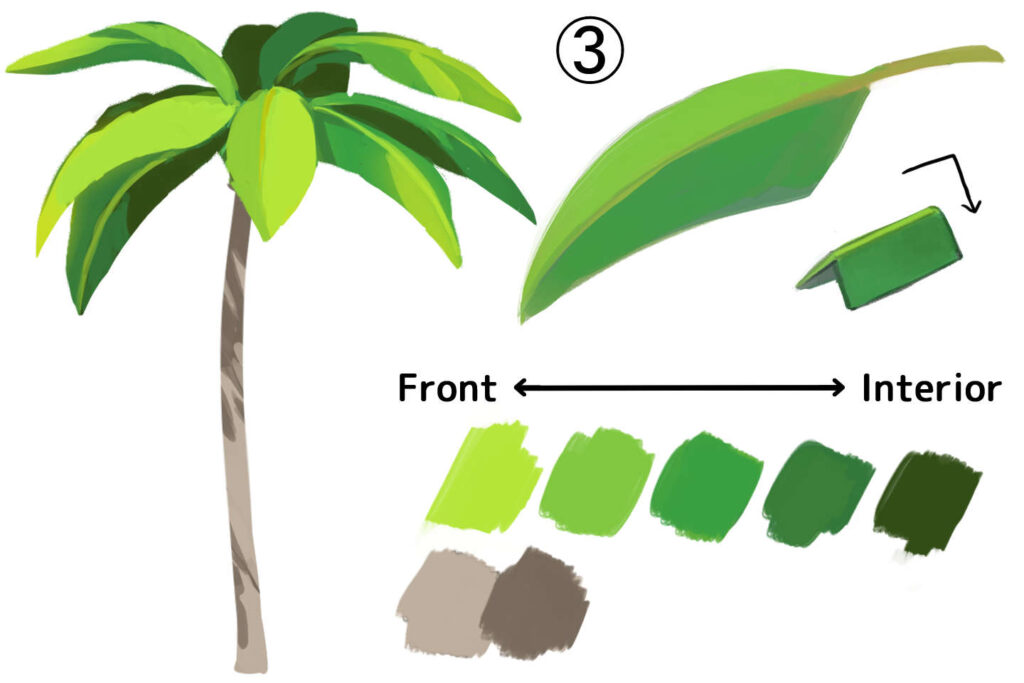
③By painting the leaves that stick out in the foreground yellowish green and the leaves in the background a darker, slightly bluish green, you can create a sense of perspective by differentiating the color of each individual leaf.
The leaves are folded downwards from the main vein in the middle, so the way the light hits them changes from left to right.
When placing the colors, make sure to create a difference between the light and dark areas on the left and right.
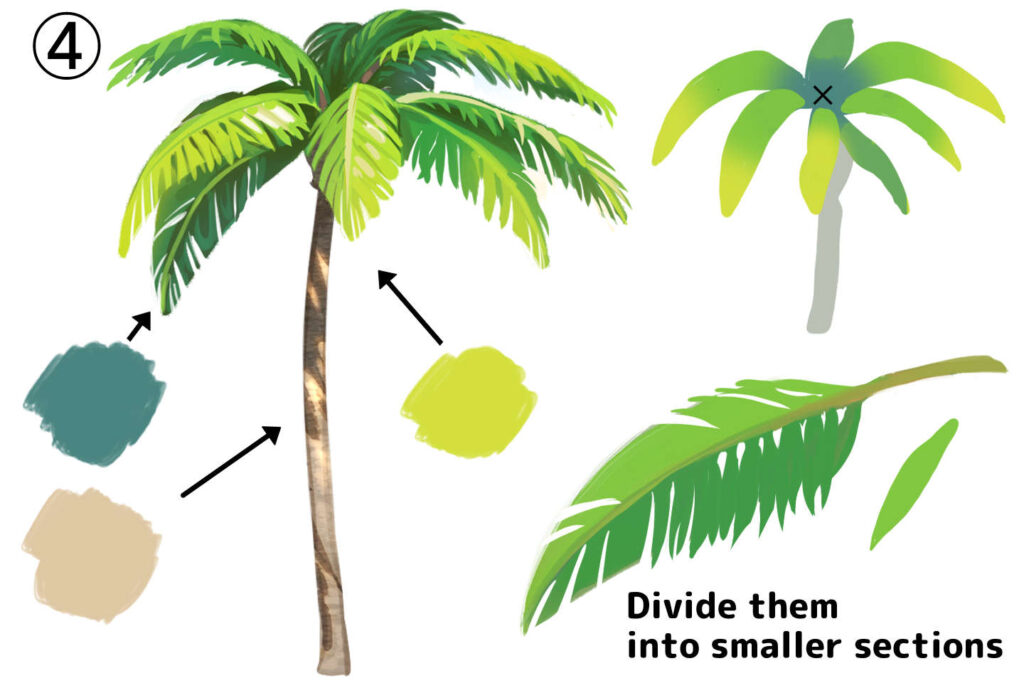
④To finish, the leaves are divided into smaller sections and their shape is adjusted.
The overall effect is fine-tuned such that the leaves sticking out in the foreground are made more yellow, the leaves at the base and in the back are made more blue, and the parts of the trunk being in the light are made brighter, etc., and the painting is complete.
How to draw shrubs
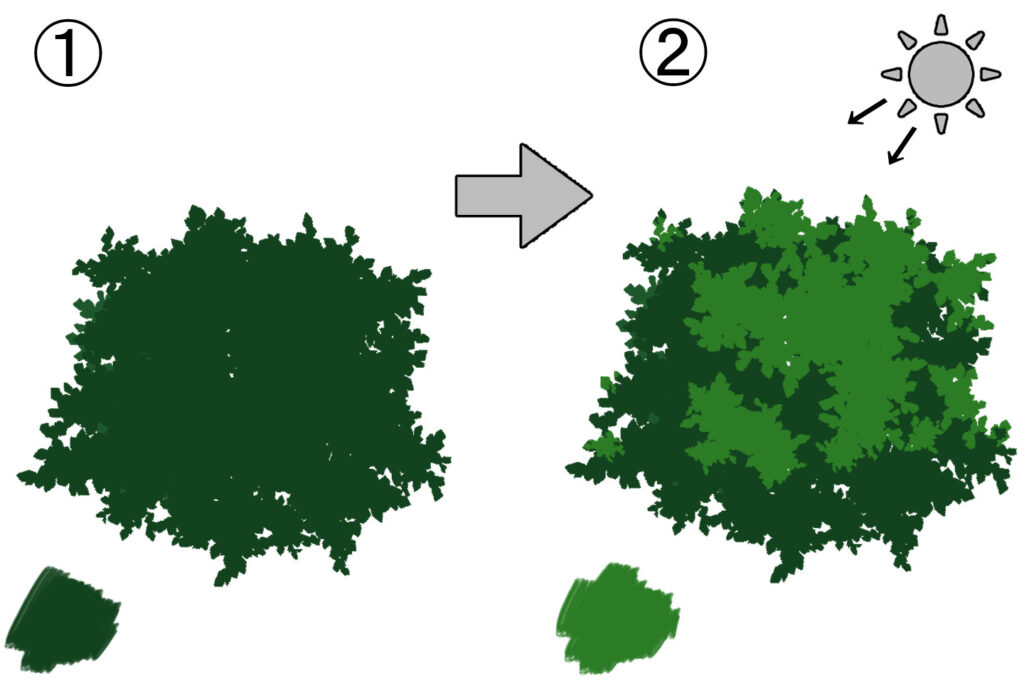
① Draw a mass of leaves, imagining the overall shape (silhouette).
② Place inherent colors in the areas you want to make them look as if they are in the foreground.
③ Overlap brighter colors to add more sense of depth.
④ Add a bright yellowish color to the areas that are in the light.
⑤Add reflected light in a color that is closer to blue from the opposite side of the direction from which the light was added.
⑥Make any final adjustments to the shape of the leaves and other details, and you’re done.
Attention! Five reasons why the tree does not look natural and how to fix them
Cause 1: The silhouette is lumpy

The important point is drawing the leaves while being aware of they are in a lump.
However, if you actually draw them as circles, it’s easy to end up with a rough impression like cotton on a branch…
Solution: break the round silhouette
Trees are made up of a collection of diamond-shaped leaves.
If you draw the pointed parts of the leaves and scrape between the leaves with an eraser to make a space among the two, it will look like a natural silhouette.
Cause 2: The tree is symmetrical and the shapes are uniform
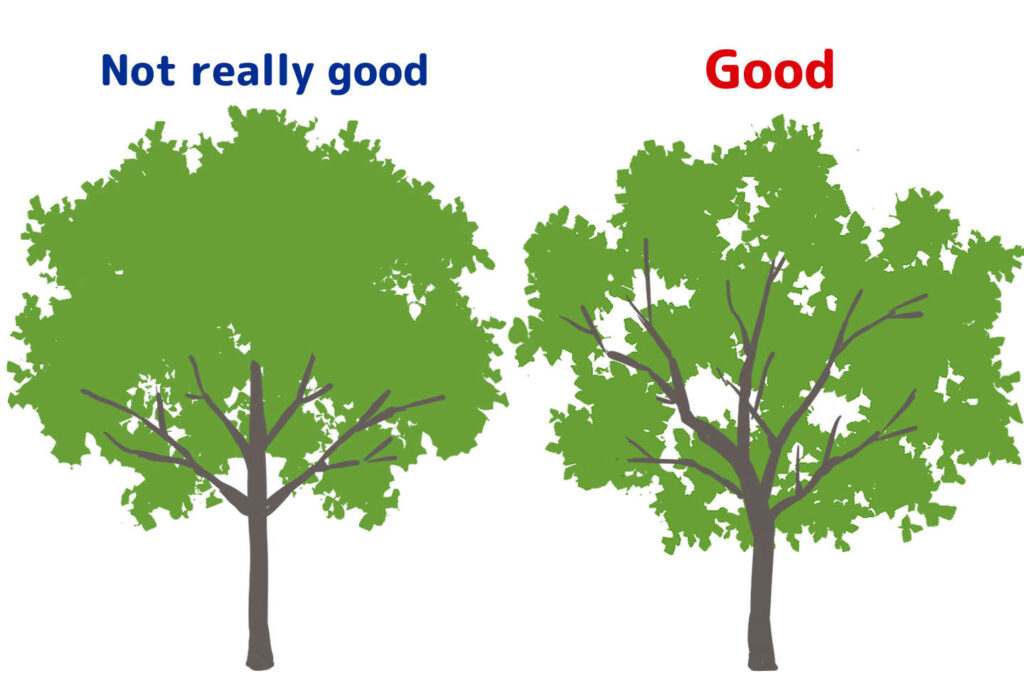
Even if they are the same species, natural objects are never exactly the same shape, and come in a variety of sizes and shapes.
In contrast, many man-made objects have a fixed size and shape.
In other words, if they are symmetrical or have a uniform shape, they will cause a feeling out of place as natural objects.
Solution: Add variations
Try shifting the position of the branches’ bases on the left and right, or change the density of the leaves to many, normal or few, and be conscious of drawing them randomly.
Cause 3: The branches are only on the left and right, with no overlap in front or back
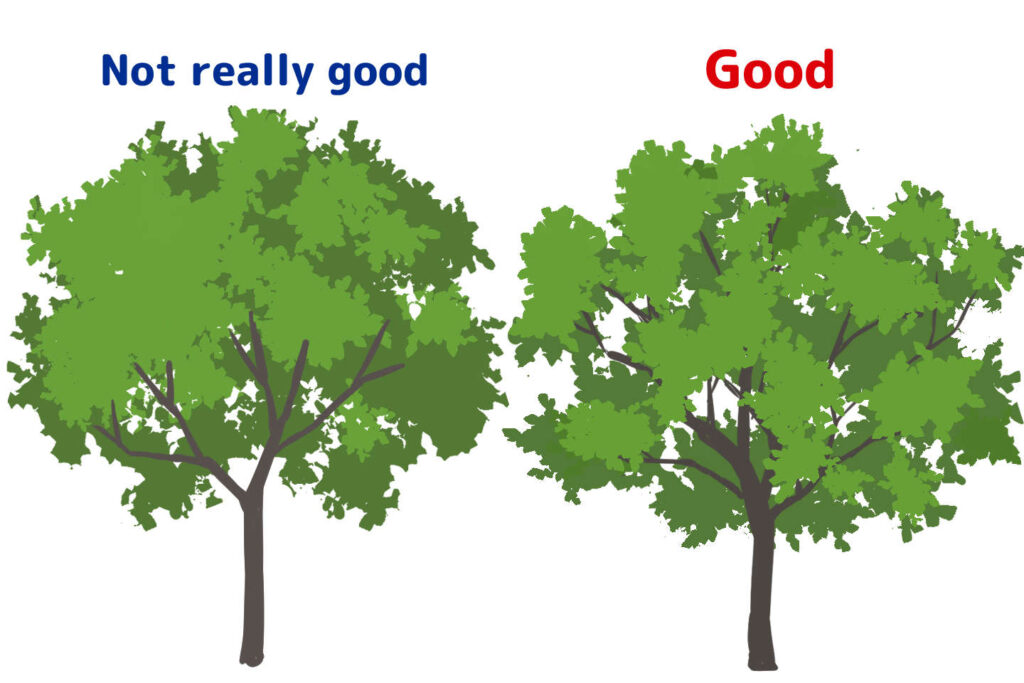
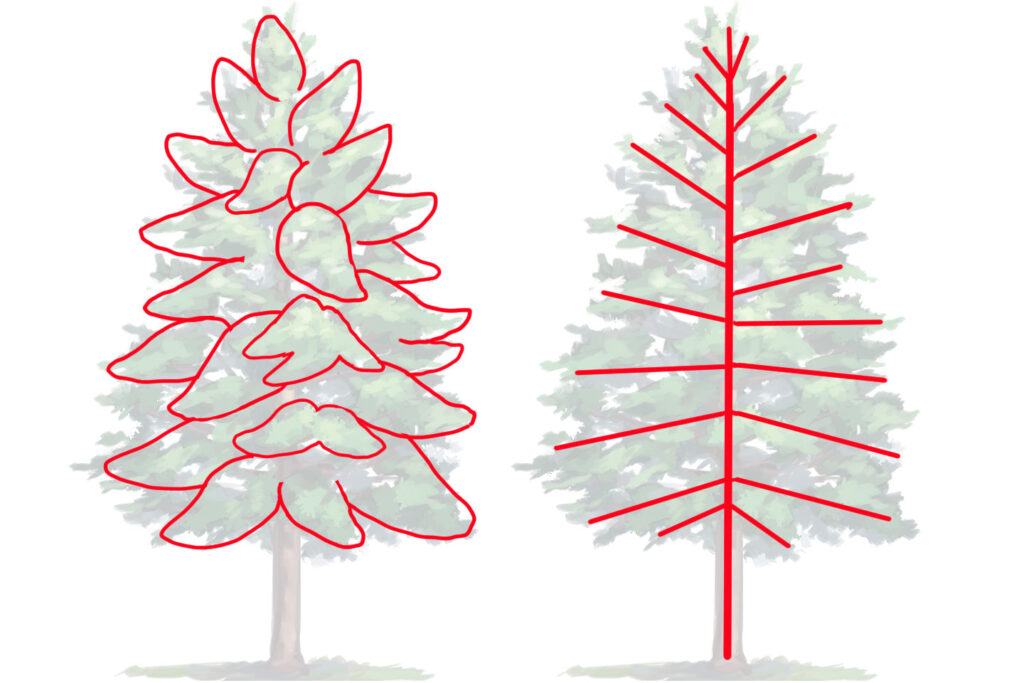
The tree has a cylindrical trunk, and branches radiate out from the center.
The leaves are attached to the ends of the branches, giving the tree a shape like an umbrella.
As shown in the illustration on the left, a tree with branches only on the left and right sides has no depth, and this can give the appearance of a papier-mâché signboard.
Solution: Add branches and leaves to the front and back
You can create a sense of depth by intersecting the branches in the gaps of the leaves and the interior of the tree.
Add leaves to the front and back of the branches.
By creating this kind of overlapping effect, you can create a tree with depth using the overlapped perspective technique (when objects are overlapped, the objects in the background appear to be further away than those in the foreground).
Cause 4: There is no regularity in the way the branches are drawn.
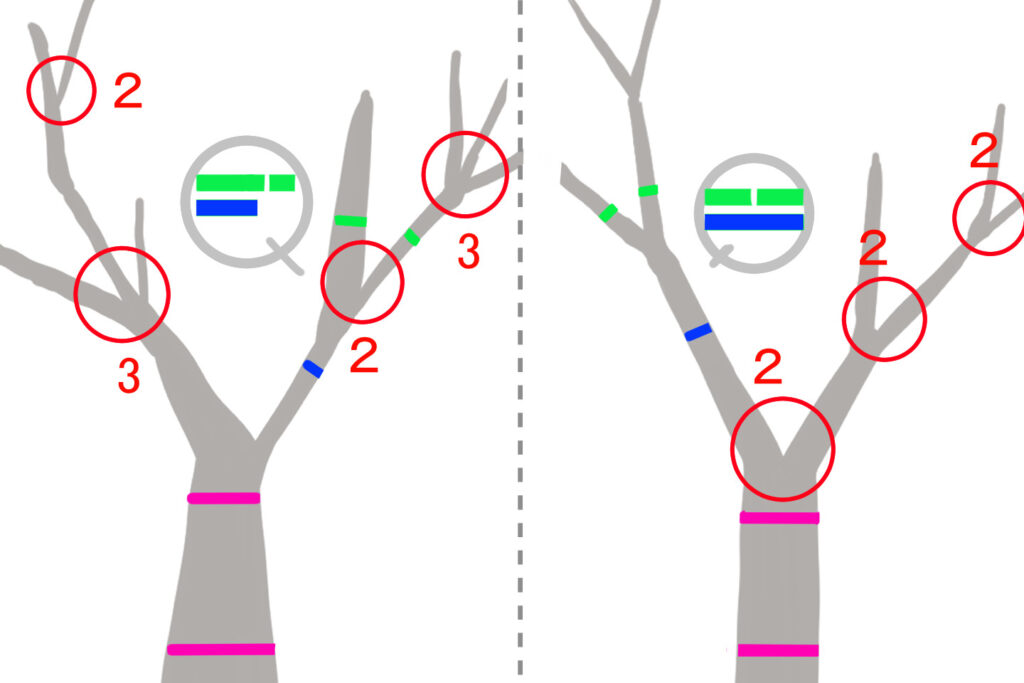
Branches with thick ends are heavy and break easily, so it is difficult for them to exist physically, and this gives the viewer a feeling out of place. (See the green and blue branches in the illustration on the left.)
There is also a rule for how branches split: A tree that splits into two branches at the start will always split into two branches. The same applies to three-forked branches, which will always split into three branches right up to the end of the branch.
Solution: draw the branches thinner the further they go, and be aware of the rule of branching out.
The trunk that grows from the base is the thickest, and then it becomes thinner each time it branches out.
The branches that split into two become the same thickness as the branch before it split. (See the thickness of the branches compared by the blue and green lines in the illustration on the right)
You can draw a tree without strictly following the rules of branching, but it is better to avoid sudden changes such as branches splitting into five from two.
Try to keep the way the branches split as uniform as possible.
Paint the trunk brown

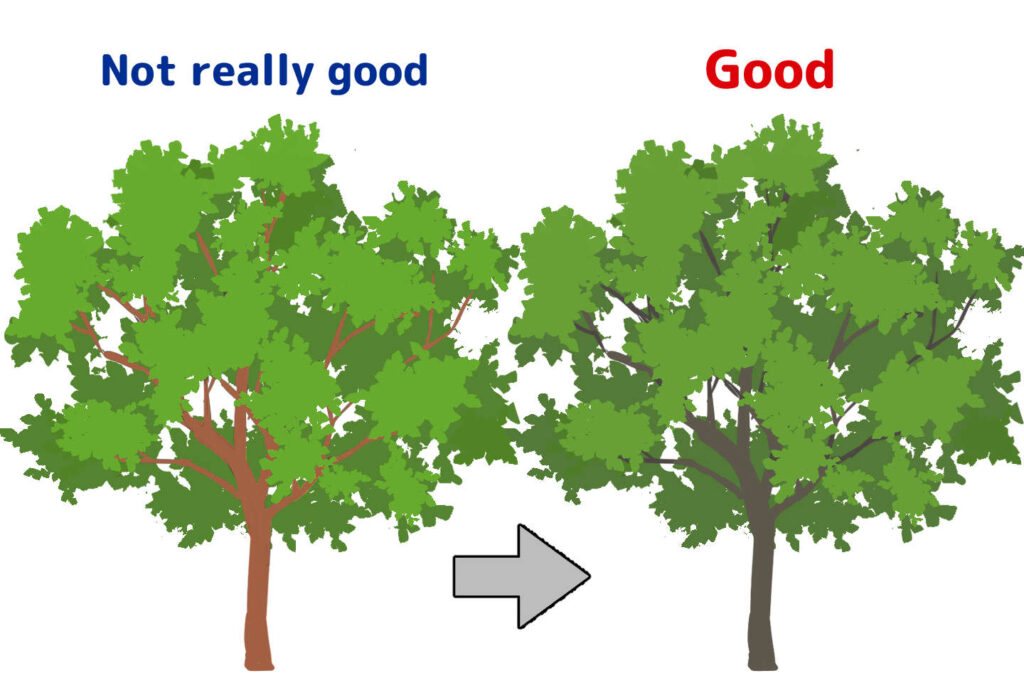
Generally speaking, when we think of wood, we tend to think of it as brown, but if you look closely, it’s actually a greenish-grey color.
Therefore, if you paint the tree in a vivid reddish-brown like the one in the left illustration, it will look somewhat fake and causing a feeling out of place.
Solution: Paint the trunk in a color with low saturation
The color of the trunk varies depending on the breed of a tree, but they all have the common characteristic of being low in saturation and not vivid.
Let’s arrange the color to match the image, such as a reddish-gray or greenish-gray based on gray color.
Let’s try using the free downloadable tree materials and brushes, too
Depicting the sharp shape of the leaves and the fine gaps between them is a difficult task that requires time and patience.
If you use materials like leaf stamps, it will be easier to depict the fine details and you can easily draw high-quality trees!
Important points taught by the instructor
As a point to note, if you just paste the material in place or use the material brush, it will look out of place when compared to the rest of the image and will stand out for the wrong reasons.
Be sure to adjust the colors and shapes so that they blend in after using the materials, or use them in parts, etc.
Being able to draw trees will expand your range of expression
Because trees are a familiar motif, if you master them, you can use them in a variety of illustrations, and you will be able to push your usual illustrations up to the next level of quality.
However, if you are practicing on your own, you may have trouble recreating the trees that match the image you want to draw, or you may be troubled by a feeling out of place and you don’t understand the cause of.
If you could find a teacher nearby who you could consult with, or someone who could teach you how to draw trees that suits your image, you could enjoy practicing drawing trees.
If you want to know and learn more, please participate in our private lessons at egaco.
Pickup Articles
Category Related Articles