This article was created by the illustrators and manga artists who teach at the illustration and manga school, egaco, based on the knowledge and skills they have honed through commercial production and other work. If you would like to learn more about content that is tailored to what you want to draw, we recommend taking a private lesson at egaco.
When drawing the human body, you may have struggled to draw the legs as you wanted, or you may have tried hard but ended in vain…we suppose there are many people who have experienced this sort of trouble and given up.
The secret to drawing legs well is to know the basic way to draw legs and the structure of them.
Along with the basic way to draw legs and their structure, we will also give you tips and hints on how to draw the legs you want.
Need to know before everything! What are the four basic points to improve skills for drawing the legs
The legs are one of the most important parts to decide the balance of the entire body when drawing a person with a high proportion of the head vs. whole body.
Also, because they have a complex shape and structure with bumps and hollows, the legs are a difficult part to understand just by looking at them. The knowledge you need to know in order to draw legs can be roughly divided into the following four categories:
- The proportion of the leg to the human body
- How to divide the parts of the legs
- The basic skeletal and muscle structure of the legs
- The range of motion of the legs’ joints
By understanding these basic structures, you can draw the ideal legs.
1: Let’s learn how to get the proportions of the legs
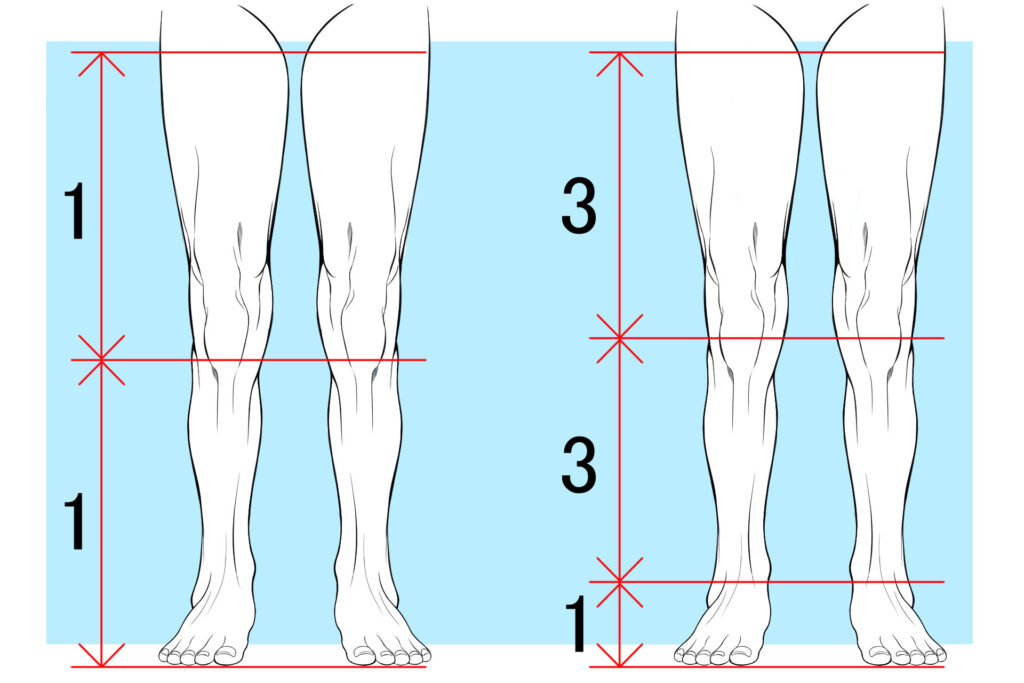
In order to draw the legs in a balanced way, let’s remember the proportions of the legs.
The lower body of the human body is made up of the thigh (from the hip joint to the knee) and the lower leg (from the knee to the ankle), and the basic proportion is 1:1.
In addition, the proportion of the entire leg, which is divided into parts such as thigh, calf, and ankle,
the balance will be better if you think of it as 3 (thigh) : 3 (calf) : 1 (foot) when considering the proportions of the seven parts of the body,
If you know the balance of the proportions of the lower body as described above, you will no longer have any problems when drawing or have any problems with balance.
2: Let’s learn how to divide the parts of the legs

When drawing legs, it can be difficult to draw the whole lower body at once.
In such cases, try dividing the leg into parts. This is recommended because it helps you understand the structure of the leg.
Let’s think about the parts of the leg by dividing them into the following two main categories.
- The thigh to knee part
- The knee to ankle part
When you divide the leg into parts from the thigh to the knee, the thigh area below the groin is the thickest, and the leg gradually becomes thinner from the thigh to the knee.
When you divide the leg into parts from the knee to the ankle, the area from the knee to the calf is slightly thicker than the knee, and the leg gradually becomes thinner from the calf to the ankle.
3: Let’s understand the structure of the legs or muscles
Even if you can only understand the proportions and perspective of the leg, you can draw legs that look natural.
However, if you can understand the basic framework and important muscles of the legs, you can draw a more convincing ones.
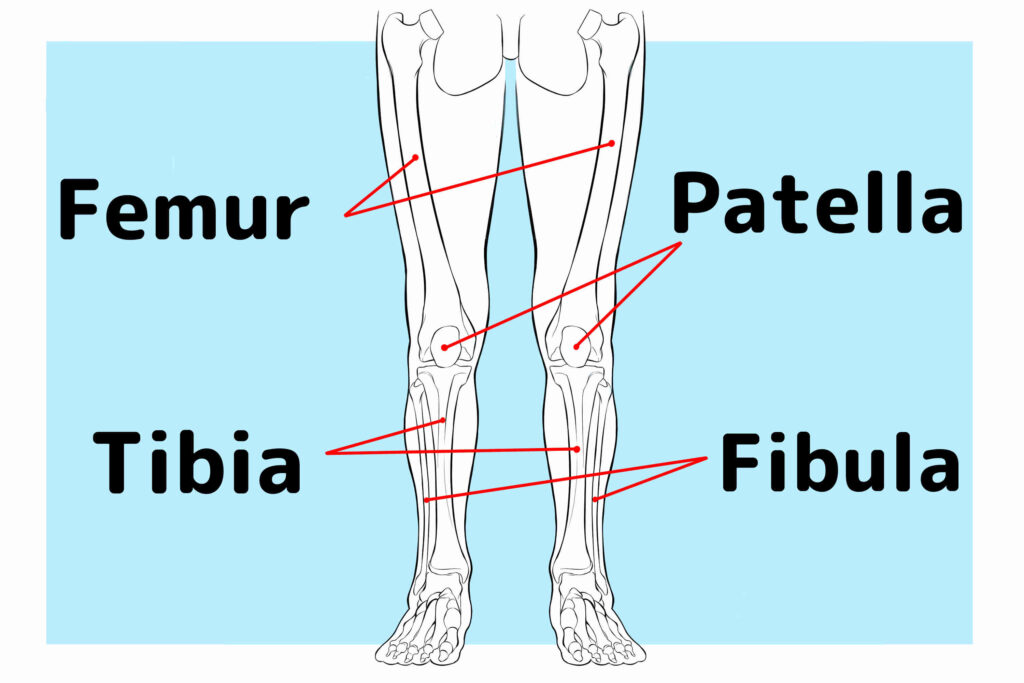
The four skeletal structures of the legs that you should know
The four main skeletal structures that you should know when drawing legs can be broadly divided into four categories.
1.Daitaikotsu…Femur
2. Shigaikotsu…Patella
3. Keikotsu…Tibia
4. Hikotsu…Fibula
The femur grows from the hip joint to the patella on the inside of the body.
Therefore, the shape of the foot when looking from the front is not vertical, but slightly curved inwards towards the knee.
When looking from the side, the femur grows in a shape close to vertical towards the patella.
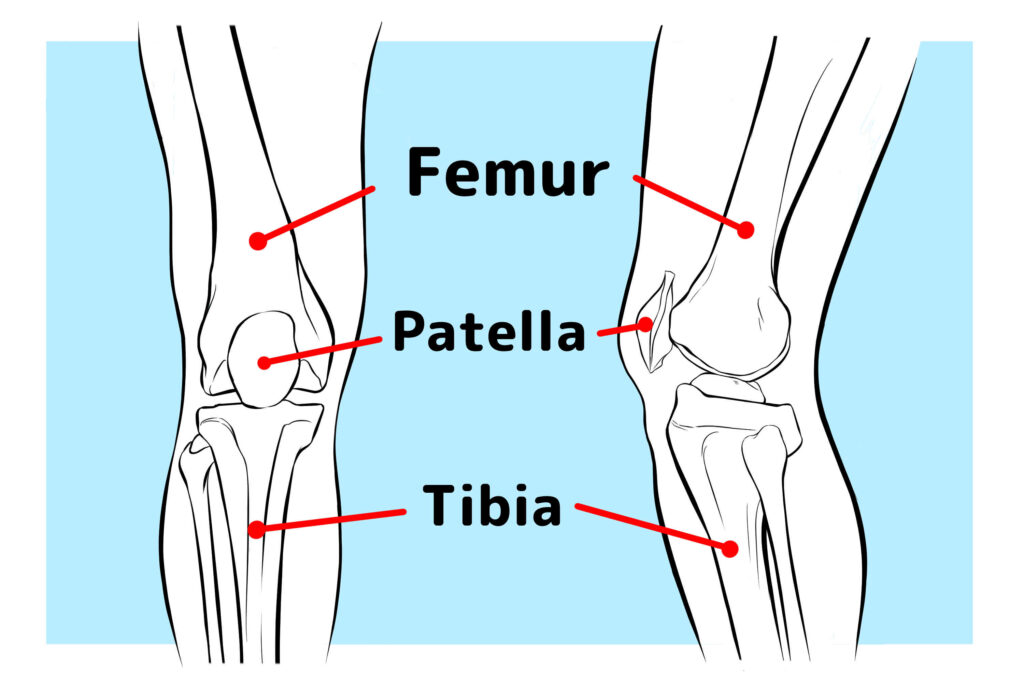
The femur, patella and tibia are connected to the knee, and the shape of these bones also affects the silhouette around the knee.
When standing or bending the knee, the three bones have an effect on the silhouette, creating a concave and convex shape as shown in the illustration.
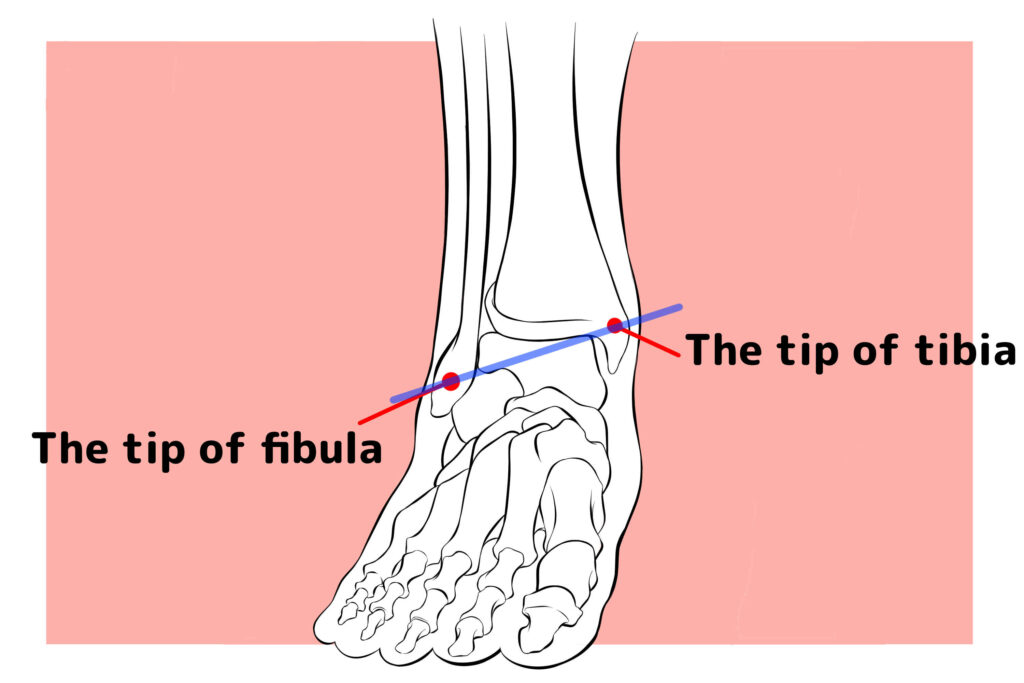
Remember that the ankle joint is higher at the inner ankle, which is the tip of the inner tibia, and the outer ankle is lower than the inner ankle, which is the tip of the outer fibula.
Let’s learn about the muscles of the foot
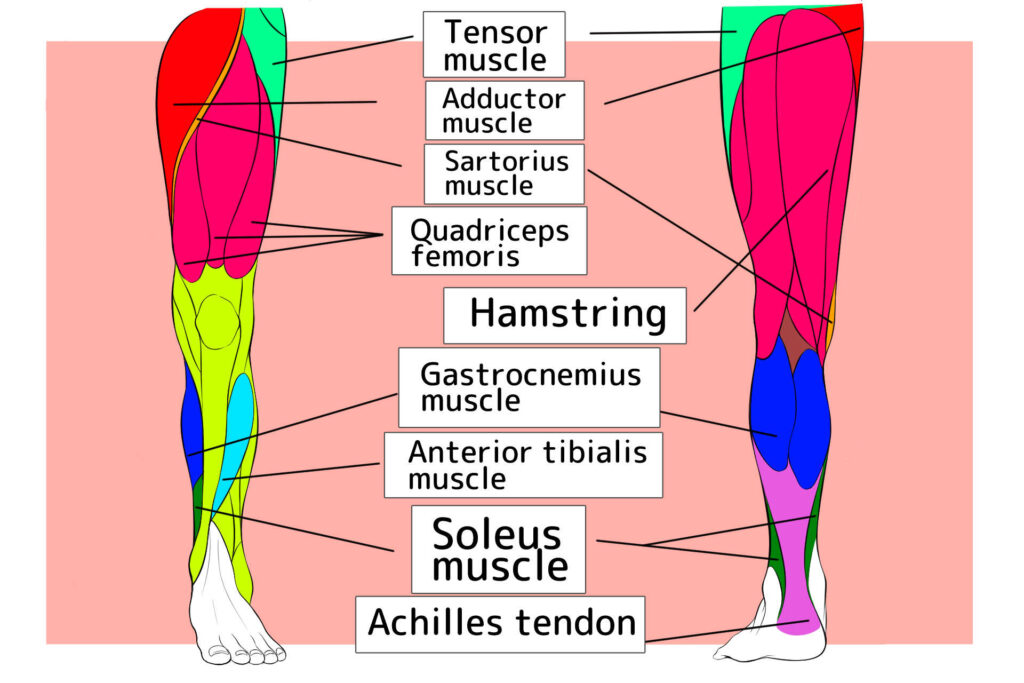
There are many muscles in the legs, but the main parts that form the silhouette of the legs are as shown in the above illustration.
The thigh muscles looked from the front are the gluteal muscles, adductor muscles, quadriceps muscles and sartorius muscles.
The calf is made up of two muscles: the gastrocnemius and the anterior tibialis muscle.
The gastrocnemius is the muscle that forms the large silhouette of the lower leg, so draw it large being conscious of the fullness.
On the back, be conscious of the silhouette of, from the top, the gluteal muscles, adductor muscles, hamstrings (the muscles on the back of the thigh), gastrocnemius (calf muscles), soleus muscles and Achilles tendons.

As shown in the illustration, the overall flow of the muscles forms an inverted Japanese figure eight shape in the thighs. If you are aware of this figure eight silhouette from the knees down, you can draw convincing legs.
Let’s find out the range of motion of the legs
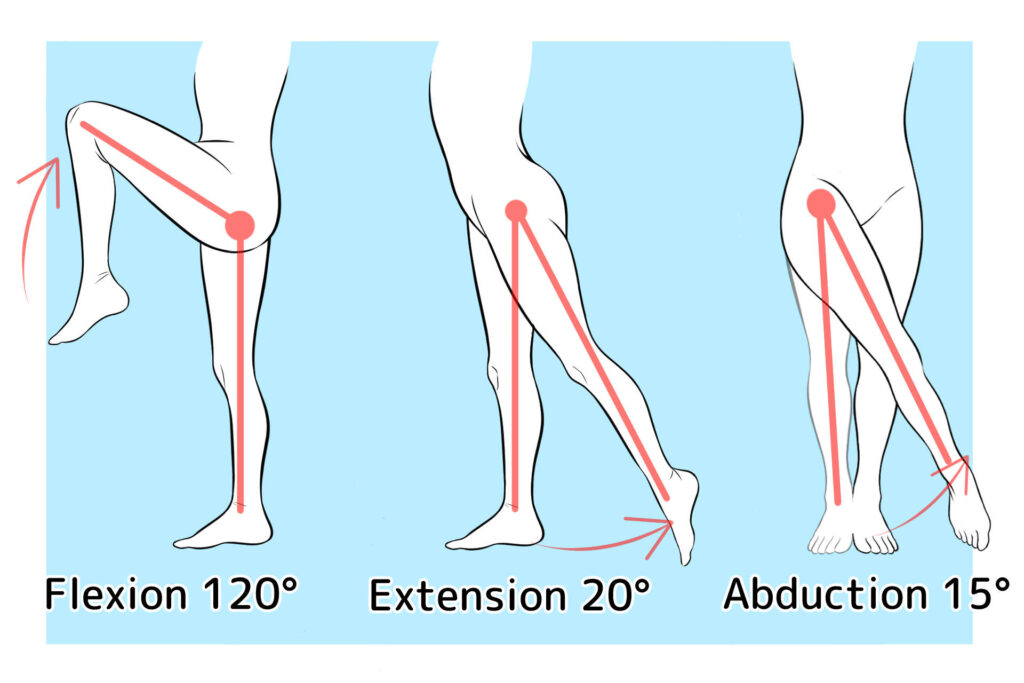
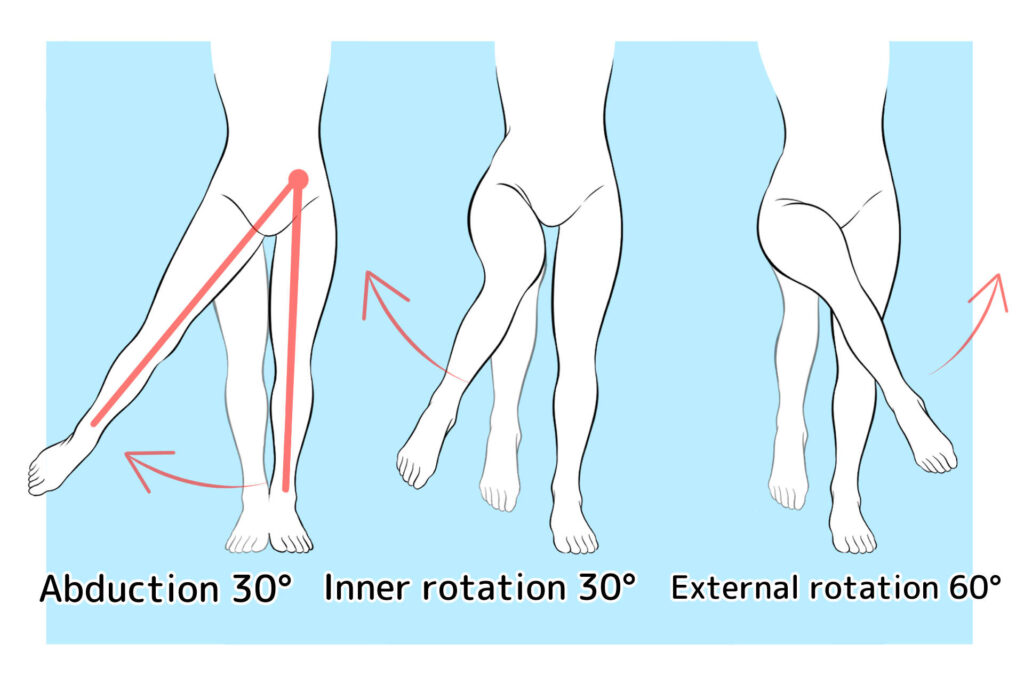

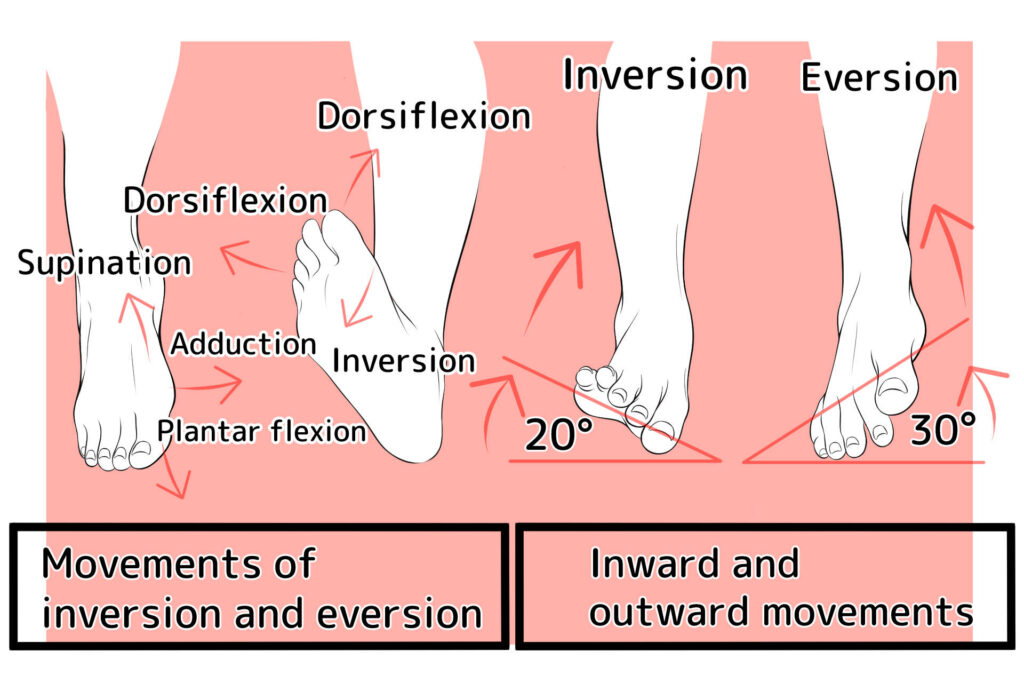
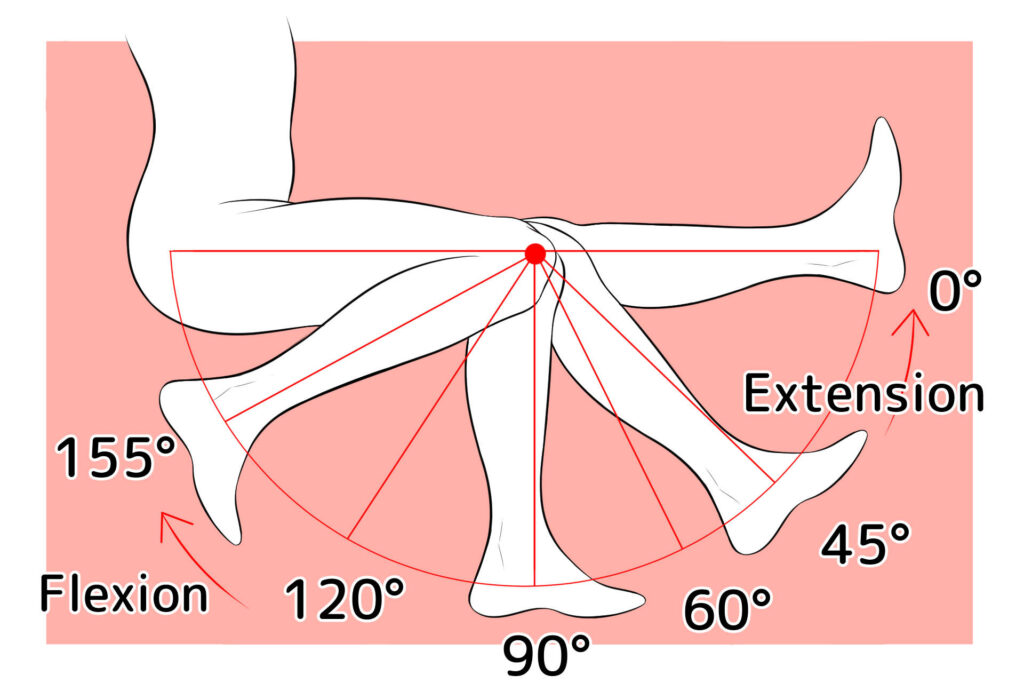
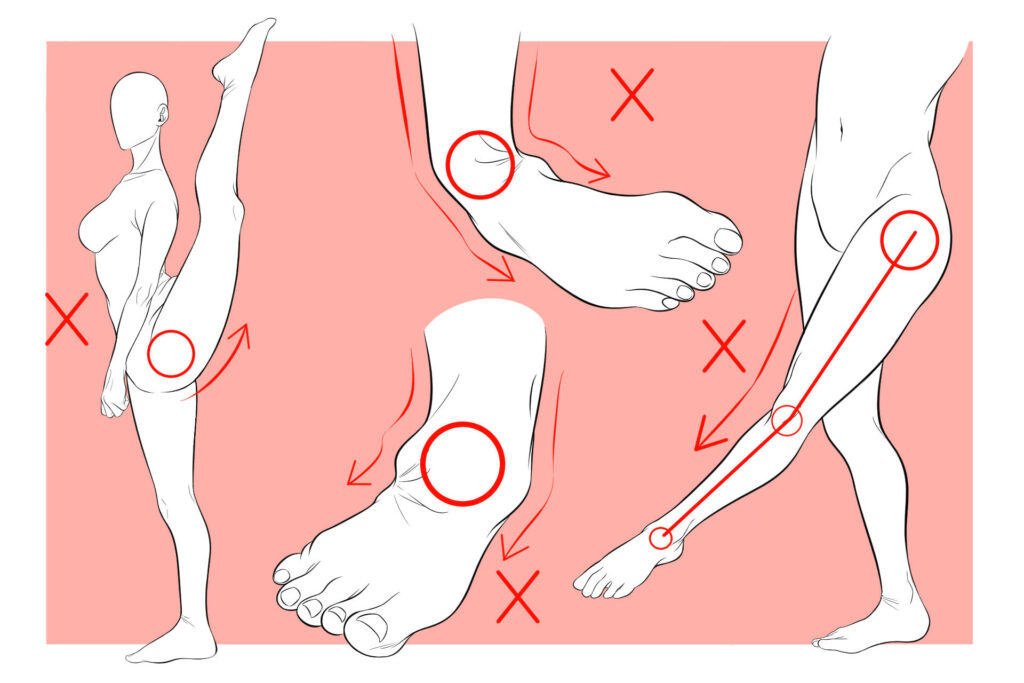
The range of motion of the joints in the hip, knee and ankle of the foot is as shown in the illustration, and although there are individual differences, it is more or less fixed.
If you draw legs ignoring the range of motion and angle of these joints, the leg will look strange, with the joints disconnected or broken.
If you know the range of motion and angle of the joints, you can capture the movement of the legs and draw them that look natural.
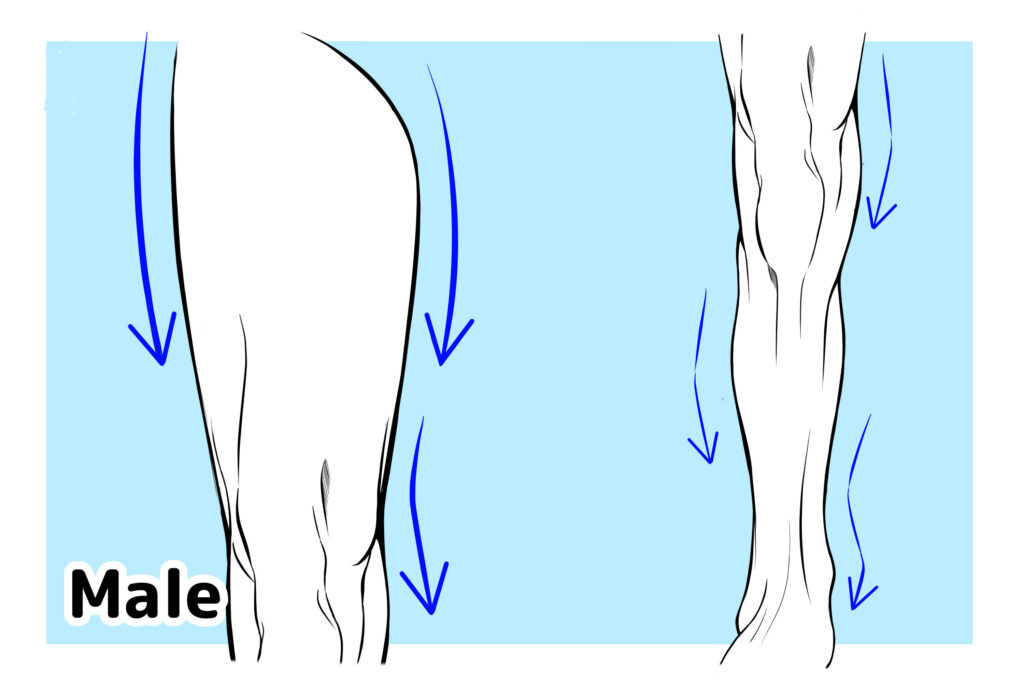
1: Let’s learn how to draw legs for men and women, and the differences between them
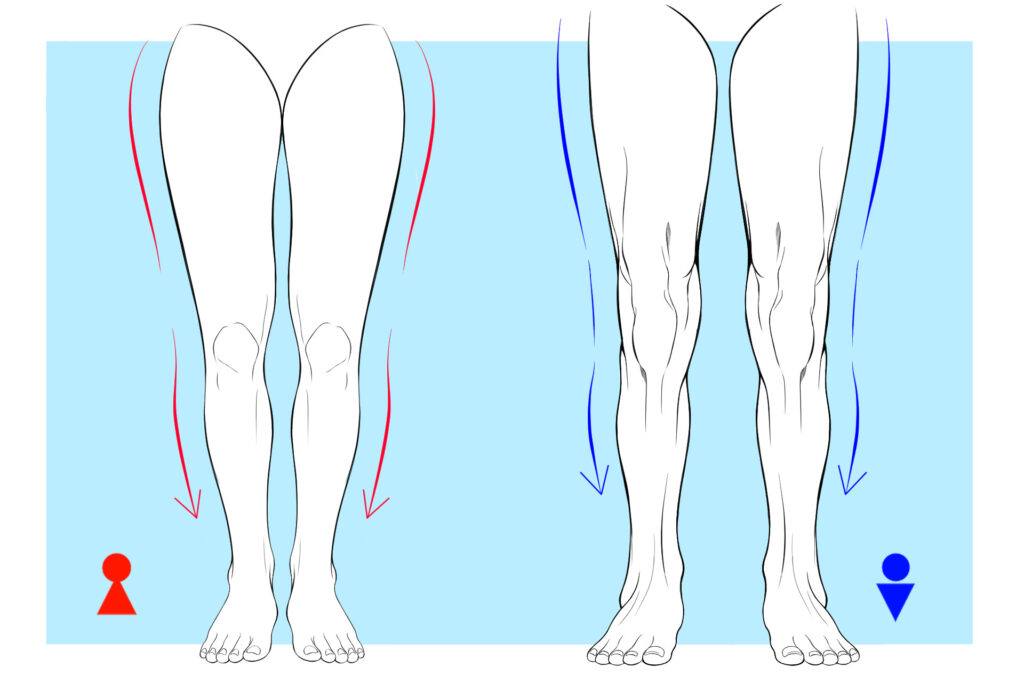
Women’s legs have more fat on them than men’s, so you can express their femininity by drawing round curves without over-drawing the muscles.
Draw the curves of the outside silhouette of the hips, the fullness of the thighs, and putting an emphasis on narrow parts of the knees and ankles.
Men’s legs have more developed thighs and calves than women’s.
By drawing in the muscles well, you can express a more masculine-looking leg, so be aware of the ups and downs of the fullness of muscles in the linear silhouette.
The silhouette of the outside of the hips is gentle, and it becomes thicker from the hips to the thighs, and gradually tapers down to the knees.
Be careful not to overdo the bulges and tapers compared to women.
2:Let’s learn how to draw the legs by age, toshin and body shape
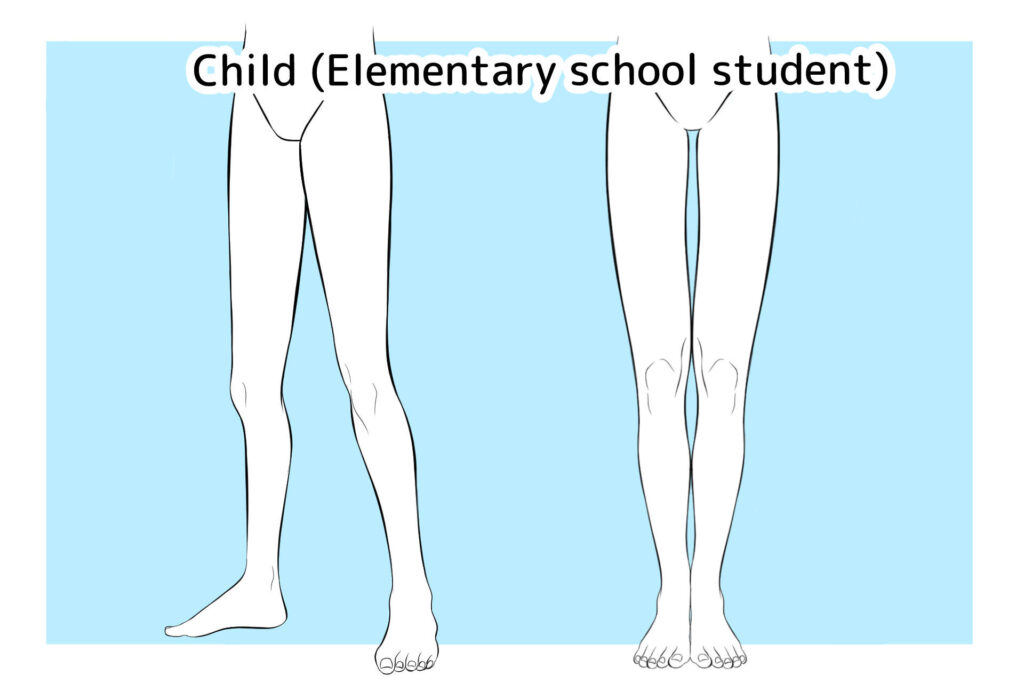
Boys and girls from junior high school age and up are drawn differently according to their physical build.
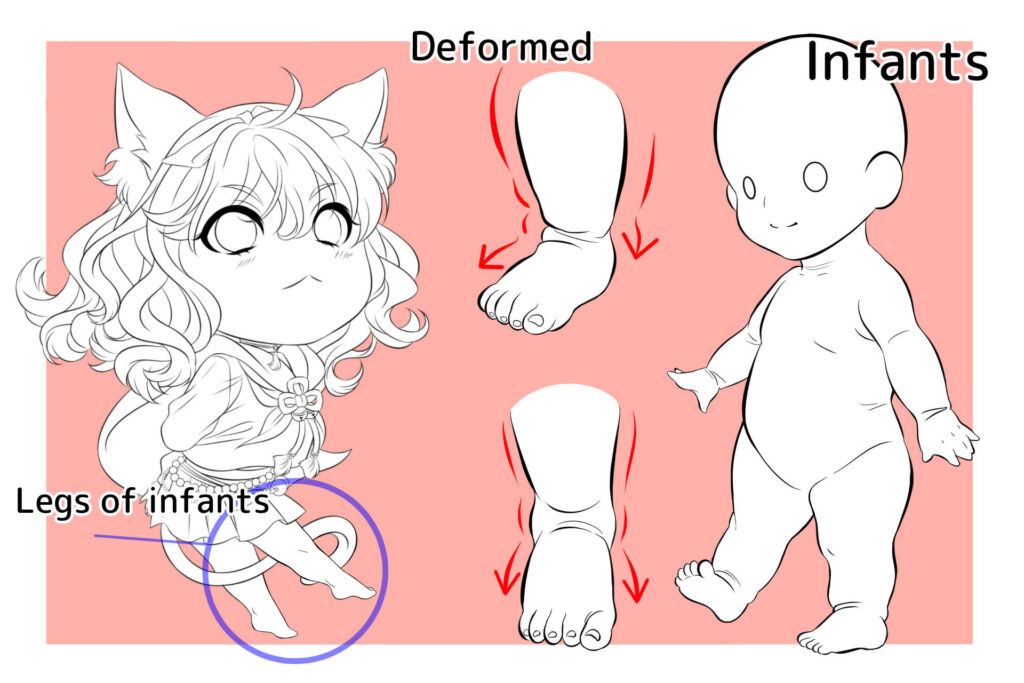
Children are still in the process of growing up to become adults, so there is little difference between boys and girls, but even though they are children, there is a big difference in appearance between infants and elementary school students
.
Infants have little bone prominence because their bodies and leg skeletons are still immature.
Their bodies are generally round, and there are wrinkles and dents in the joint areas.
When they reach around elementary school age, their skeletal structure and muscles have developed more than in infancy, and the bumps and hollows in the foot silhouette become more noticeable.
There is no clear difference between boys and girls until elementary school age, so draw the legs
as if they were somewhere between the two genders.
When drawing the feet with a deformed head, be careful not to draw the bumps and hollows in the skeletal structure and muscles in detail for both boys and girls.
If you draw too much, the deformed feeling will disappear and the face and body will look the other way around.
When drawing mini-characters, be aware of how to draw the legs of infants, which are round and feature no bumps or hollows.
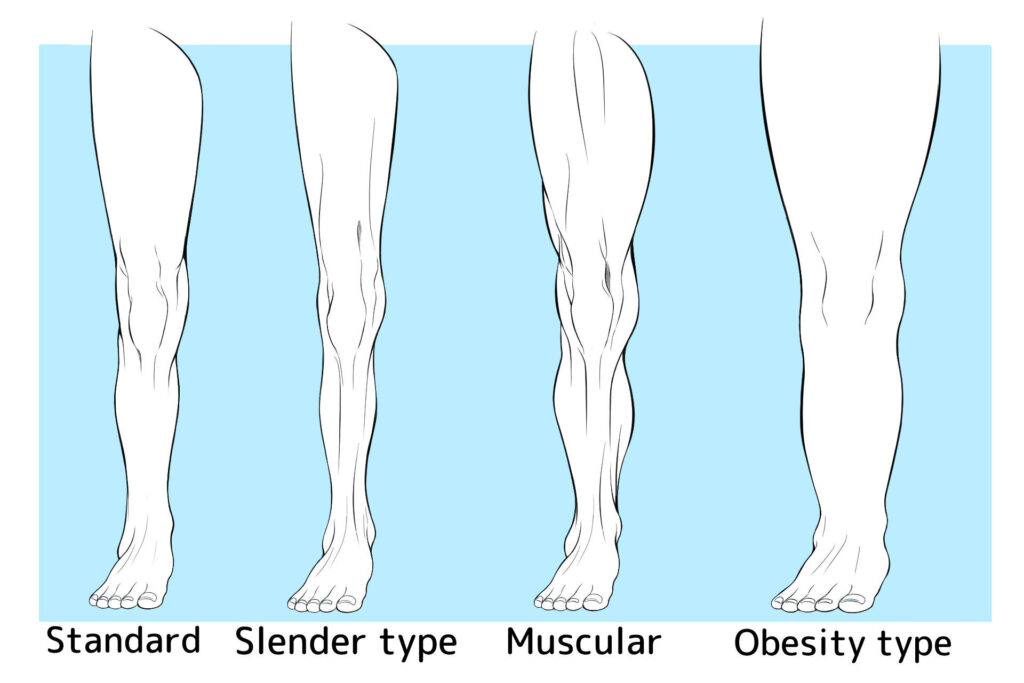
When drawing the legs of each body type, make sure to draw them in a way that shows the characteristics of each body type.
If the legs are thin, there is not much fat or muscle whether male or female, so draw them emphasizing the unevenness of the skeleton.
If the legs are fat, on the contrary to thin legs, there is a lot of fat whether male or female, so draw them with a large, rounded silhouette, etc., making sure to capture the characteristics.
3: Let’s draw the legs in different poses!
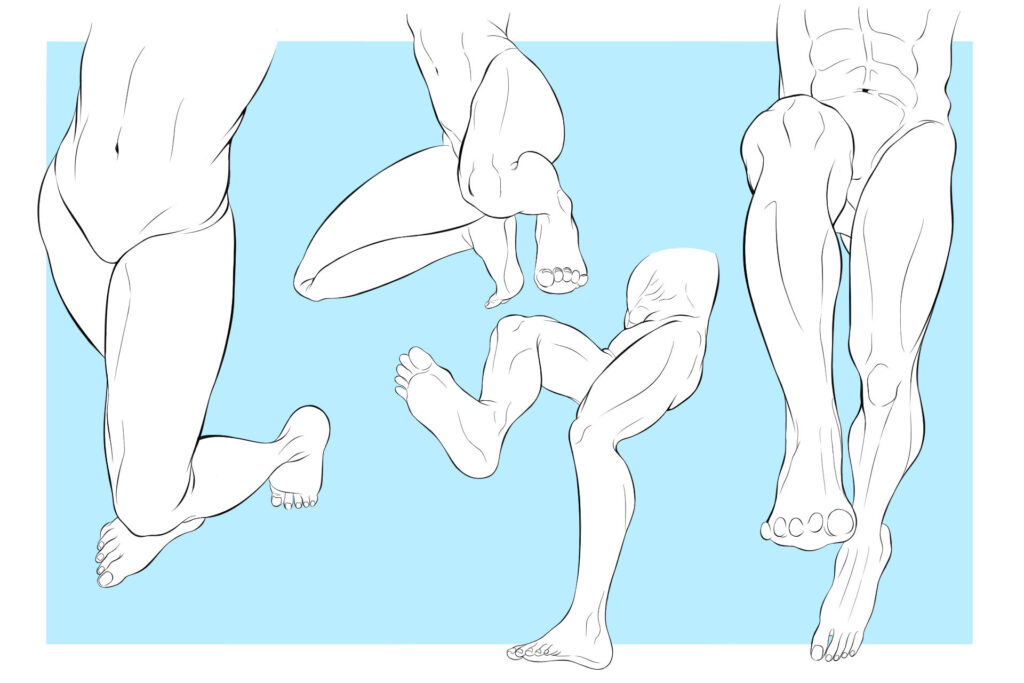
When you actually pose the legs, parts of the legs may not be visible, or they may look shorter or longer depending on the angle, giving them a three-dimensional feel and depth
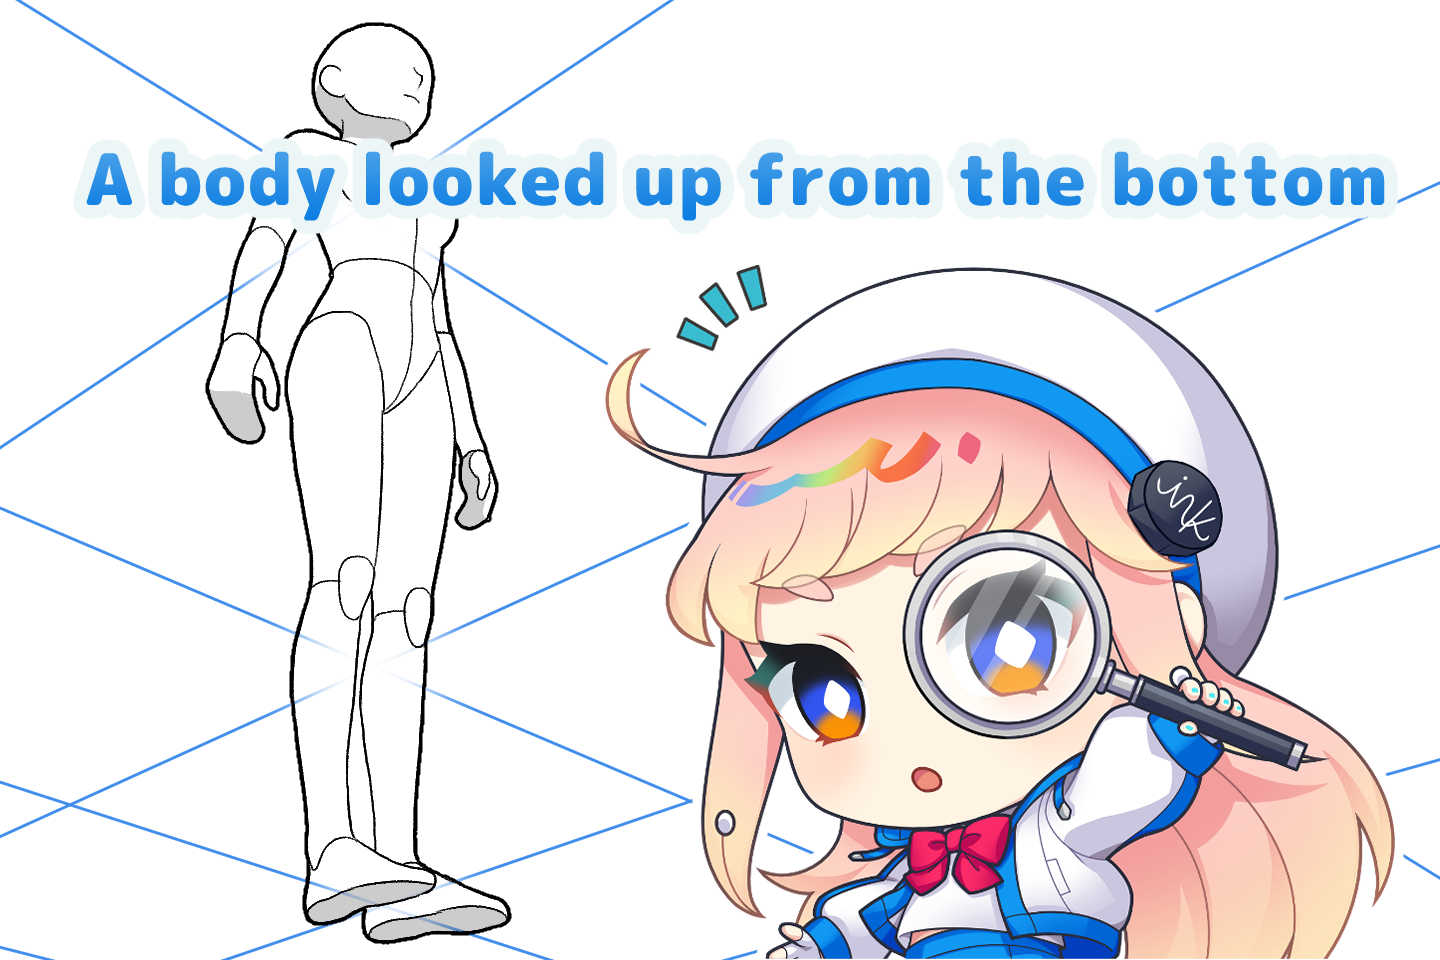
Let’s draw the legs being aware of the 3-dimentionality or depth when looking in bird’s-eye-view (fukan) or looking up from the bottom (aori).
Please refer to the article here regarding bird’s-eye-view (fukan) or aori, looking up from the bottom.
Let’s draw the ideal legs! by learning the leg’s structure and how to draw them
At first, it’s quite difficult to draw the legs. By reading this article, you can learn the basic structure of the legs and get the tips for how to draw them.
Using the knowledge you’ve gained, please practice drawing a lot of legs.
You can practice drawing legs on your own, but at first you may find it difficult to draw them as you want, and you may wonder what you should do to solve the problem.
Pickup Articles

Category Related Articles