This article was created by the illustrators and manga artists who teach at the illustration and manga school, egaco, based on the knowledge and skills they have honed through commercial production and other work. If you would like to learn more about content that is tailored to what you want to draw, we recommend taking a private lesson at egaco.
Have you ever wanted to try drawing an illustration of long hair that sways in the wind?
However, when you actually try drawing it, you may find that you can’t do it well because “it looks somewhat stiff” or “you can’t see the flow of the hair at all!”
The key to drawing beautiful long hair is to be conscious of the gaps between the tufts of hair and the overall silhouette.
In this article, we will explain the basic drawing method as well as examples of common mistakes and how to improve them.
Read this article and learn how to draw long hair just the way you want!
Understanding the basic structure of long hair is the first step towards improvement
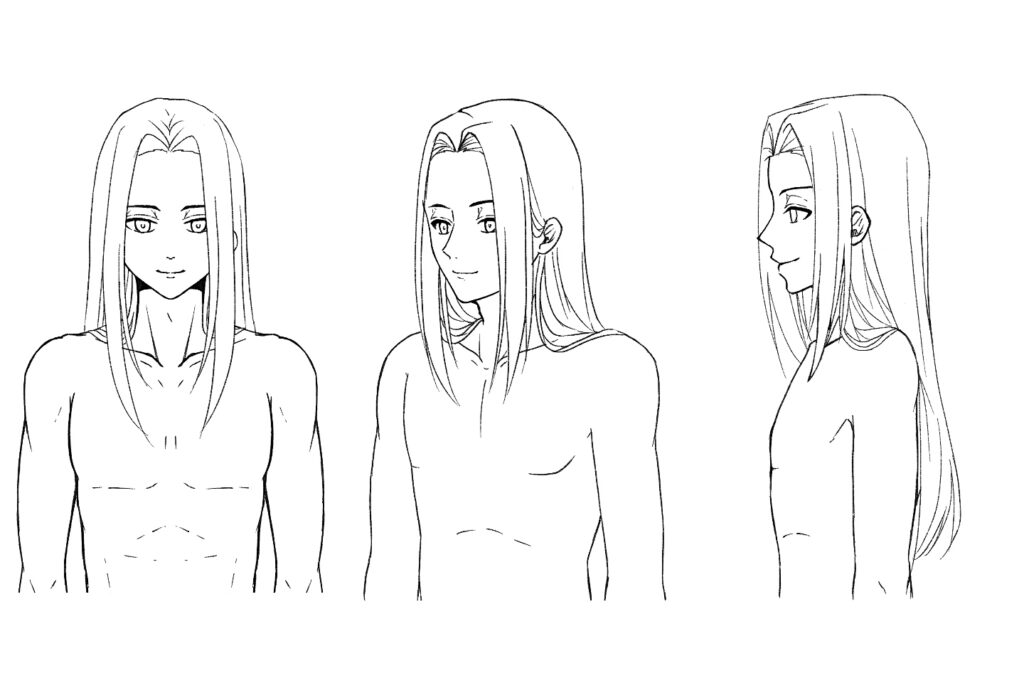
Let’s understand the characteristics of the bangs, side hair and back hair
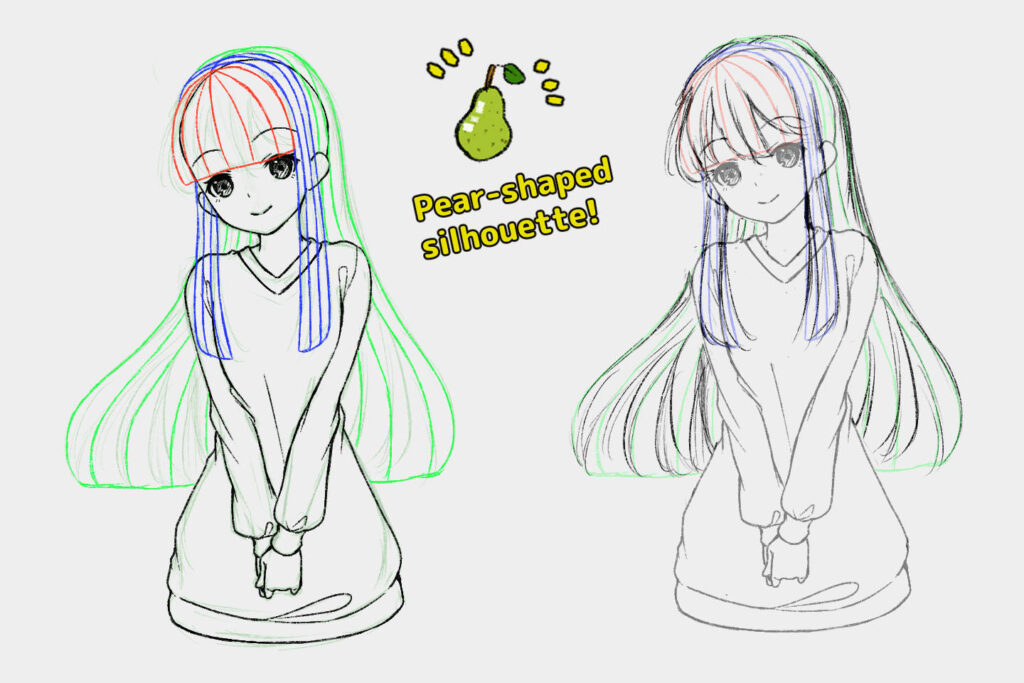
First of all, let’s divide long hair into three parts, bangs, side hair and back hair.

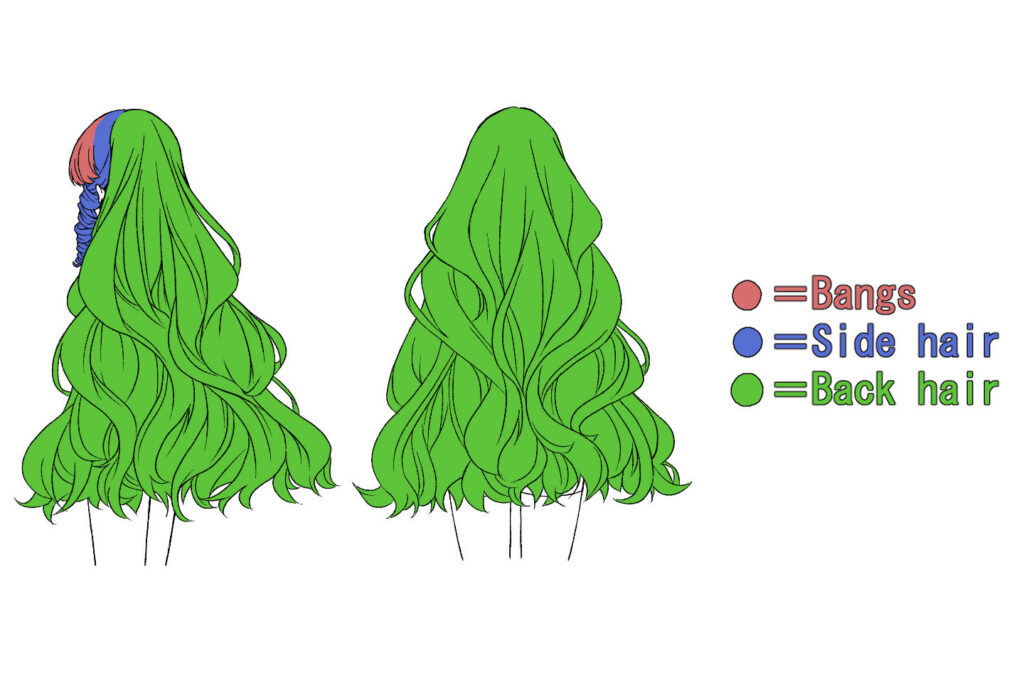
Bangs
The hair at the forehead is the bangs. If you divide the hair in the middle, it may be combined with the side hair.
The side hair
The hair at the side is the side hair, which is the area between the outer corner of the eye and the ear. This part (side hair) is often used to create the image of a character’s face.
Even in the situation like a character who usually let the hair down ties up her/his hair, if you don’t leave the side hair down, it will look like a completely different character.
The back hair
The part from the ears to the back is the back hair. This is the part that gives the character its overall silhouette.
Even if the angle of the face changes, by drawing the silhouette as a most important factor, you can give the impression that the character is the same whichever the angle the character is seen from.
With long hair, the hair just behind the ears often extends slightly over the shoulders in not a few drawings.
What is the difference between drawing long hair and short hair?
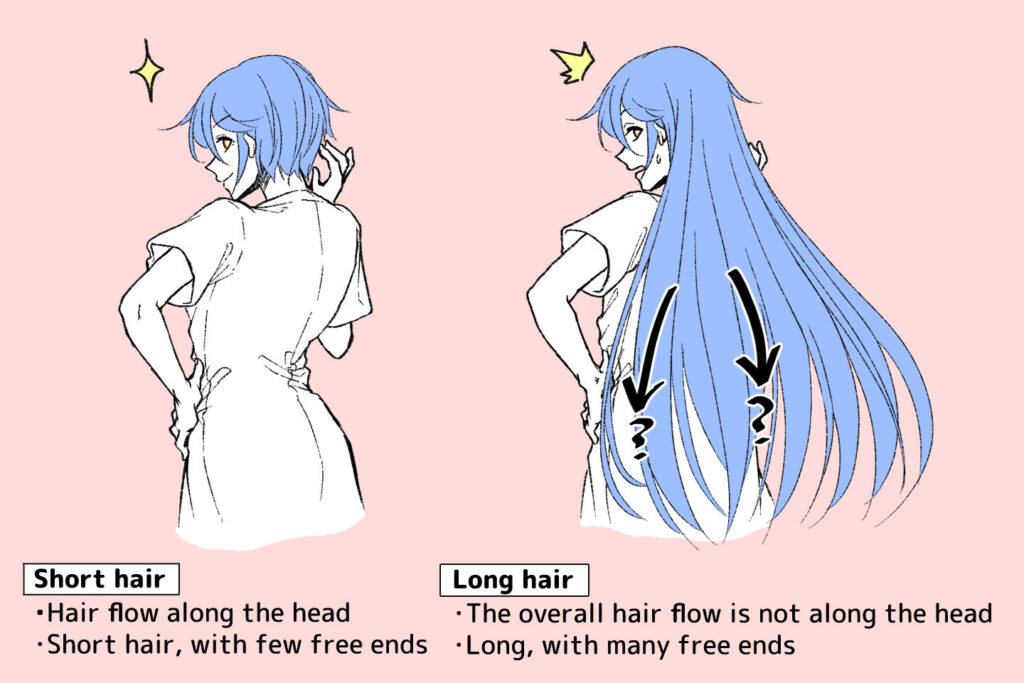
The feature of long hair is that it is easy to create hair with a high degree of freedom because it is longer.
In the case of short hair, draw the flow of the hair so that it follows the shape of the head, and then tidy up the ends of the hair.
However, with long hair, you need to add a see-through effect as well as the overall silhouette and flow of the hair.
Because the hair is long and the individual strands move freely, if you just draw the ends of the hair in a jagged way as you do with short hair, it will give a very heavy impression.
A basic guide to drawing a long hair
Let’s draw the hair silhouette
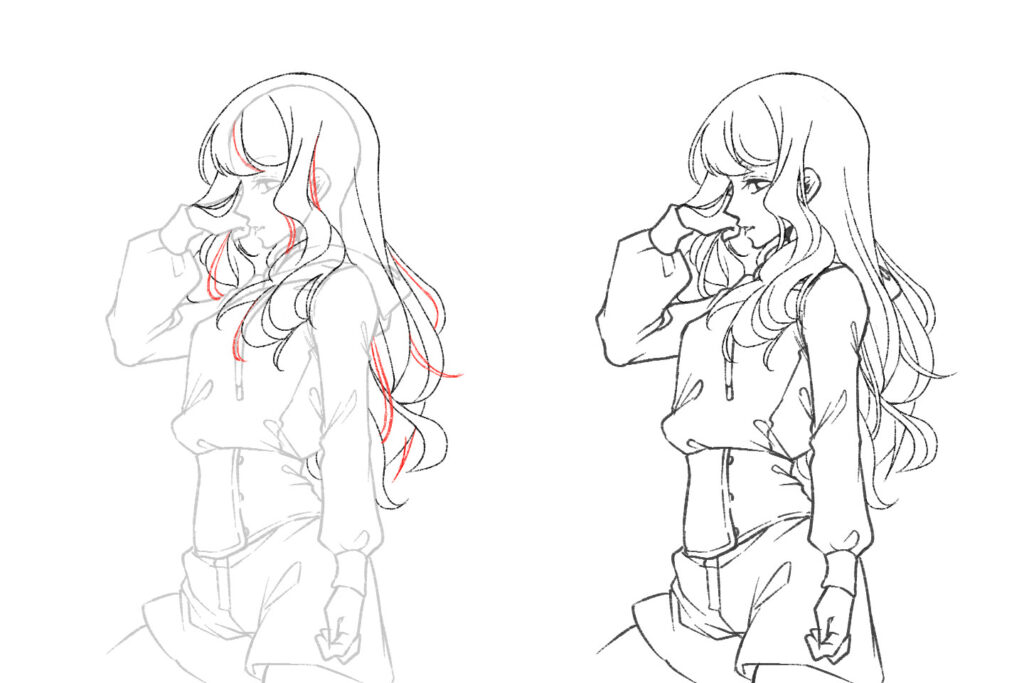
After dividing the hair into sections, create a rough sketch of the hair and add a flow of hair a little bit while imagining it as a fountain.
Increase the number of hair strands to create spaces
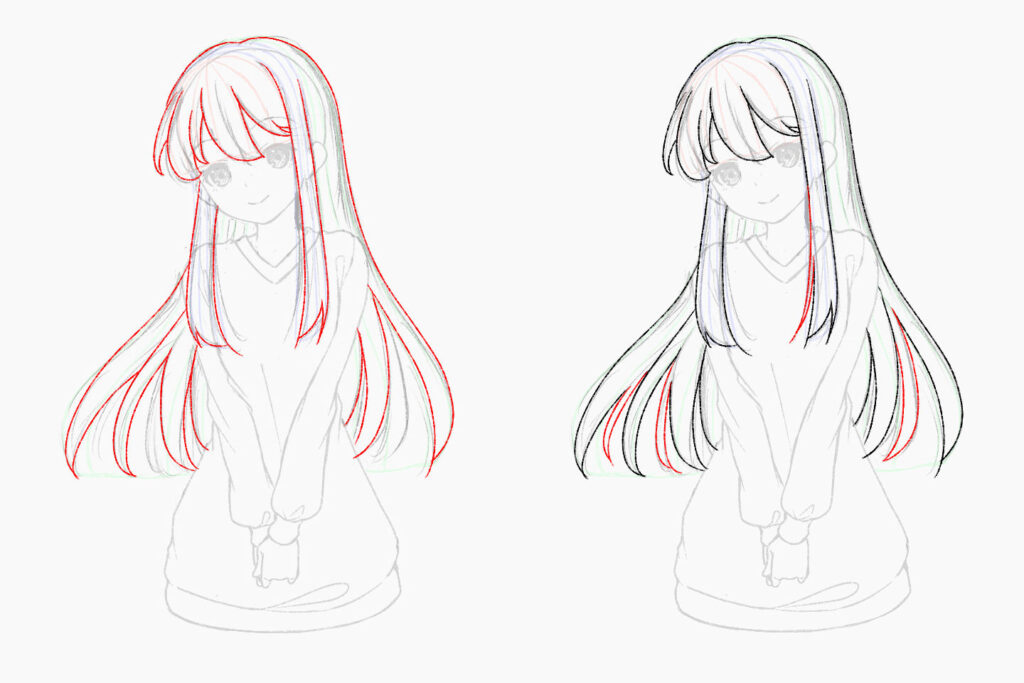
Increase the number of hair strands along the silhouette.
First, create a thick hair strand as shown in the illustration on the left.
Next, draw thin or medium-thick hair strands that branch out from that hair strand.
Finally, draw thin or medium-thick hair strands in the empty spaces.
Let’s draw short and fine hair so that the space between the hair becomes irregular.

Finally, draw the straggling short and fine hair.
The key to drawing the straggling short and fine hair is to not distort the silhouette too much.
Keep in mind that you should be drawing the hair in the image of cutting the even spaces in the hair bundles obliquely.
Also, try to make the direction of the hair ends the same as much as possible to create a sense of clumping.
Add a few loose hairs to each part and draw the flow of the hair, and you’re done!
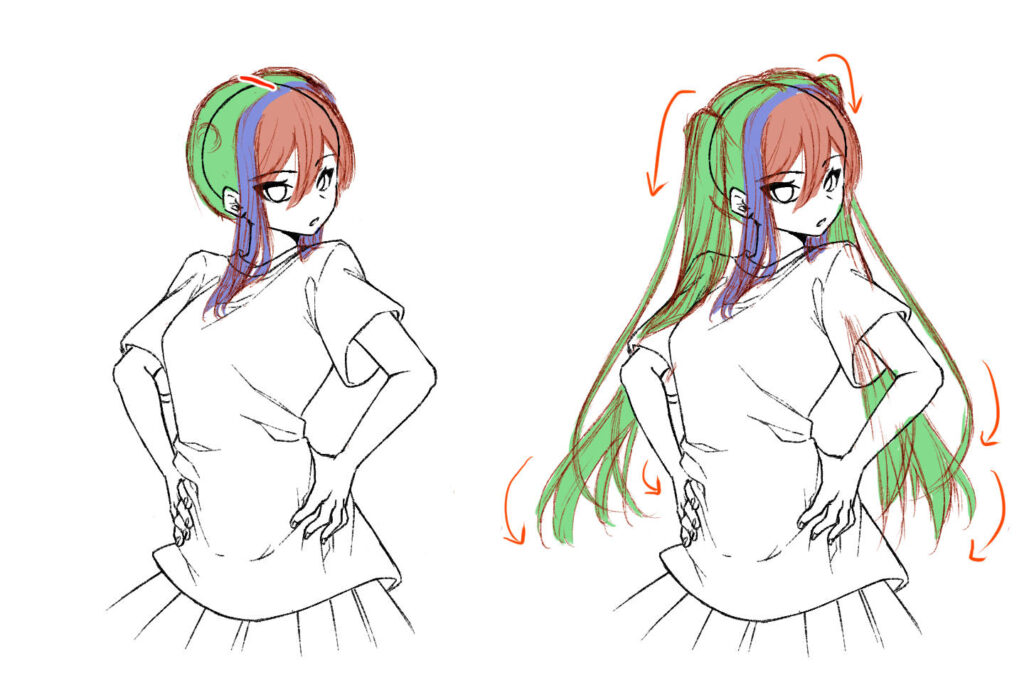
Advanced version: how to draw long hair that sways in the wind
How to draw wavy long hair
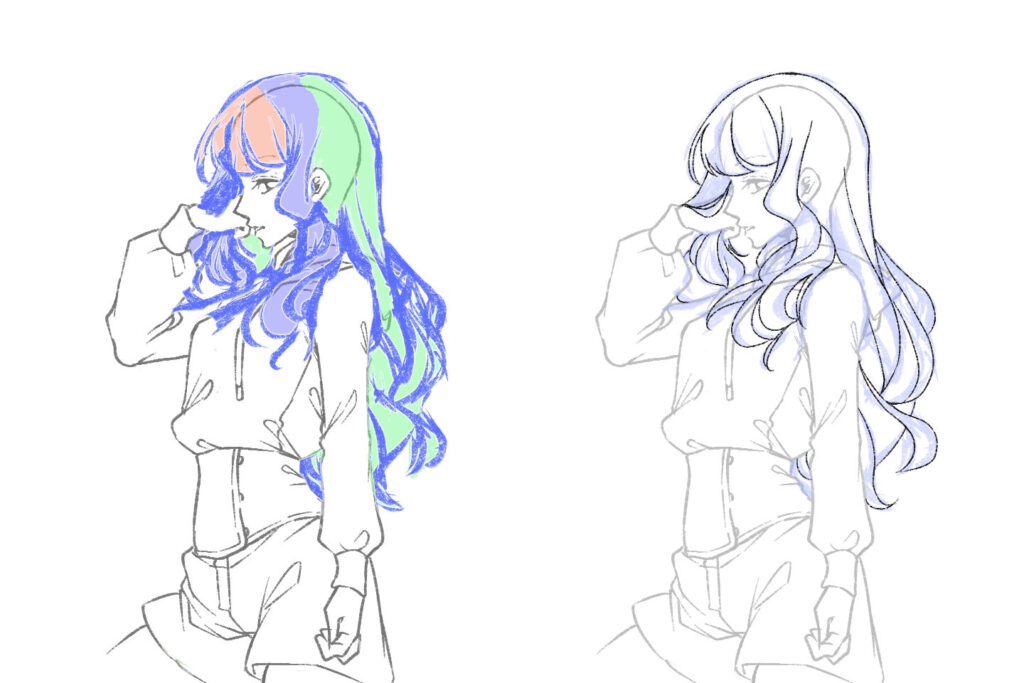
How to divide into parts is the same as the basic method described above.
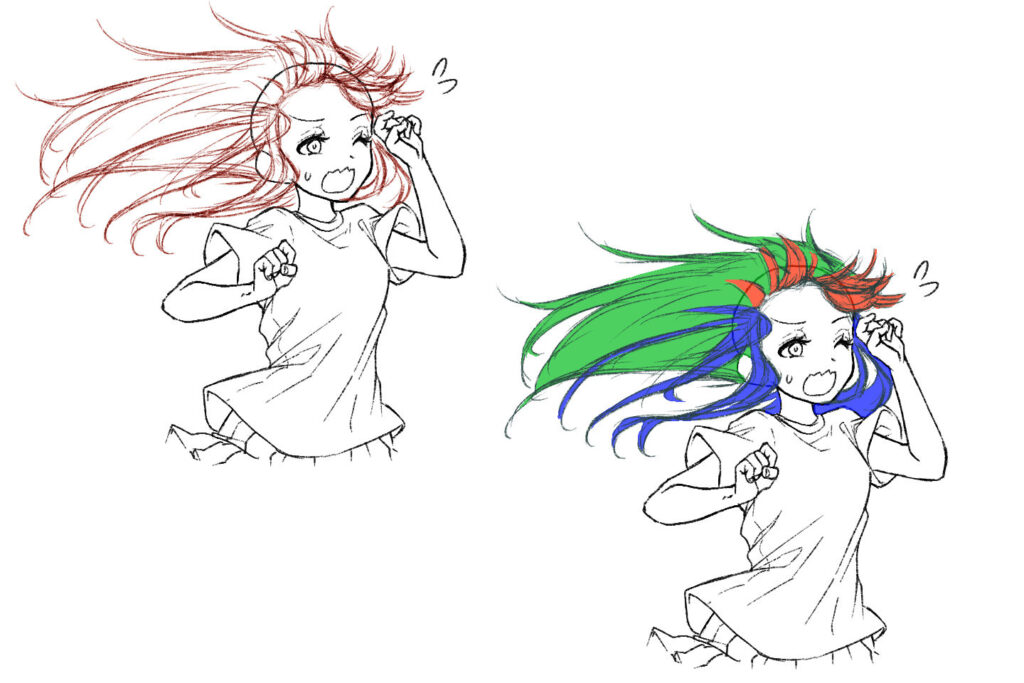
First, draw the overall outline and the general flow in the rough draft.
Cross every single line of the thick silhouette you have drawn while being aware of those as a large bundle of hair as well as paying attention to the front and back.
Important points taught by the instructor
It is a good idea to make the lines of the rough draft of the hair thicker than usual. If you use thin lines, you can draw details as much as you want resulting in too much particulars, so it is better to make the silhouette first using thick lines for a better appearance.
Once you’ve completed a thick bundle of hair, draw smaller bundles that branch out from it.
Finally, add the straggling, short and fine hair and strands of hair to complete the illustration.
How to draw long, waiving hair
Here too, be aware of the bangs, side hair and back hair.
However, when dividing the hair, what you should be aware of is not the flow of the hair, but where the hair grows.
Imagine how the hair moves from the hairline of each part, and draw it.
First, draw a large silhouette and decide how the hair will flow.
Next, turn the silhouette into fine strands of hair.
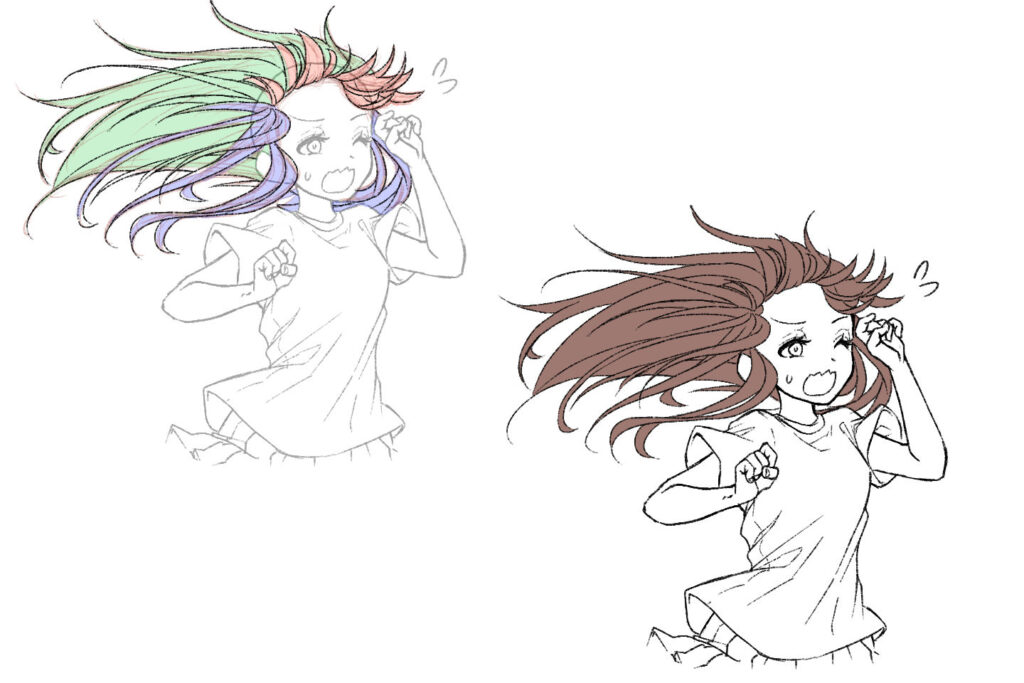
At this point, be sure to draw the hair so that there are gaps between the strands.
Add a few more straggling, short and fine hairs at random, and you’re done!
Important points taught by the instructor
Draw straggling, short and fine hair imaging something that complicates the silhouette
Draw straggling, short and fine hair this time imaging something that complicates the silhouette. If the silhouette is not broken at all, it will look strange as if the hair that should be blowing in the wind is stuck in place.
It is very difficult to draw hair that is blowing in the wind, so please try practicing by copying the work of your favorite illustrator or manga artist.
When practicing copying someone else’s work, don’t focus on a strand of hair, but choose the one if you like the the overall silhouette of the hair.
Tips for drawing long hair
Let the hair spread towards the ends.
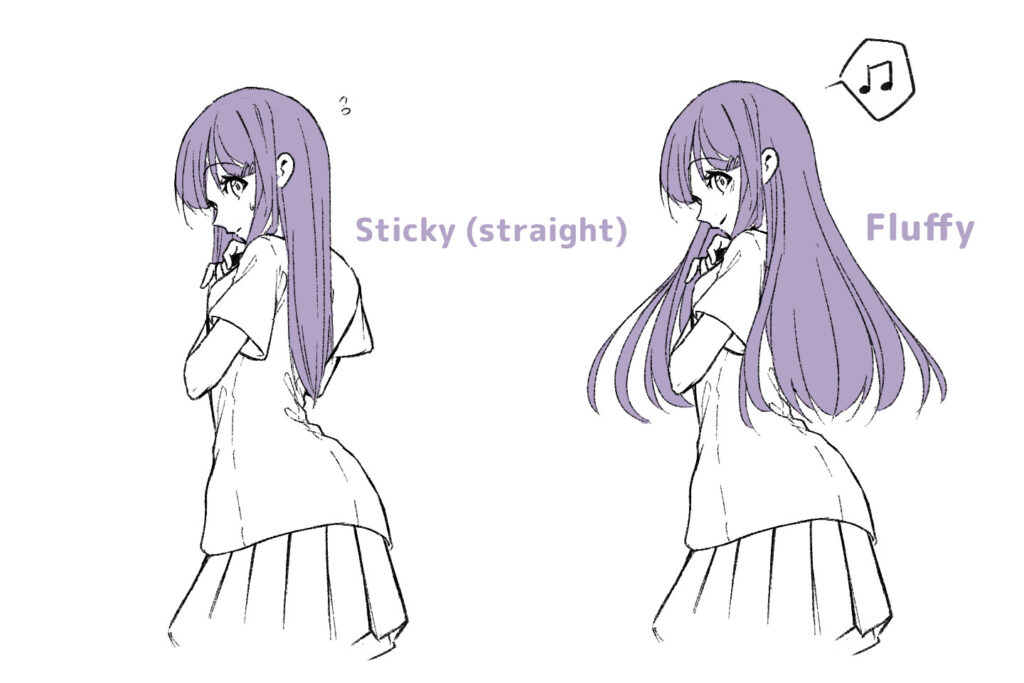
It is easier to make it look beautiful if you make the hair spread out more towards the ends than around the head.
In real life, the hair becomes sparser and the hair bundles smaller as you get to the ends of the hair.
However, if you draw it like that, the overall silhouette will be too quiet, so make the silhouette of the hair ends slightly larger than the head to give it more movement.
The key is to make the silhouette look bigger, and to depict the hair as soft-looking by creating spaces between the hair bundles.
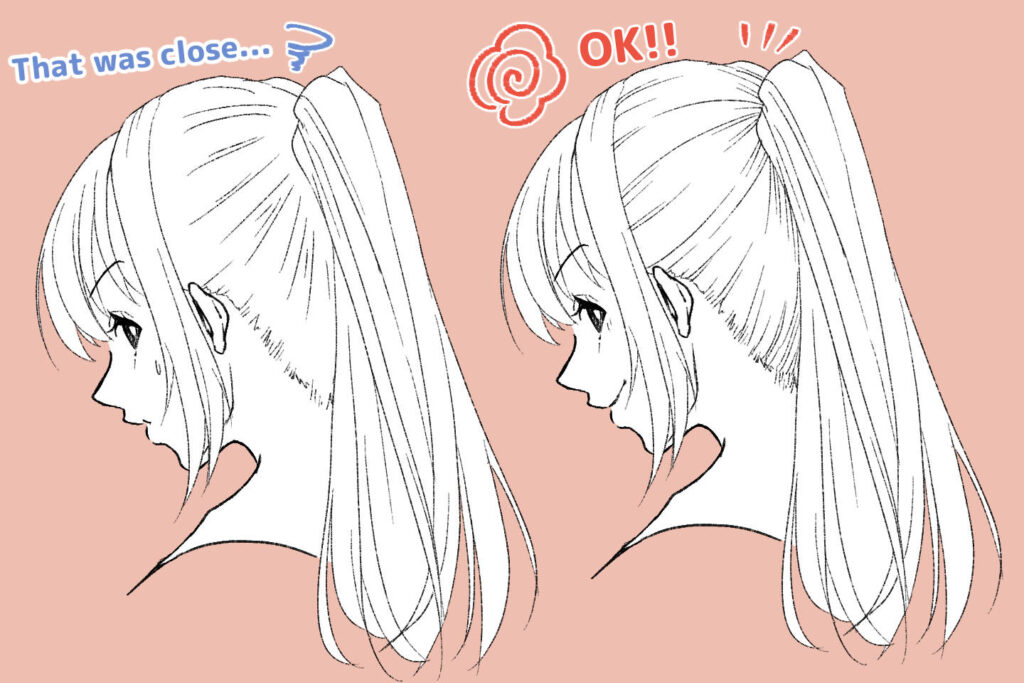
Tips for drawing long hair that is tied up
Be careful when depicting the head where the hair is gathered in a knot.
When drawing hair that is tied up, pay attention to the way the hair is gathered at the knot.
For example, when drawing twin tails, first decide on the bangs, side hair and a parting in the back hair.
Next, decide on the knot and draw the hair bundle from there. When drawing twin tails, it looks cute if you draw them so that they rise up slightly above the knot.
Important points taught by the instructor
The ends of the hair should be curled slightly inwards
Also, if you curl the ends of the hair slightly inwards, you can create a beautiful silhouette, so why not practice curling the hair inwards first?
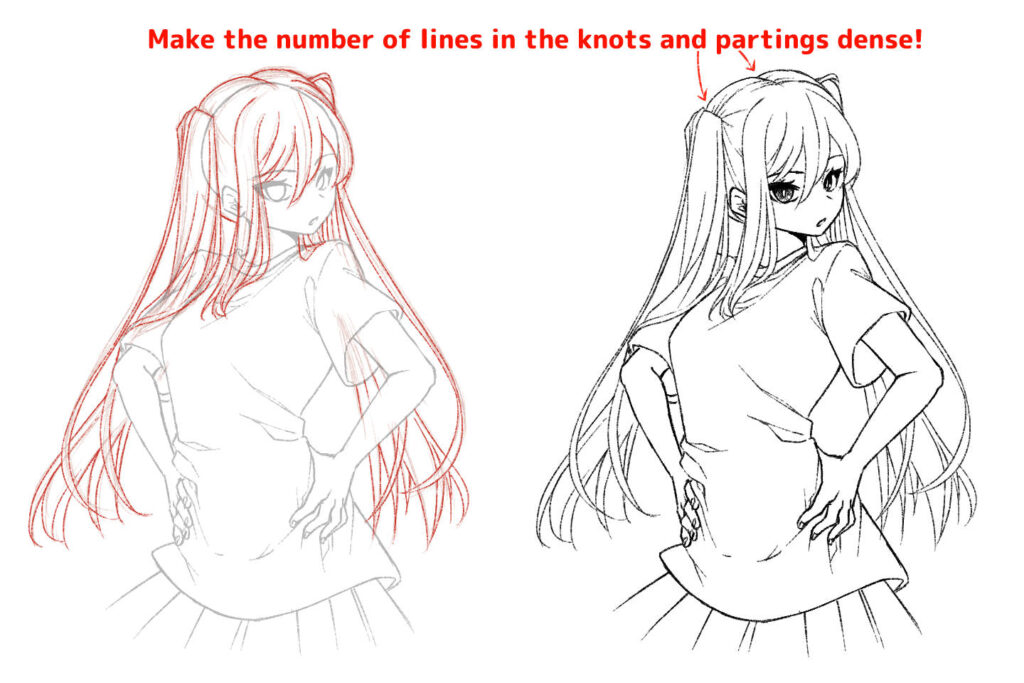
Make the number of lines in the knots and partings dense!
Finally, draw the flow of the hair tied up in the head.
At this time, to express the flow of the hair, draw lines that connect to the knots and partings of the hair.
One common mistake that beginners make is to draw a head with hair tied up in a knot using only lines that don’t connect to anywhere.
It’s hard to tell where the lines of the hair flow from, so draw the lines firmly so that they connect to the knot or parting.
Common mistakes with long hair and how to fix them
Drawing hair using only one thin line, resulting in hair that looks like a ghost
When drawing hair, draw in thick strands of hair in moderation.
If you draw hair using only thin lines, it is easy to end up with an imbalance such that the face is cute and deformed but the hair is realistic and after all it looks like horror-style hair.
Try practicing being aware of drawing thick strands of hair and then drawing thin or medium-thick strands of hair that branch out from those thick strands in mind, as in Step 2.
First, try to make the simple hair bunches and silhouettes look nice, and when you get used to it, try arranging them with random movements, such as crossing the thin hair strands slightly.
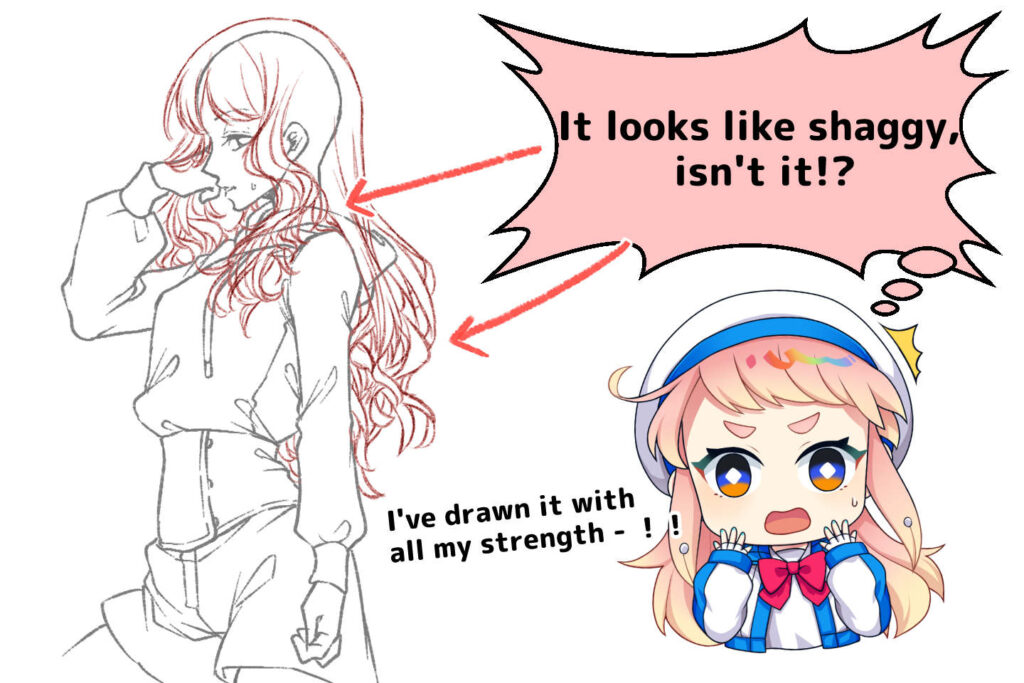
The overall look will be more shaggy, and the hair will look heavier
While being aware of the movement of the tufts of hair, draw tufts of various sizes, and create spaces between the tufts.
If the movement of the tips of the hair is minimal, it will look like thick, shaggy fur.
The order of drawing is as follows:
- Thick tufts of hair
- Medium to thin tufts of hair that branch out from the thick tufts of hair
- Medium to thin tufts of hair that are not affected by the thick tufts of hair
- Thin tufts of hair that slightly go against the flow of the hair
Let’s practice drawing the hair in the order from thick to thin hair, as in Step 2.
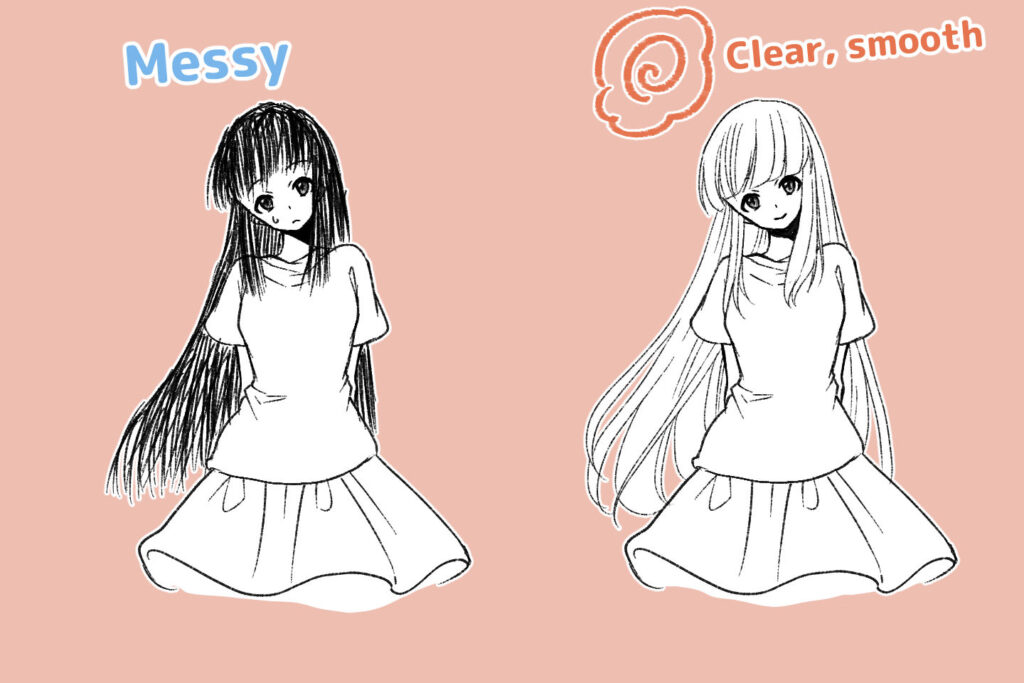
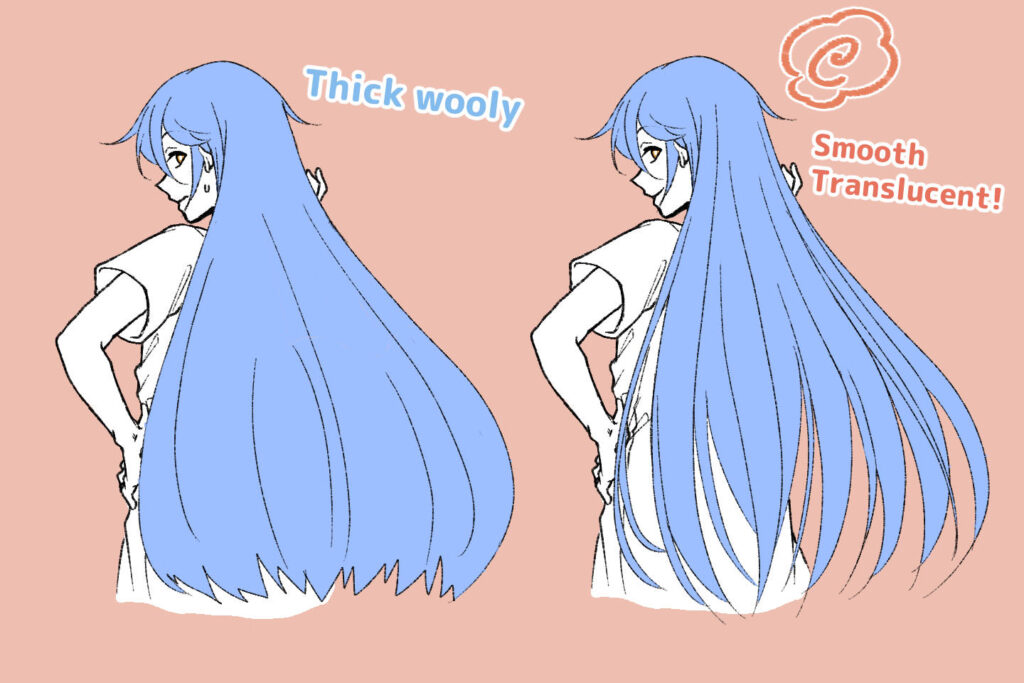
Roughly drawing only the outline is just the stage of a rough draft.
Let’s spend a little more time on making a fair copy and aim for hair that looks translucent and smooth!
Looks like unkempt hair.
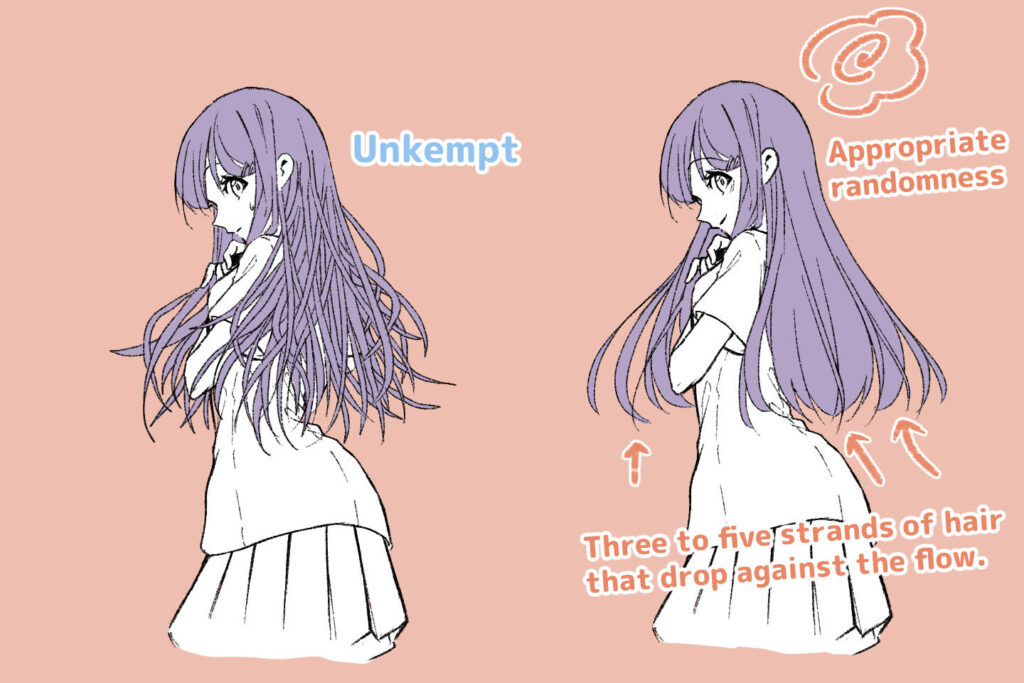
If you are too conscious of the hair being intricately intertwined, it will end up looking like the messy hair on the left.
Just like drawing the human body, you need a rough draft and rough sketch of the hair, so first roughly sketch the overall silhouette and flow, and then start drawing in the details.
The rough silhouette of the hair is an important process that determines the character’s impression.
First, check Step 1 which explains how to draw the overall silhouette, and then also check Step 3 which explains how to draw straggling, short and fine hair.
Three to five straggling short and fine hair are enough to give a sense of randomness. Don’t add too many, and keep it to the level where the overall silhouette doesn’t collapse.
A list of long hair styles is introduced with examples!
Twin tails, intake hair 1
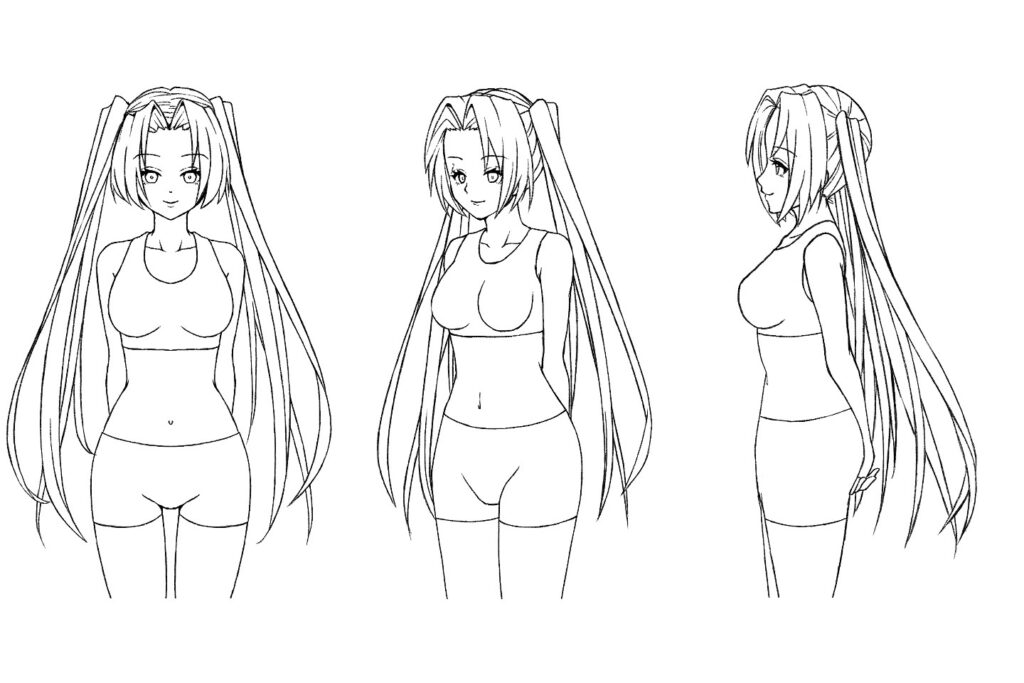
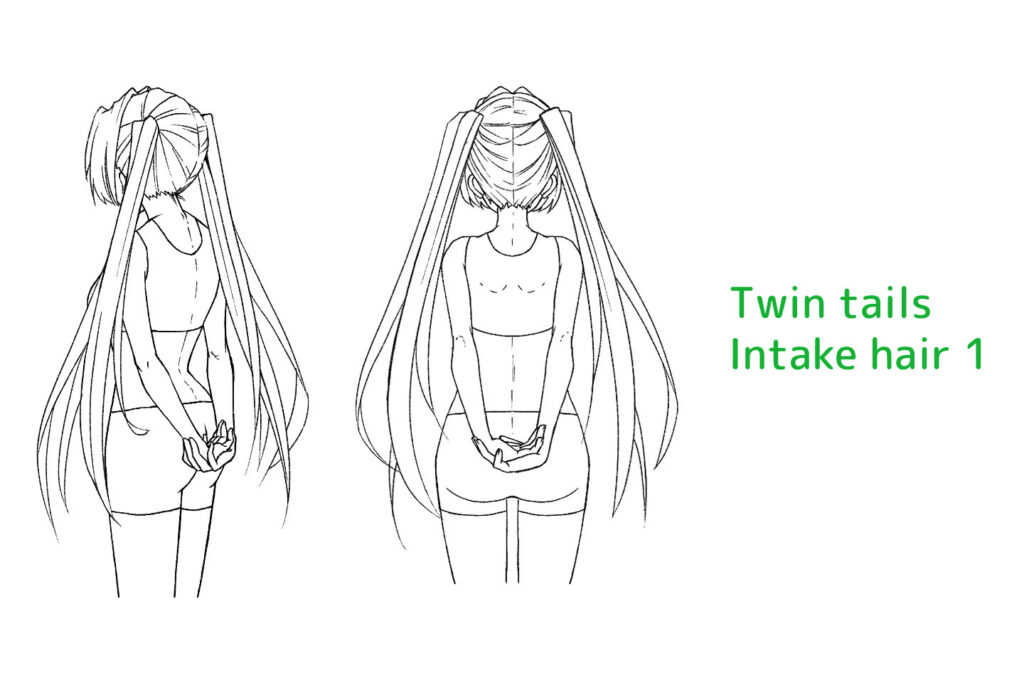
Intake hair is the bangs also called air intake or intake.
The top of the hair in the middle is lifted up and parted to the left and right, and then folded back down in the middle to create an M-shaped silhouette.
The name comes from the fact that it is reminiscent of the air intake of an aircraft.
A twin tail is drawn with a slightly thin bundle of hair.
There are also some that are drawn with a thicker twin tail, so please research how to draw it in a way that is close to your image.
Ponytail, intake hair (side hair)
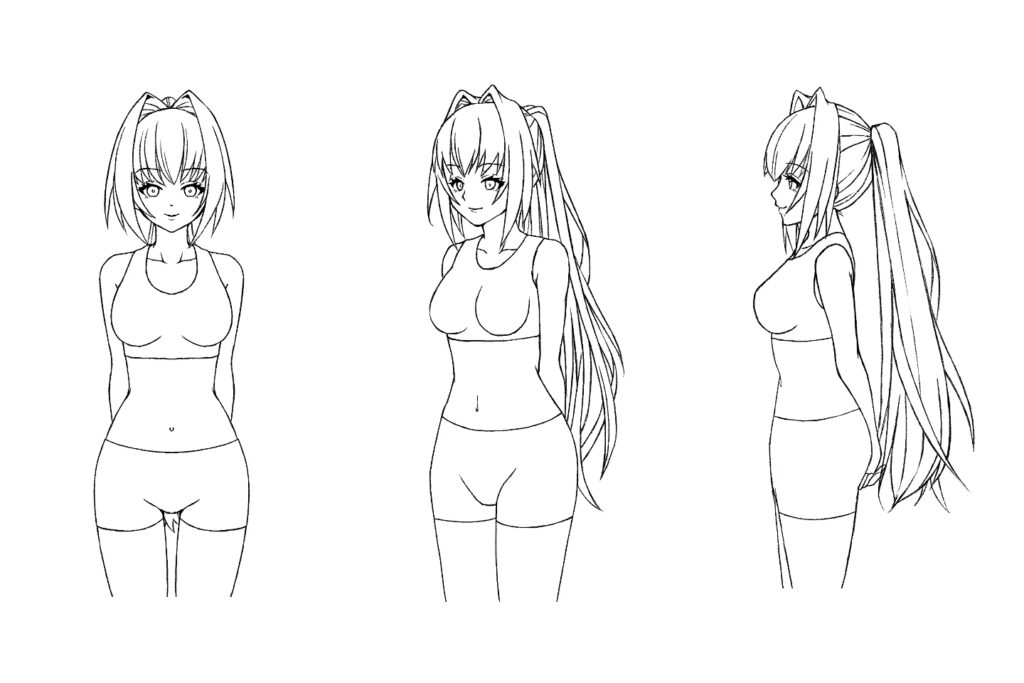
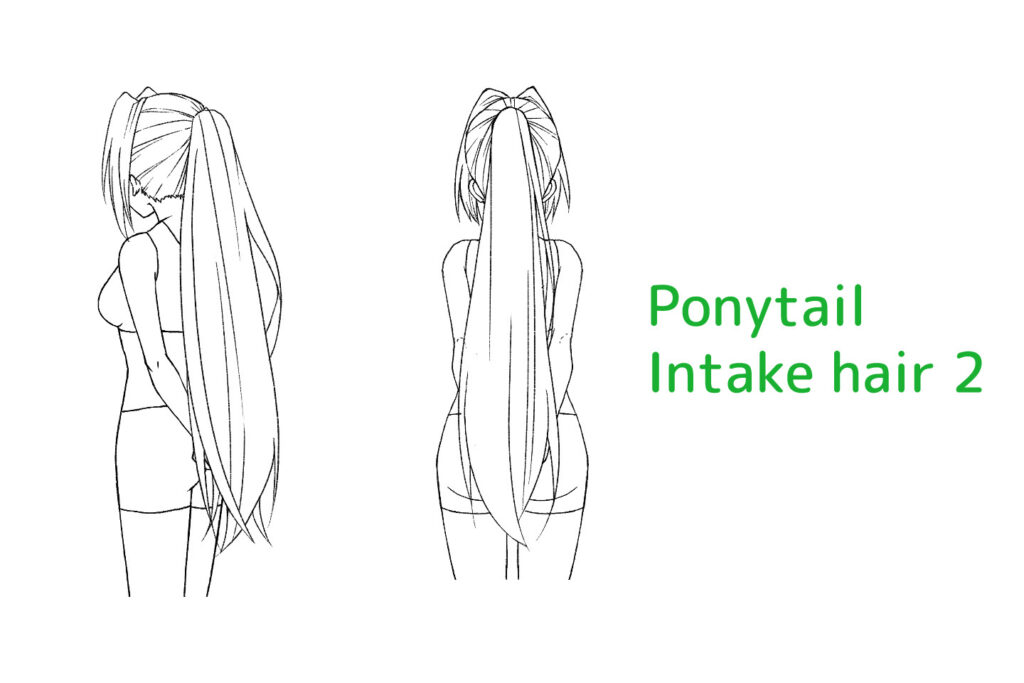
This intake hair pattern has side hair as the intake hair.
The side hair’s position is higher than the case that the bangs are intake hair, and there is a distinctive M-shaped part and space.
Some characters emphasize this to create a design that looks like cat ears.
In the case of a ponytail, it is almost completely hidden from the front view.
Therefore, to emphasize the ponytail, there are also expressions that make the hair blow over-exaggeratedly.
It’s a great hairstyle for practicing the hair that is blowing.
Vertical rolls, fluffy waves
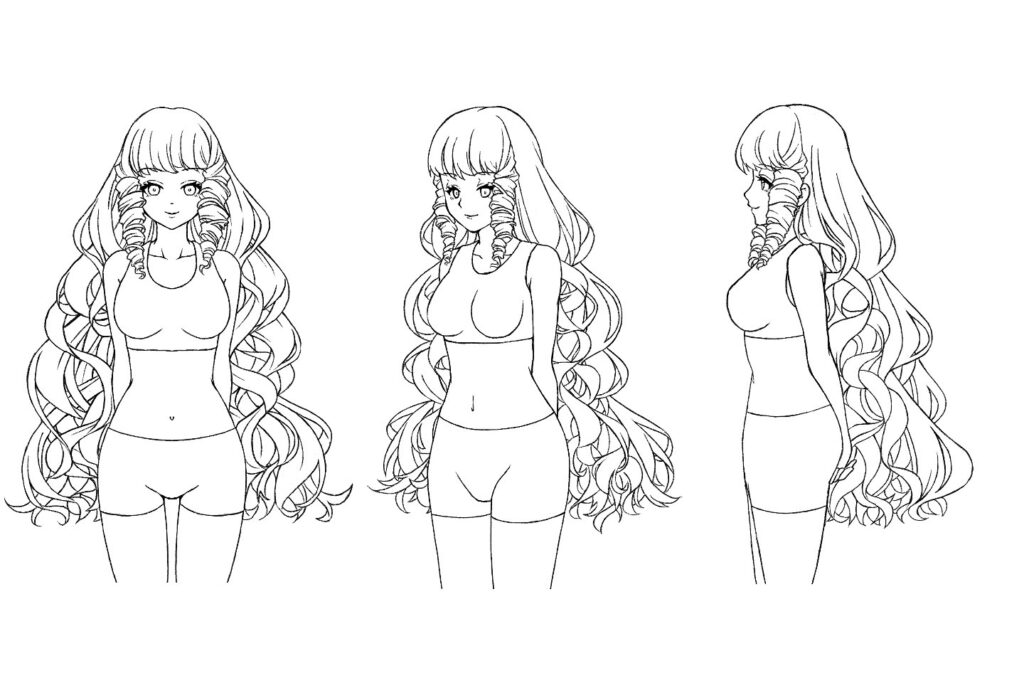
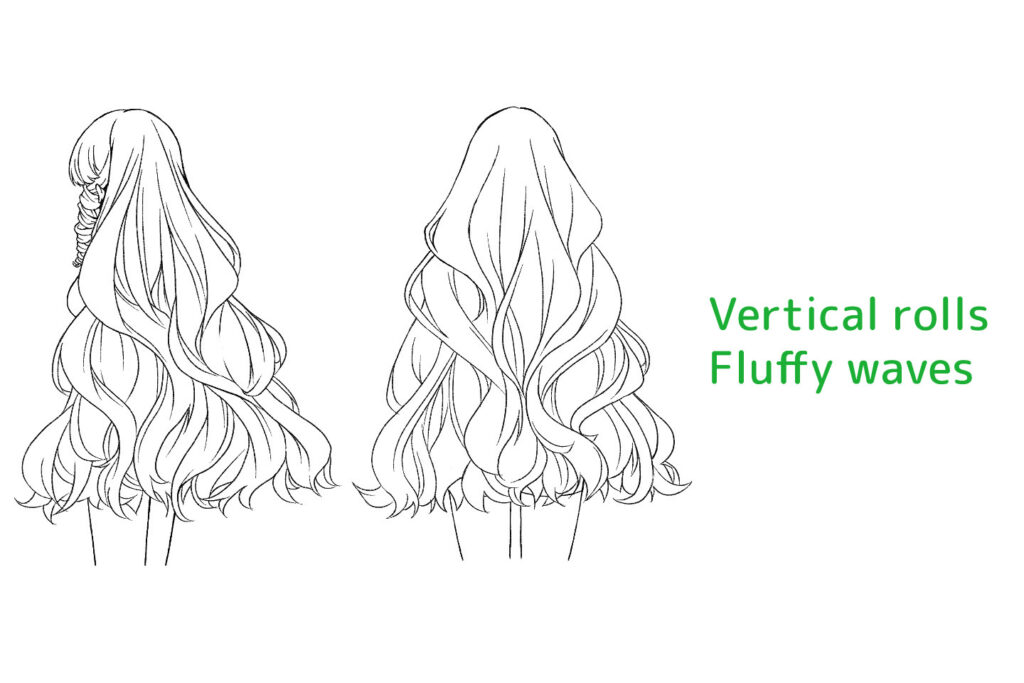
The vertical roll is a hairstyle often seen on fantasy characters such as young ladies.
There are many different types such as those that look like short cylinders stacked on top of each other, or those that get thinner towards the ends, or those that look like large ribbons wrapped around the hair.
If you try to draw long wavy hair in great detail particularly, you can go on forever, so you have to find a certain point of compromise.
Try to draw the silhouette by filling it in with large hair bundles except for the ends of hair.
Side-up hair
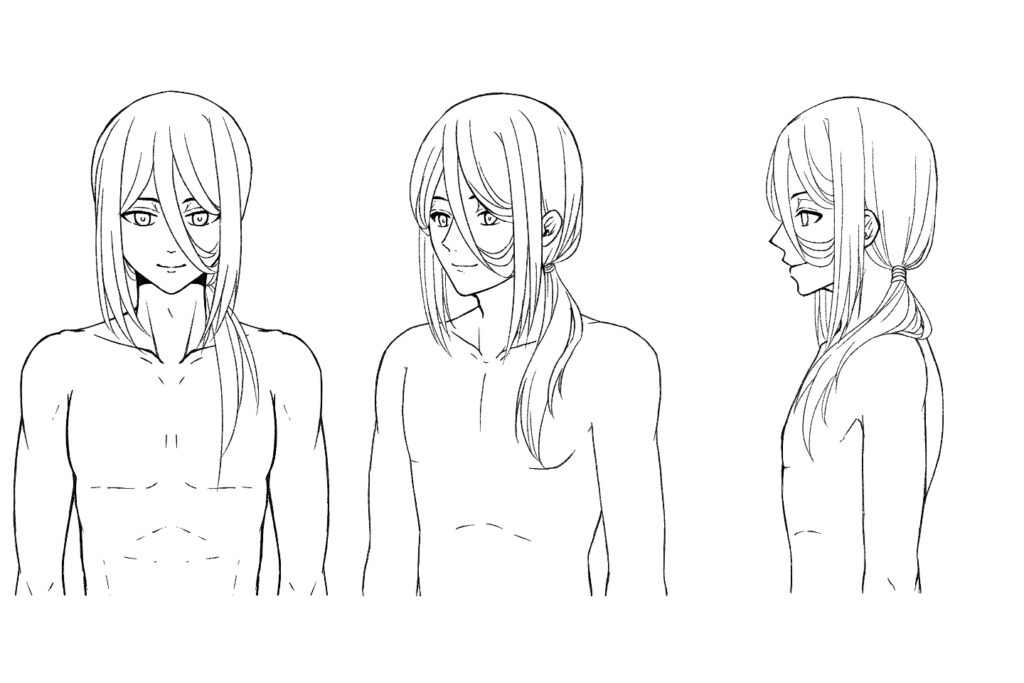
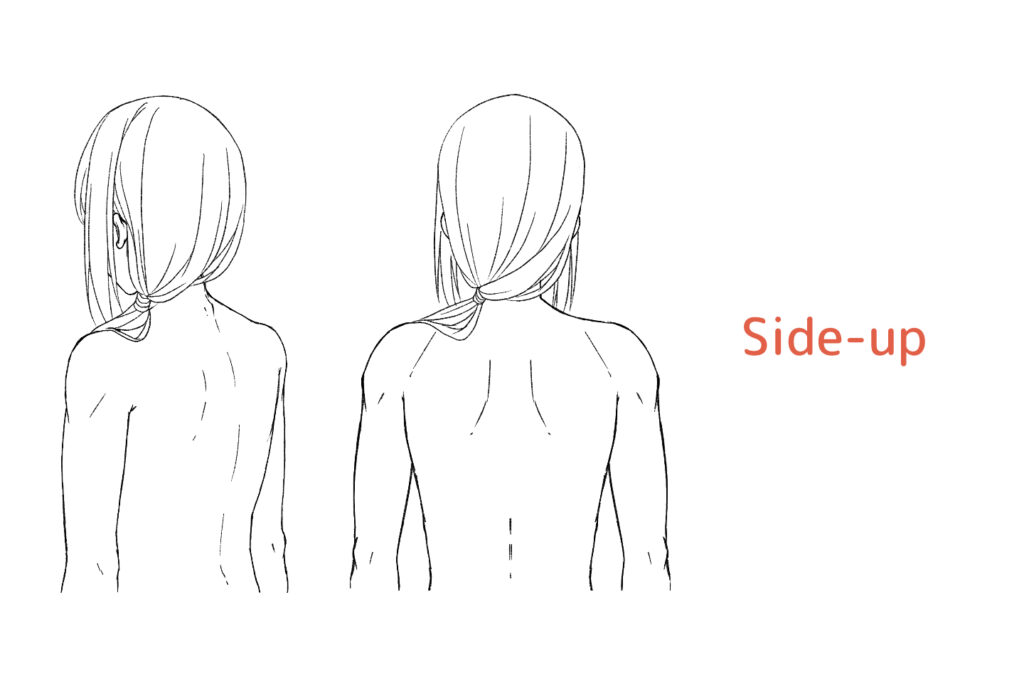
air is gathered to one side or the other is called a side-up.
This hairstyle is often seen on sexy male characters.
If you draw the hair slightly over the shoulders, making it look like it’s hanging down, it will look like that.
If you add a few strands of straggling, short and fine hair that flow towards the knot at the back of the head, you can draw it so that it looks like it’s bound softly.
Half-up, permed hair
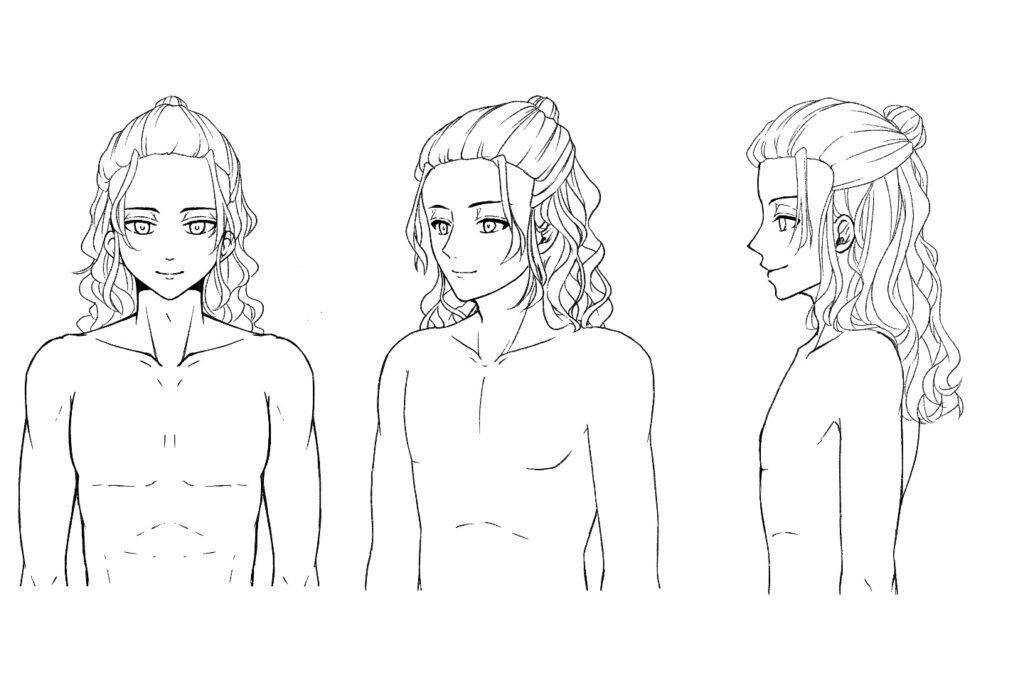
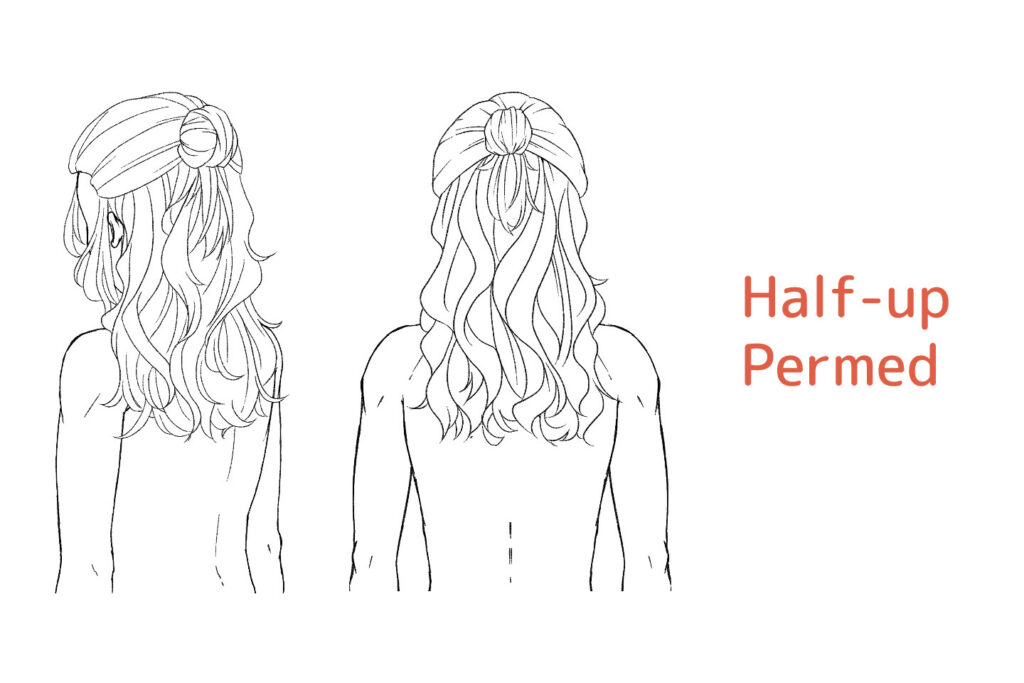
Half-up is a hairstyle that the bangs and the side hair are tied up at the back.
If it’s a girl’s hair, there are many characters with half twin tails (or two-sided up) with their hair tied in twin tails.
This is a slightly difficult hairstyle that includes both the hair that is tied up and the back hair that is left down.
If the hair is permed, the bunches of hair that hang down from the tied section will also be permed, so please be careful when drawing.
The perm will create more detailed bumps and hollows than a natural wave.
Center part
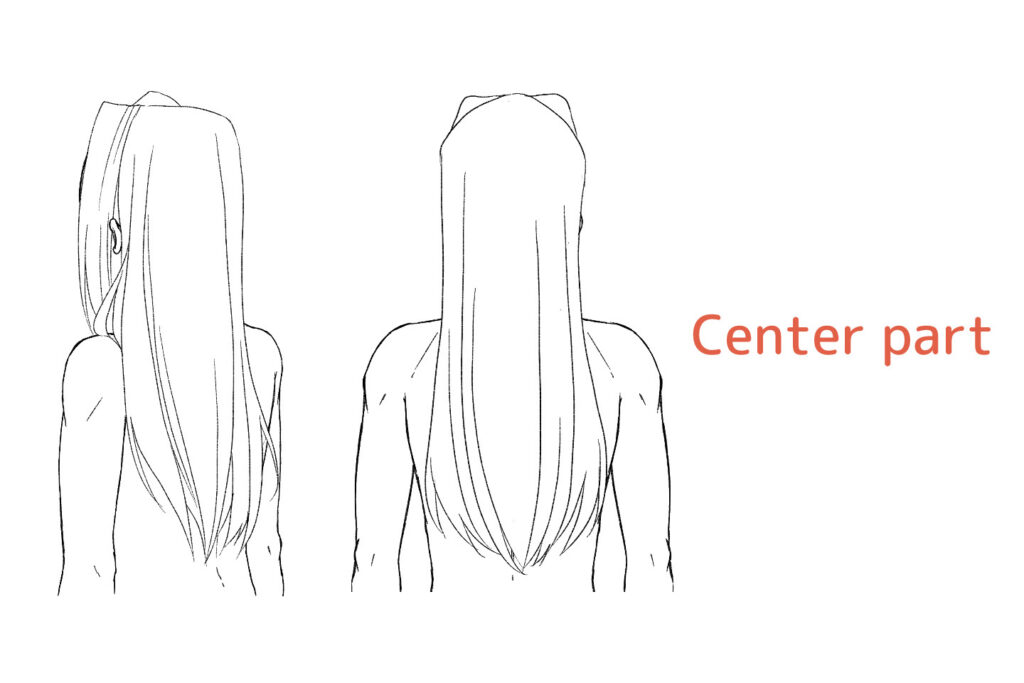
Center part refers to a hair style that parts the hair at the center.
Simple straight hair is a little boring if you just let it hang down.
If you draw it so that it spreads out to the left and right, the silhouette of the picture will become larger, and you can also create a movement in a picture of a standing figure.
Also, try drawing the back hair so that it hangs slightly over the shoulders since it looks more natural.
To draw long hair in the way you have in your mind
Please practice various hairstyles by dividing the hairstyles in the list into parts and combining them in the way you like.
If you also practice drawing various hairstyles that are blowing in the wind, you will improve even faster!
You can practice drawing long hair on your own, but if you are new to drawing, we recommend practicing at our Illustration and Manga School, egaco.
Pickup Articles
Category Related Articles