This article was created by the illustrators and manga artists who teach at the illustration and manga school, egaco, based on the knowledge and skills they have honed through commercial production and other work. If you would like to learn more about content that is tailored to what you want to draw, we recommend taking a private lesson at egaco.
I want to draw a character wearing a kimono, but,
- What shape is the collar?
- How long are the sleeves and the hem?
- Where is the obi tied?
- Are there any differences between men’s and women’s kimonos?
Haven’t you had a question like this before?
To draw a kimono, first you need to understand the structure of a kimono!
The features of a kimono are very different from those of Western clothing. If you draw it based on your imagination, it will look strange, so be sure to refer to the materials.
On this page, we will introduce you the structure of a kimono and the tips for drawing a kimono in illustrations!
The basics of kimono! Let’s get rid of any sense of discomfort by understanding the types and structure
Kinds of kimono

There are several types of kimono, and you usually choose which type of kimono to wear according to the TPO (time, place, and occasion).
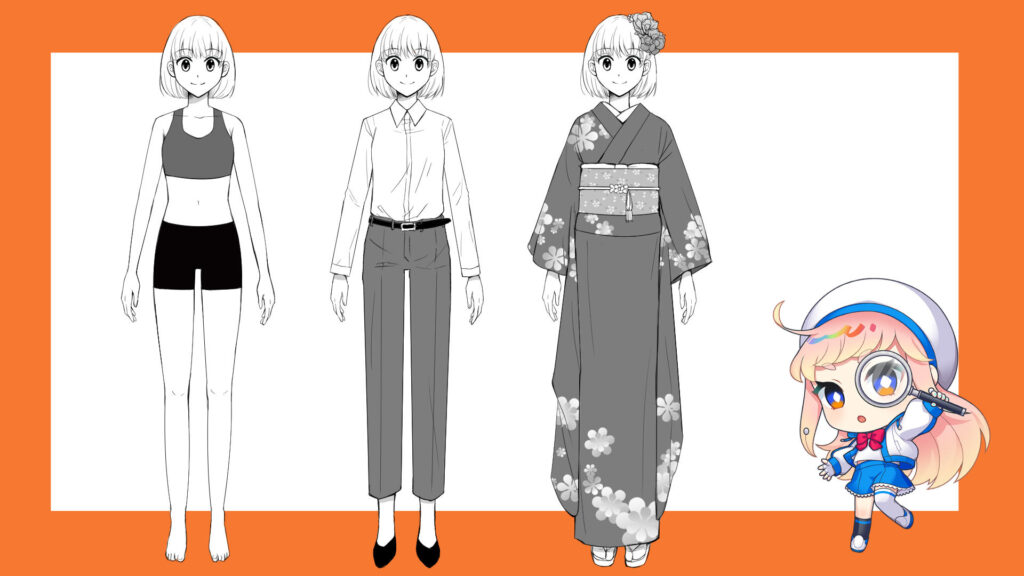
(1) Tsumugi (Pongee)… Women’s everyday clothes to wear when going out. It is a casual type of clothing.
(2) Haregi (formal kimono)… Formal attire for unmarried women. It is also called furisode, and this is the type of kimono worn at coming-of-age ceremonies.
(3) Kinagashi (casual kimono)… Men’s everyday clothes. In modern terms, it is about as casual as a hoodie.
Important points taught by instructors
Pay attention to which side of kimono collar should come to the front.

Point
A Japanese term, awase, which side of kimono collar should come to the front is always the right side viewed from the front for both men and women.
If you draw the left side collar on the top when viewed from the front, it becomes a kimono to be worn by the deceased, called shinishozoku.
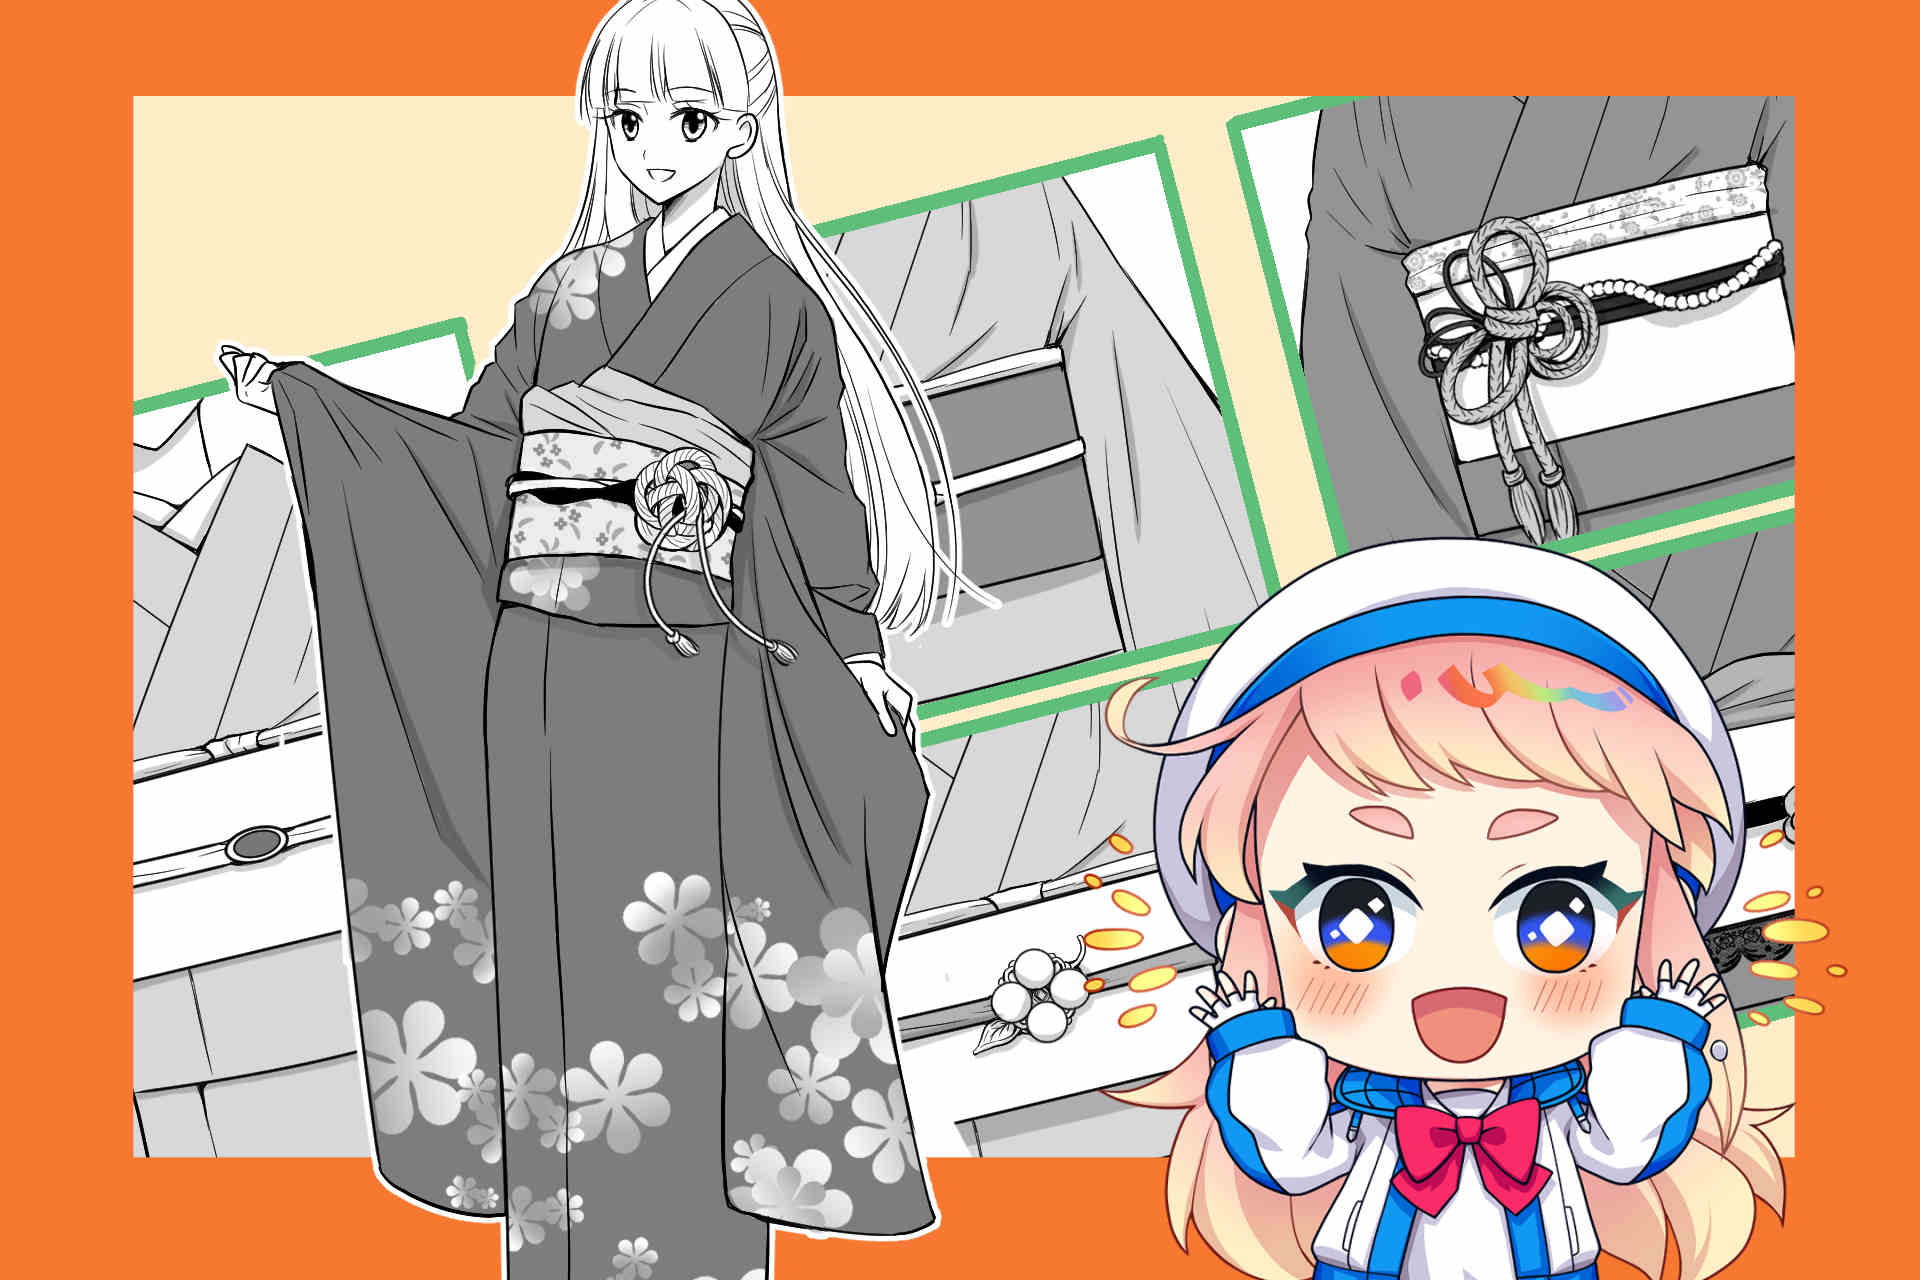
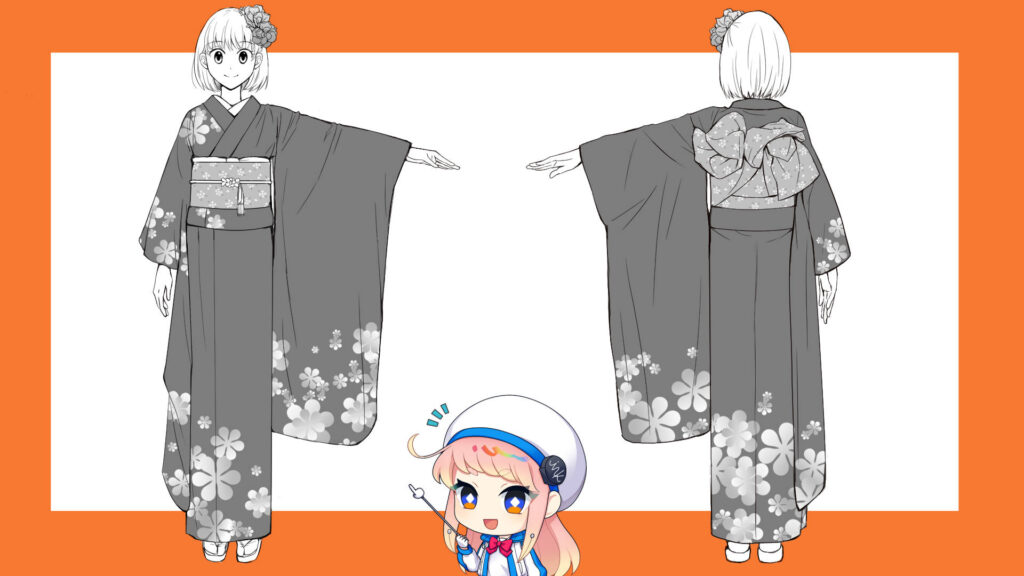
The structure of tsumugi (one of kimono)

- Haneri (A replaceable neckpiece on a kimono)
- Eri (Collar)
- Sodeguchi (The edge of a kimono sleeve)
- Ohashori (The portion tucked up and bound in place)
- Tamoto (A pocket of a kimono sleeve)
- Tare (A flap of an obi viewed from the back)
Basic knowledge of Tumugi’s structure

Basically, the length of sleeves goes up to the wrists, and the hem goes down to the ankles.
The obi is tied just below the bust. Because the obi is stiff, it won’t be creased except at the knot.
The bottom part of the sleeve from which the hand goes out, is sewn together.
Structure of haregi (one of kimono)
The basic structure is the same as that of tsumugi, but the sleeves are very long, reaching almost to the calf.
When wearing a haregi, the way the obi is tied and the hair ornaments tend to be more ornate.
Choose a design that suits your character.
The structure of kinagashi (one of men’s kimono)
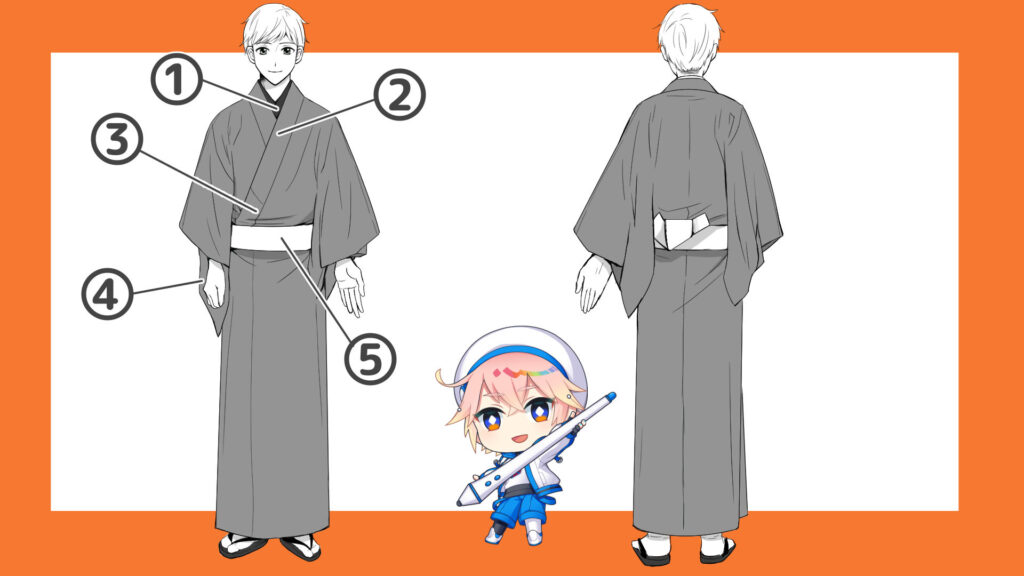
(1) Juban (underwear of kimono)
(2) Kakeeri (a piece of collar-cloth sewed on a kimono)
(3) Erisaki (a collar tip)
(4) Tamoto (a pocket of a kimono sleeve)
(5) Obi (sash) (Compared to women’s obi, it is thin)
Basically, the length of sleeves is up to the wrists, and the length of the hem is up to the ankles. If the hem is too short, it will give the impression of being childish or sloppy.
The position of an obi for men is worn much lower than the one for women’s, around the hipbones.
Draw the knot of an obi slightly to the side

For adults, the knot of an obi is not in the center of the body, but slightly to the side.
The end of the tied obi is usually facing upwards.
Let’s draw kimonos according to the type! Features and comparisons of silhouettes
The way the character’s body looks differs from when they are wearing clothes.
Pay attention to the unique silhouette of the kimono.
Comparison with the body and clothes
Compared to Western clothes, the thickness or thinness of the body is less likely to be reflected in the appearance of a kimono, so be careful not to overdo the lines of the chest or waist.
The difference between the western skirt and the hem of kimono

NG….No good
The hem of kimono do not spread out like Western skirts.
For this reason, the stride is also narrower than with Western clothing.
The key to drawing a kimono with a sense of edge
When viewing from the side, the obi is going up toward the back of the character

The obi is going up toward the back of the character. Be careful not to make it horizontal.
The back of the character is always straighten due to the hard obi. Be aware that women’s obi is particularly large and hard.
In case of female characters, draw kimonos with nukieri, making a space between the back side of the neck and the collar.
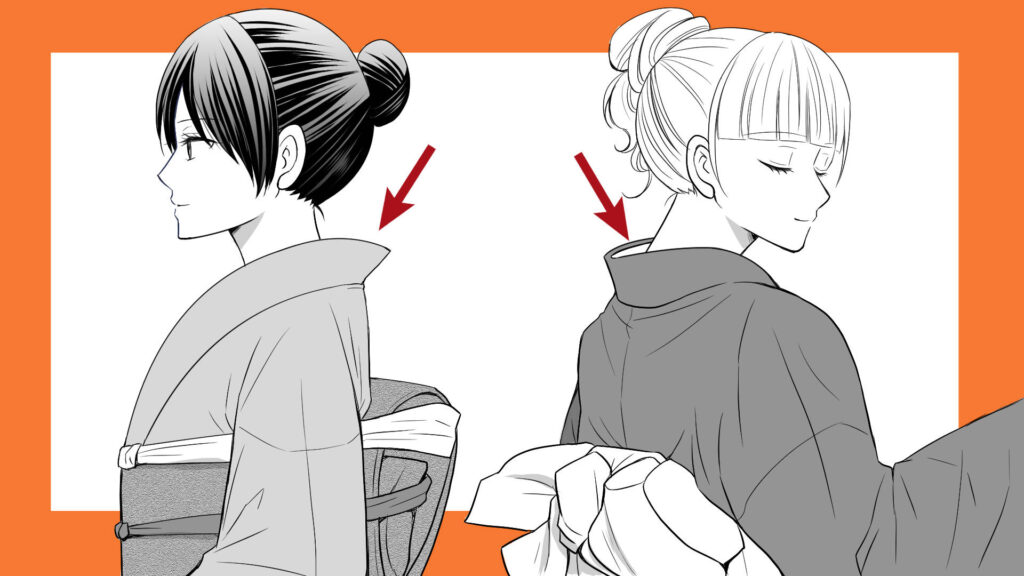
In case of women, dragging the collar to the back and make a space between the back side of the neck and the collar.
Draw a kimono bearing the nukieri, i.e., making a space between the back side of the neck and the collar, in mind.
Patterns and structures of obi
The patterns on how to tie obi
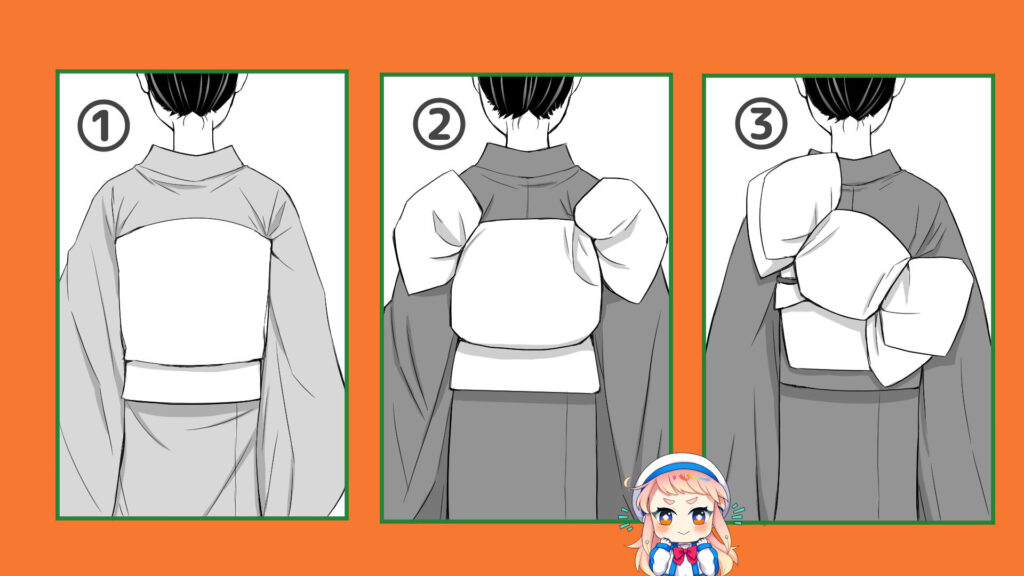
(1) Otaiko: this is a common way of tying the obi, and is used with kimono such as tumugi and homongi.
(2) Fukurasuzume: this is a typical way of tying the obi to go with formal kimono.
(3) Hanatateya: this is another way of tying the obi to go with formal kimono.
The knot in the obi for formal kimono goes up to the top of the shoulder blade.
If you tie it up big, it will give a gorgeous impression.
There are various patterns for the obi, not just the knot, but also the decoration when viewed from the front.
Choose one that matches the rank of the kimono and the character’s personality.
Several patterns of ornamental strings and clasps for holding an obi in place
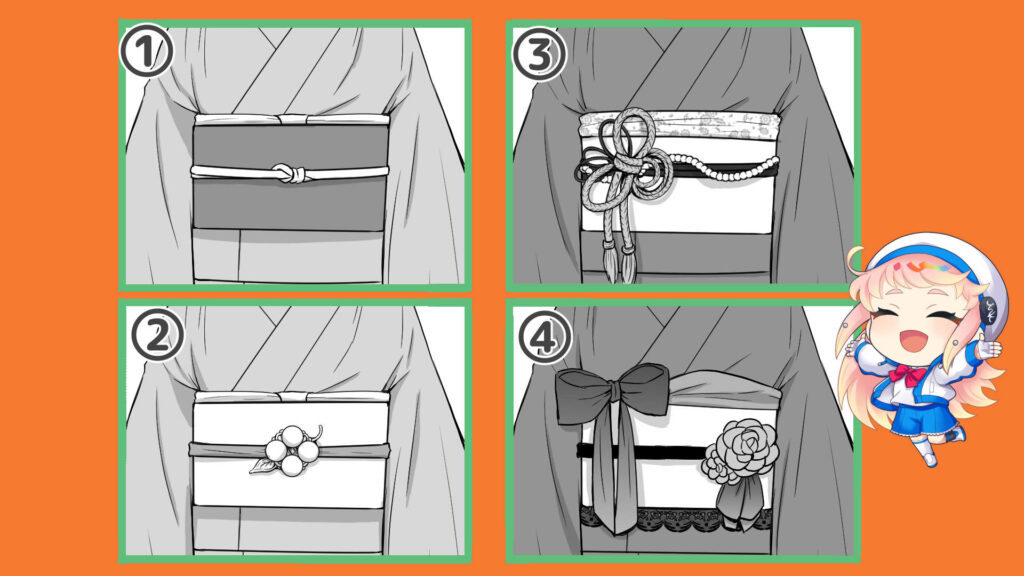
(1) Simply tie it in a knot
(2) Using obidome (an ornamental clasp in the center of the obi) – There are various designs of obidome.
(3) Obijime for formal wear – When wearing formal wear, it is more common to use a string-like obijime to express a sense of festivity than an obidome like the above (2).
(4) Express the character’s individuality through arrangement… If the character is wearing a modern-style kimono, you are basically free to decorate it as you like. Draw decorations that express your character’s individuality according to the situation.
Let’s add poses to the kimono characters!
It is important to capture the characteristics of how the wrinkles are formed when a person wearing a kimono moves, or how the fabric flows, etc. while drawing.
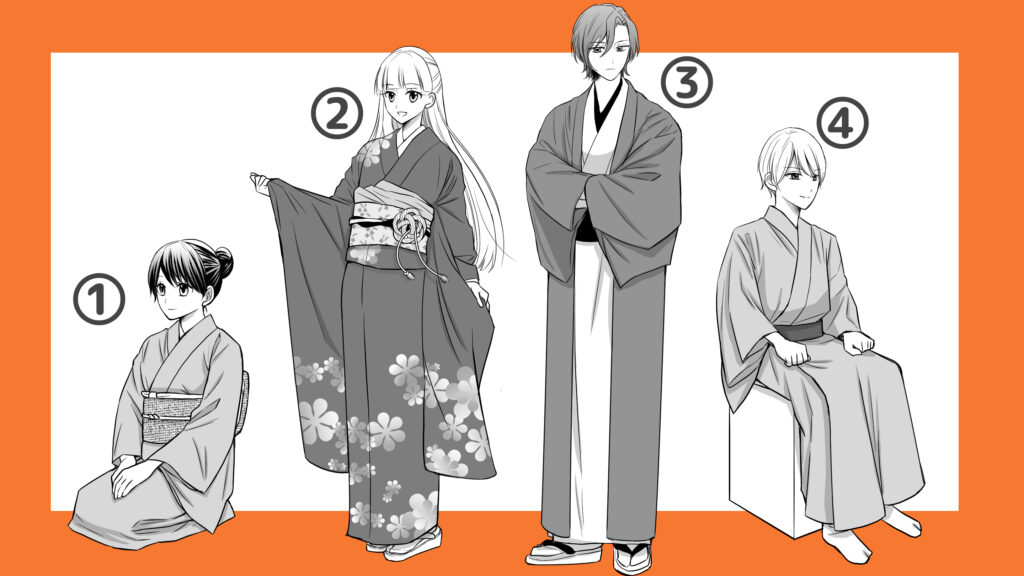
(1) Kneeling on the floor with the buttocks on the heels… The sleeves and hem of the kimono will not spread out, so the character will look more compact when sitting down.
(2) Bend the arms… Wrinkles are more likely to form on the upper body if the character move the arms, from the shoulders to the elbows. As to the lower body, wrinkles are unlikely to form if the character only bend the knees slightly.
(3) Cross the arms… The sleeves will rise up with the character’s elbows, and be caught between the arms and chest.
(4) Sit on a chair…Pay attention the hem that spreads out.
Characters become more attractive if you can draw kimonos
In order to draw kimonos, first, understanding the structures and kinds of kimono is important.
Do not draw without clarifying the points you don’t understand, and refer to the articles and materials we have shown to you this time, please! Why not create a charming character in kimono!
Pickup Articles
Category Related Articles