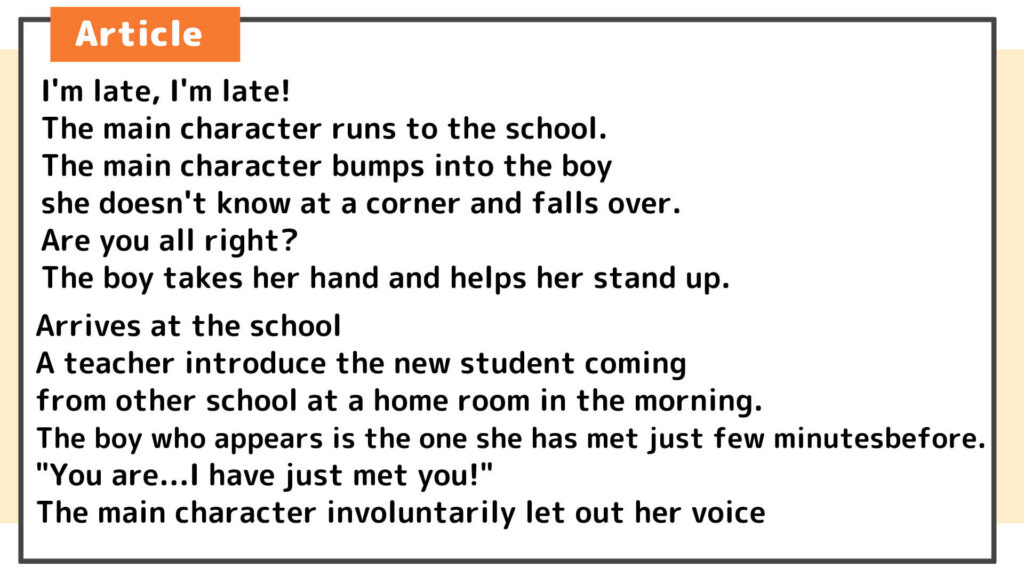
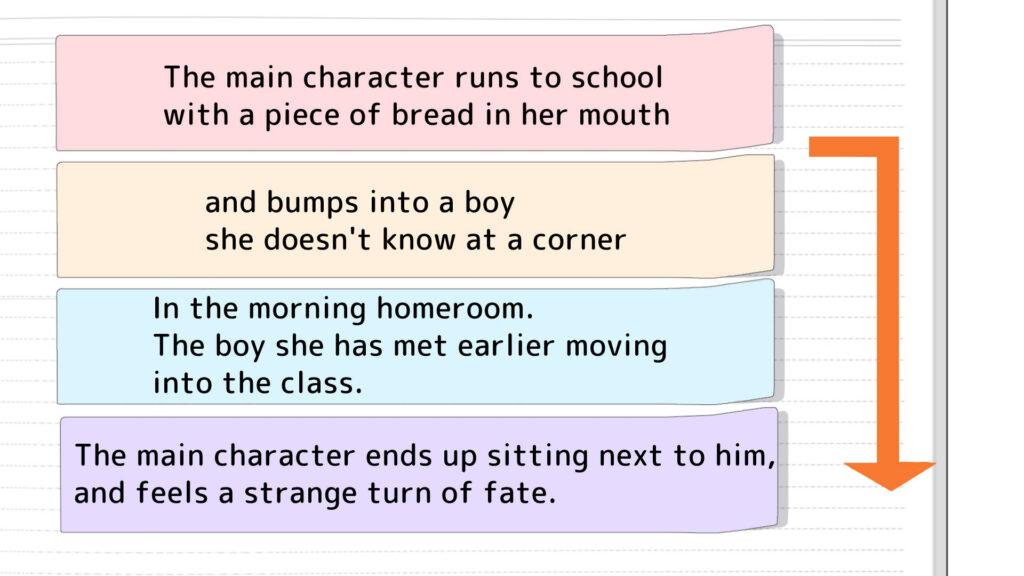
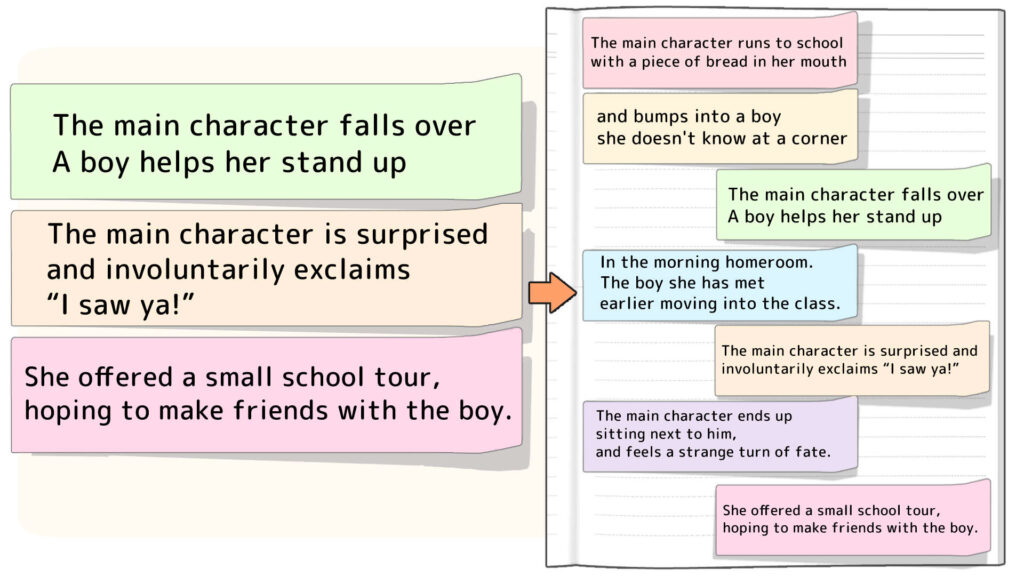
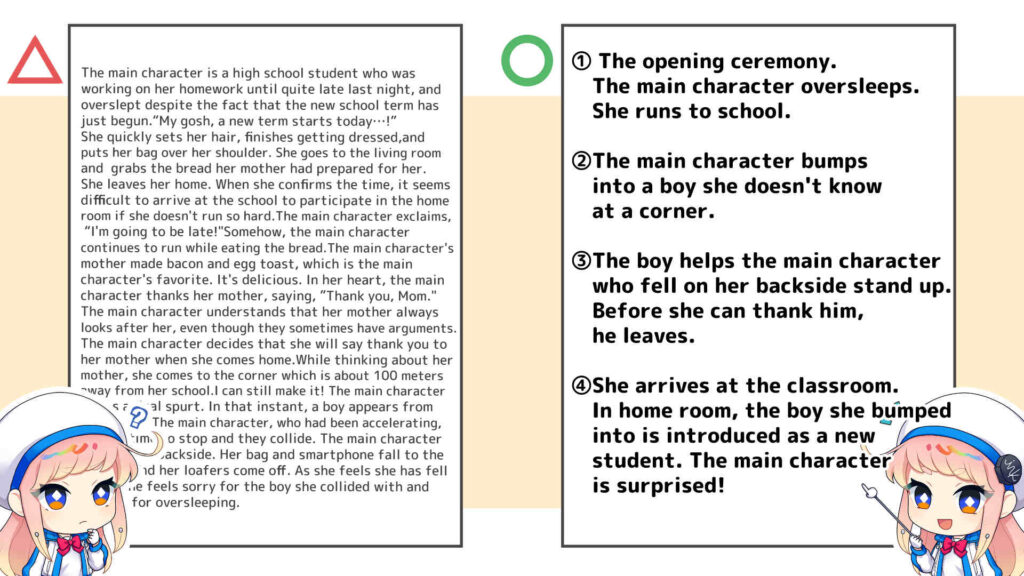
“I want to draw manga, but I don’t know where to start…”
“I draw manga, but the work is so hard that I can’t finish…”
Do you have problems like these?
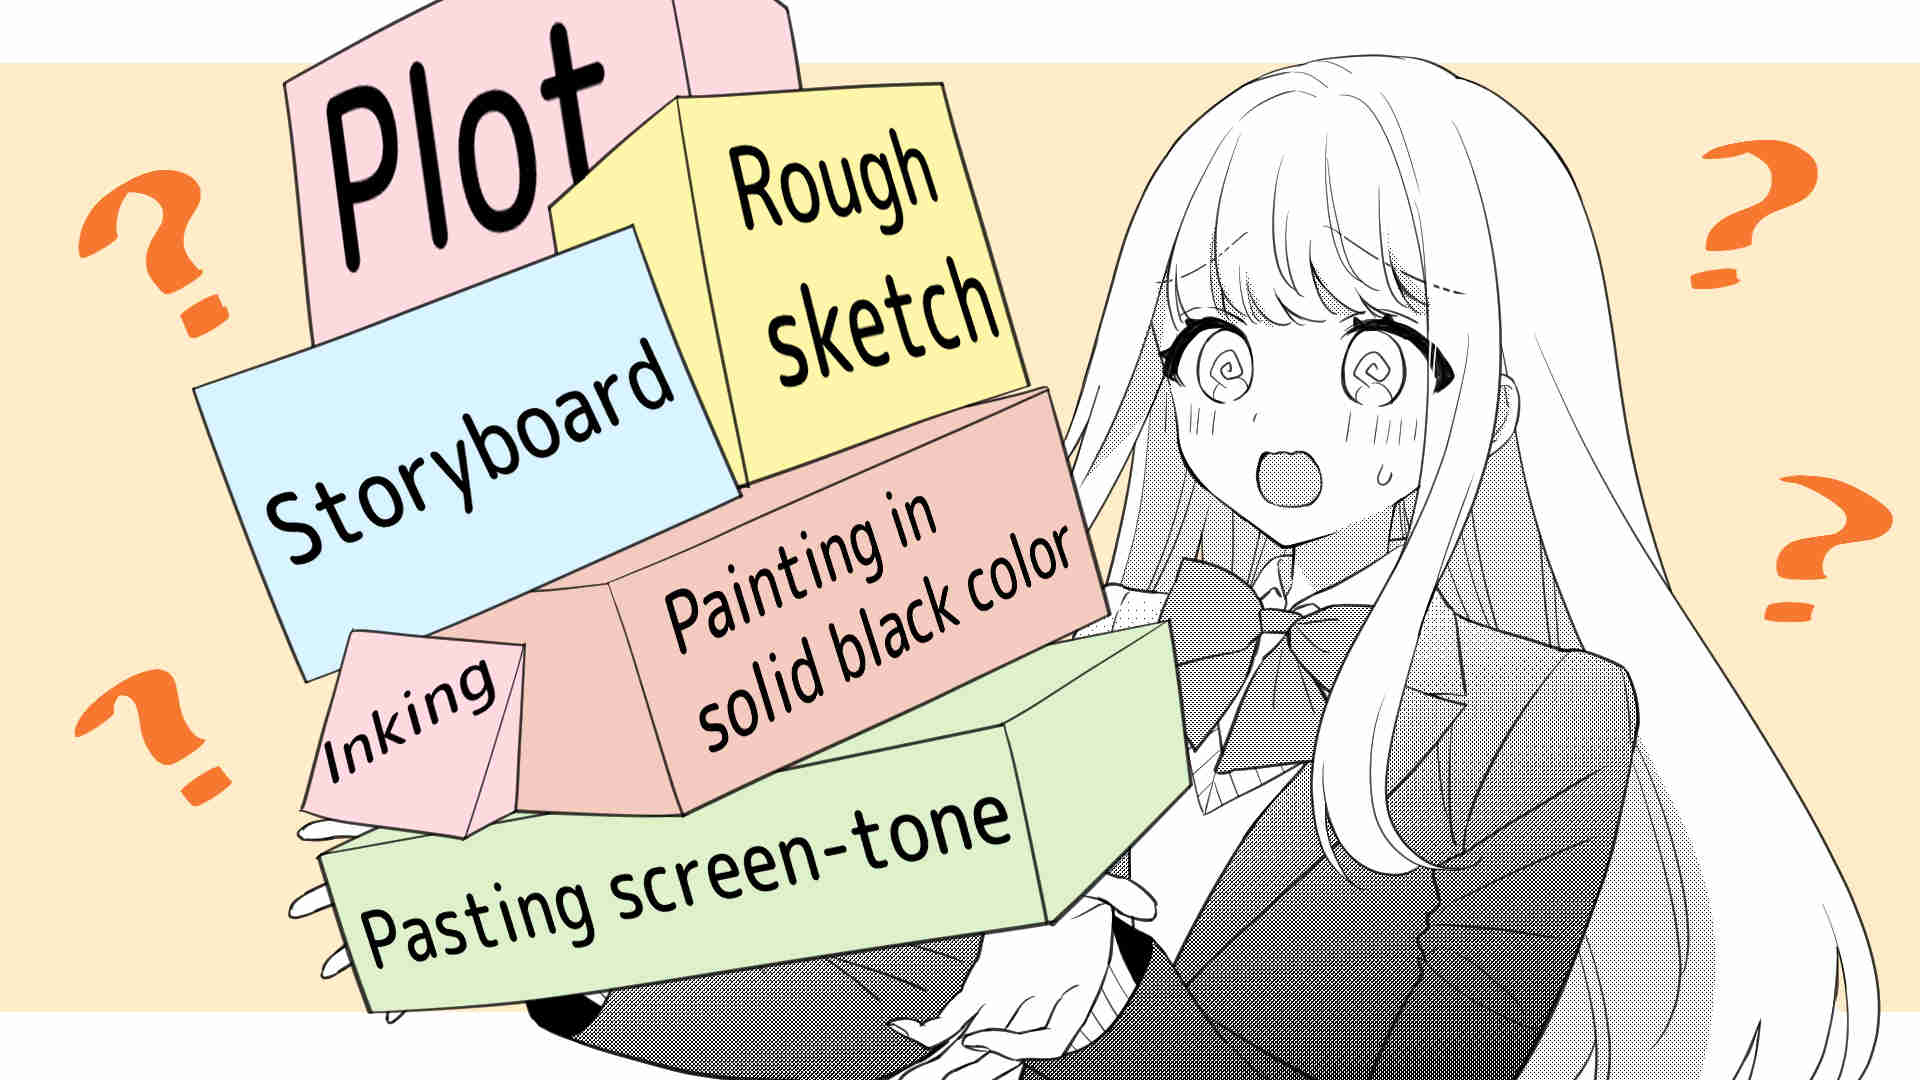
There are various steps for drawing manga, such as the plot and storyboard that determine the overall flow of manga, and the rough sketch that is used to finalize the pictures; you can get better working efficiency if you work out the order with which you go through these procedures.
In this article, we will introduce the seven steps and smooth workflow for completing a manga.
Follow the steps and don’t hesitate to make your manga!
Learn the steps to make a manga
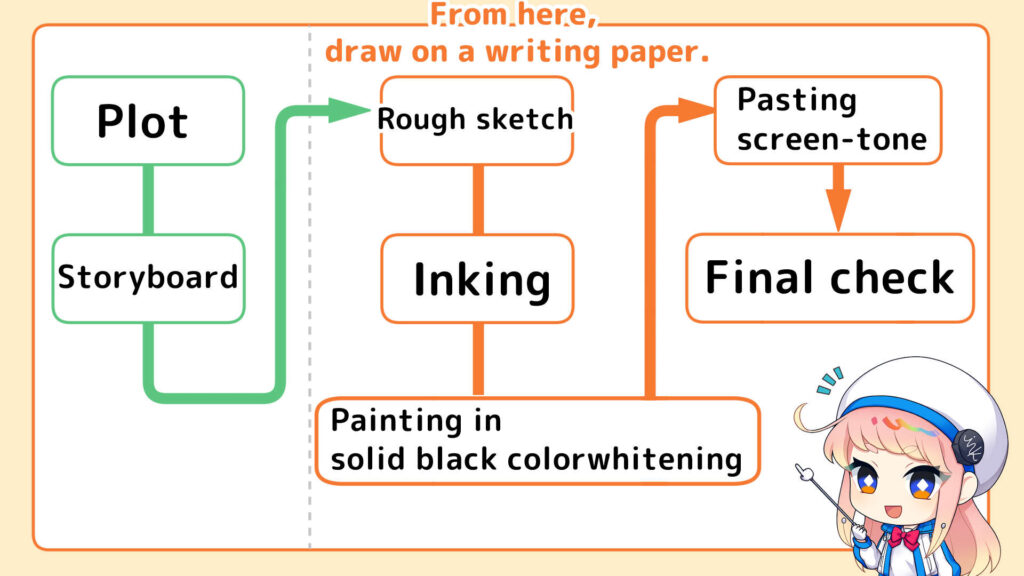
The steps for drawing a manga can be broadly divided into seven categories.
There is a lot of preparation for drawing a manga, however, every single step is important.
By organizing the story so that it can be read with pleasure, or by preparing yourself so that you don’t make mistakes when drawing, you can get closer to the image of the manga you want to draw.
- Plot (Creating characters and story)
- Storyboard (Roughly draw the panel layout, pictures and dialogues to decide the overall flow of the manga)
- Rough sketch (Start drawing it on manuscript paper based on the storyboard)
- Inking (Finish the rough sketch)
- Painting in solid black color / whitening (Paint all over in one color, fix protrusions and mistakes)
- Pasting screen-tone (Express shadows, colors and effects)
- Final check
In the above steps, a manuscript paper is used from step 3, rough sketch.
Don’t start drawing on the manuscript paper straight away, but first, put together the characters and the flow of the story in line with the plot and storyboard, and then start drawing on the manuscript paper.
Also, the tools you use and what you need to be aware of will differ depending on the stage of the process, so rather than completing one page at a time, working in the order of finishing the rough sketch for all pages, and then inking all pages would be more efficient.
(1) Create a plot
Create the framework of a manga with a plot
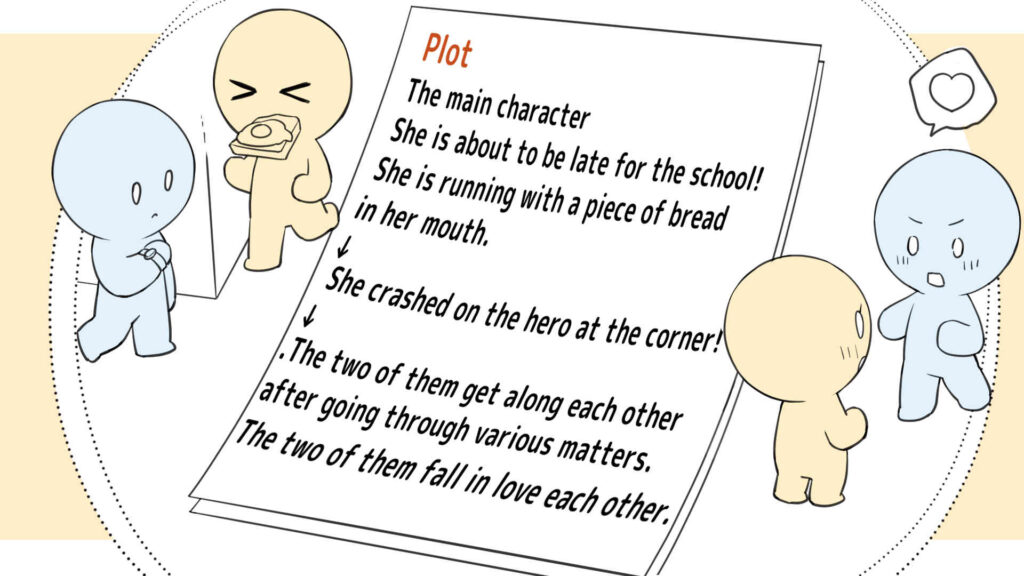
A plot is a summary of the manga in words and pictures.
It is the framework that decides the flow and direction of the manga, such as what the theme is, who the characters are, and what happens and how it is resolved.
If you have decided on the theme, characters, and story outline you want to draw at the stage of creating the plot, you can proceed with the production without deviating from the axis of the manga.
If you leave the plot vague, there is a risk that the story will become inconsistent or it will become a story unrelated to what you want to draw.
Also, even for professionals, it is difficult to create a coherent plot on the first try. Keep in mind that you should revise the plot many times in order to draw a more interesting manga, and work on the plot.
Decide on the theme, characters, and the story flow
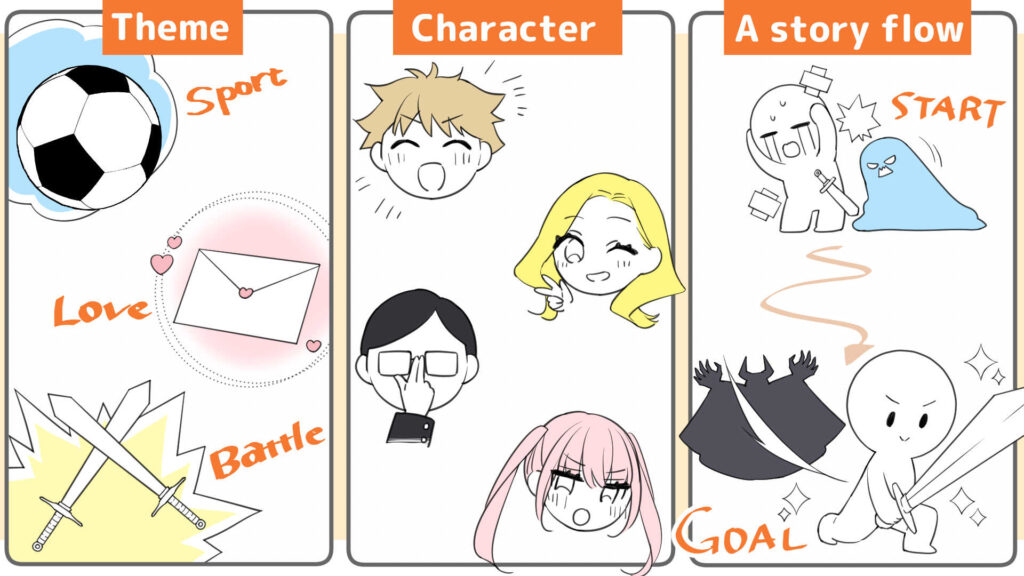
There are three main things to decide on in a plot.
- Theme (what you want to draw, what you want to convey to the readers)
- Characters
- General story flow
You can decide on your theme freely, such as something you like, love, or something you have experienced, etc.
“I want to draw the daily life of a cute girl!” or “I want the readers get excited at the battle scenes!” are also great themes.
Deciding on a theme will make the direction of your work clear, and it will be easier to create the thread of the story.
When deciding on characters, think about their specific personalities and characteristics.
If you think about a personality or individuality that can be expressed in a single word, and then think about the actions and emotional movements based on that, the character’s appeal will be enhanced.
If you are creating a one-shot manga, narrow down the main characters to two or three, and delve into their personalities and appeal.
When thinking about the general flow of the story, it is recommended that you first decide on the start and the goal.
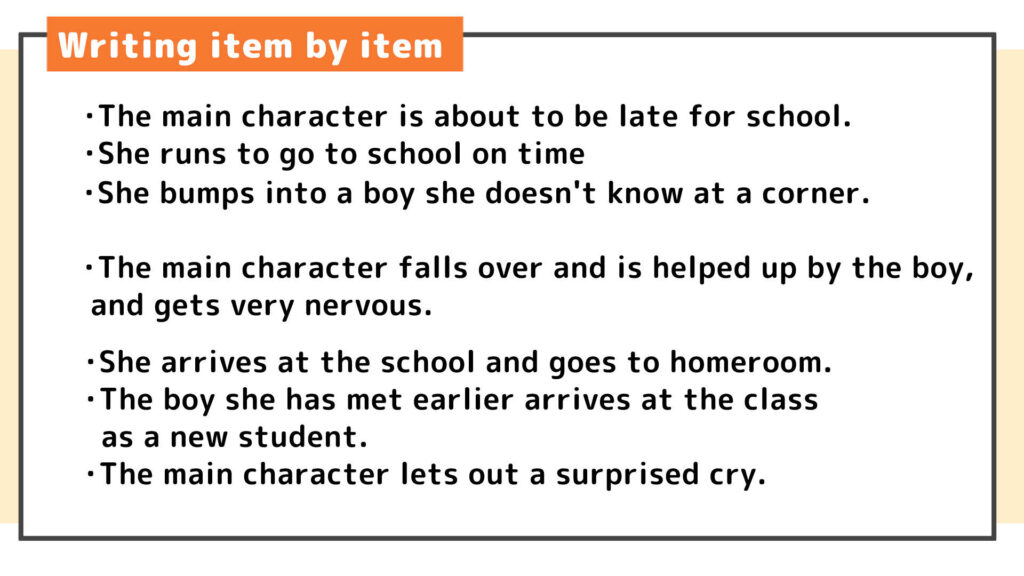
The following are examples of a start and a goal:
- The main character is in a unrequired love with her old friend (start) ⇒ The main character and the old friend fall in love with each other (goal)
- The main character’s town is attacked by a monster and is in trouble (start) ⇒ The monster is defeated and peace is restored (goal)
Once you have decided on the start and the goal, think about the episodes that will connect the two.
Three ways to create a plot

There are various ways to create a plot, and people use their own methods that vary.
There are three typical ways to create a plot:
- Create a story by making a list of points
- Write out the dialogues and the general flow of the story
- Write out the picture of main scenes + the sentences and dialogues that describe the situation, and connect the storylines together
You can either focus on one method or combine multiple methods.
Try out different ways of creating the story and find the method that is easiest for you to write.
You can write your plot in a notebook, or memo available on a smartphone, or in any other way you like.
There is also a method of writing episodes and lines on sticky notes and arranging them on a sheet of paper later.
If you want to change the order of the episodes or lines, or add or remove some, you can just move the sticky notes around to make the necessary adjustments.
When creating a plot, the two most important things are being able to check the whole thing immediately and being able to make revisions easily.
If you create a plot with a large amount of text or detailed pictures like the novel in the diagram on the left, it will take time to create and read over the plot, and it will be a hassle to fix the whole thing when you want to make corrections.
If you create an article, it is effective to summarize the main points for each scene as in the diagram on the right, and if you draw a picture, it is effective to draw rough sketches of only the important episodes.
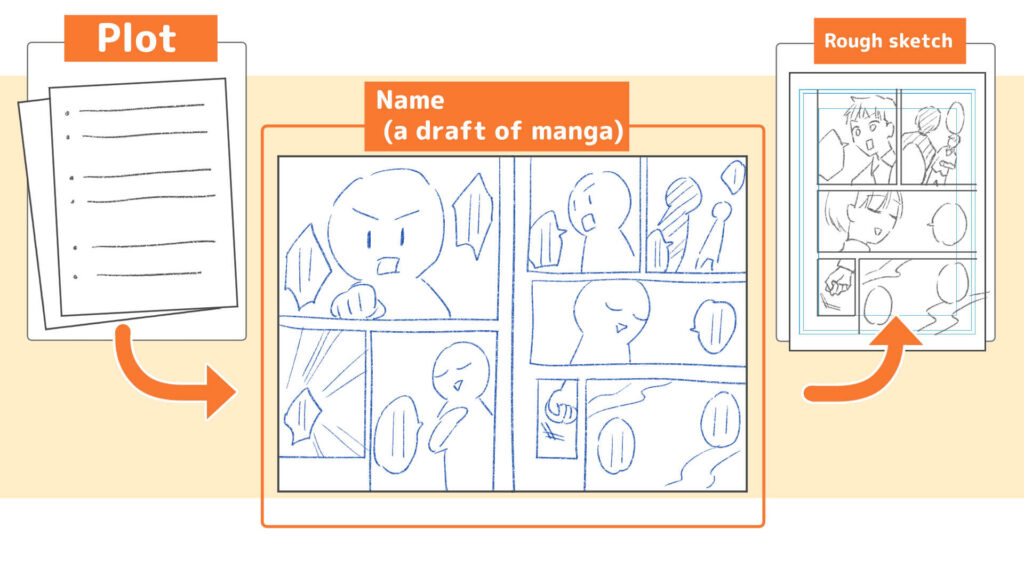
(2) Create a name (a draft of manga)
The name (a draft of manga) determines the overall flow of a manga.
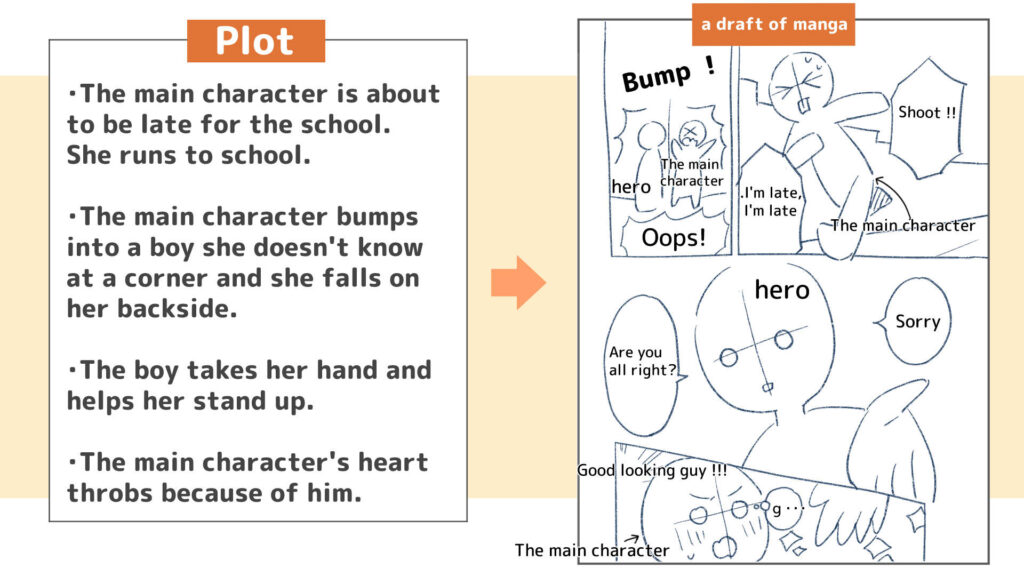
A name refers to a rough drawing of a manga from the beginning to the end.
Based on the plot, you will draw out the panel layout, pictures, and dialogues to decide the overall flow of the manga.
The purpose of creating a name (a draft of manga) is to arrange it so that it becomes an even more interesting work.
The key to creating a name (a draft of manga) is to think about how to make the episodes and characters more appealing, and to revise and refine them again and again until they become even more interesting.
A name (a draft of manga) should be created before you draw the rough sketch on a manuscript paper.
If you go straight from the plot to the rough sketch, you have to draw the panel layout, dialogue, and picture composition all at random, and when you want to make corrections, you will have to start from the very beginning.
If you create a good name (a draft of manga), you will be able to move on to the next stage of the rough sketch smoothly.
You can use any paper to draw the name (a draft of manga).
For analog work, it is easier to make corrections if you draw on a smaller copy paper or notebook than on a manuscript paper.
For digital work, you can draw on manuscript paper files as you can make corrections easily.
Also, you don’t have to start drawing the name ( a draft of manga) from the first page, the key is to start drawing where it is easiest to draw.
Start with the parts that are easiest to work on, such as drawing and connecting the scenes you think are the best parts or the most important episodes, or writing the panels and dialogues first and then adding the pictures in them.
Redirect
For super beginners! What is a name in manga? Its meaning, how to create it, and examples
Deciding on the panel layout, dialogues and how to add pictures
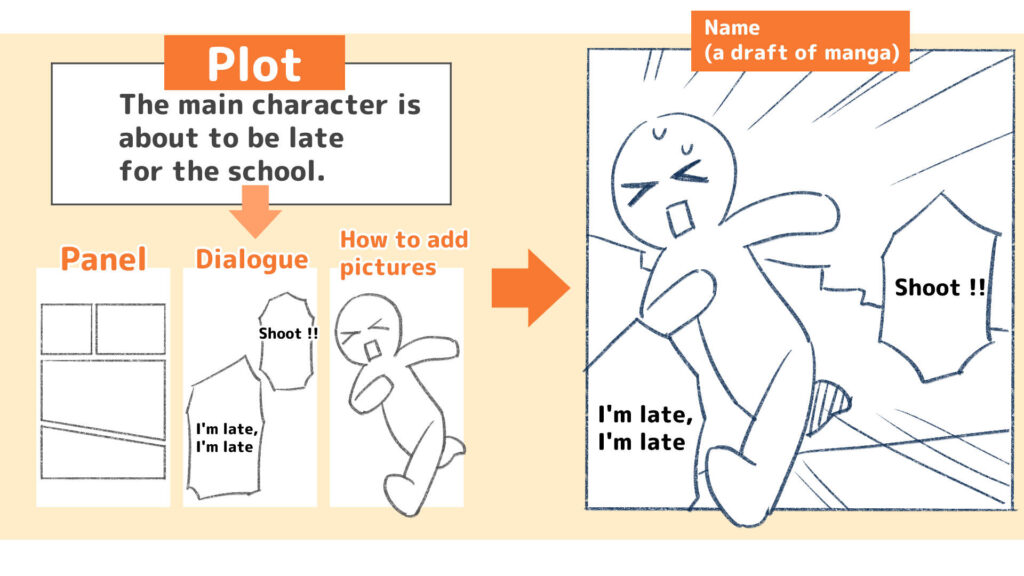
There are three main things to decide on in the name (a draft of manga).
- Panel layout
- Dialogue
- Picture layout, size and composition
When creating a name (a draft of manga), you need to divide the panels, write the dialogues, and draw the pictures based on the plot.
When dividing the panels, you can create a more readable and well-modulated name ( a draft of manga) by splitting a larger space for a highlight scene.
The dialogue should be written in line with the flow of the story.
Be aware of whether the dialogue conveys the characters’ feelings and situations, and whether it can be read at a good pace.
Draw pictures to match the panel layout and dialogues.
In a name (a draft of manga), a rough drawing is fine as long as the flow of the story as manga is clear.
Make a name (a draft of manga) in a two-page spread format.
This makes it easier to check the readability of the panel layout within the spread and to check whether the balance of pictures and dialogues is good.
Use a mini-name to get the flow of the story
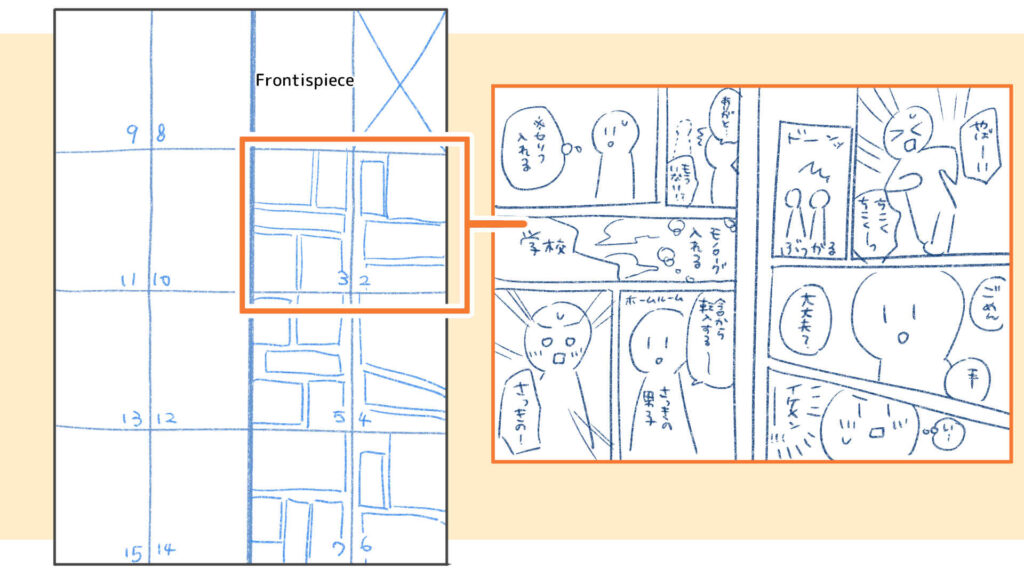
Before you start working on a name (a draft of manga), it’s also a good idea to make a mini-name by drawing it on a smaller scale.
A mini-name refers to a name drawn on a single sheet of paper that has been divided into smaller sections, and some people draw a mini-name for 8 to 16 pages on a single sheet of paper, or even 32 pages in some cases.
With a mini-name, you can draw out the rough panel layout, dialogues and character placement, omitting the fine details.
Because you can see the whole story in a small size, it’s easy to check the flow of the story as well as the balance of the panel layout, and you can quickly fix any parts you want to change.
If you decide on the overall flow with a mini-name, you can save yourself the trouble of re-drawing a final name (a draft of manga) many times.
(3) Draw a rough sketch
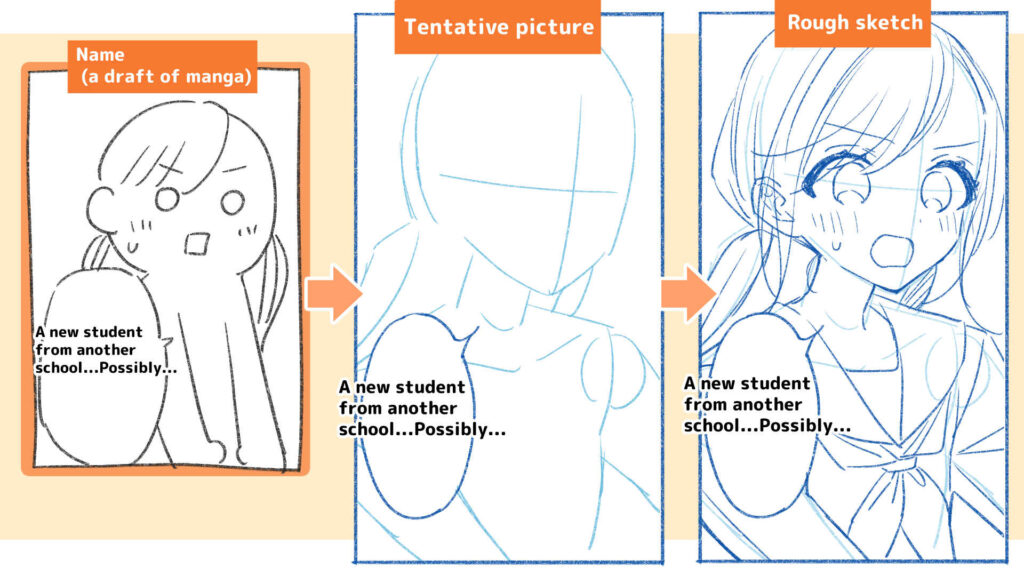
Once you have completed the name (a draft of manga), you can start drawing the rough sketch based on it.
The rough sketch process is divided into three main steps:
- Decide on the panel layout, dialogues, and speech balloon positions
- Decide on the size and position of the pictures (draw tentative pictures)
- Draw the rough sketch based on the tentative pictures
If you are drawing the manuscript by hand, draw the rough sketch directly on a manuscript paper, or if you are using a tracing board, draw it on a copy paper of the same size as the manuscript paper.
For digital work, prepare a file for the manuscript in which the required size and resolution are set.
Before starting the rough sketch, write the page numbers on the manuscript paper.
There are areas on the manuscript paper where important pictures will be placed and areas that will be hidden when printed, so draw your rough sketch while checking how to use it.
How to create a rough sketch smoothly
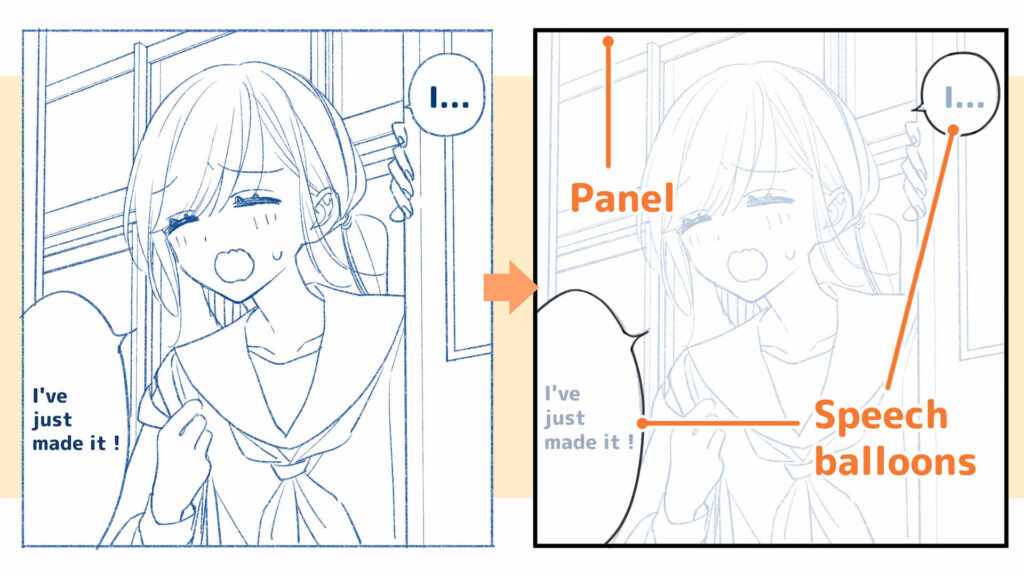
1. Decide on the position of panels, dialogues, and speech bubbles

When drawing a rough sketch, it is recommended that you first draw all the panels, dialogues, and speech bubbles for all the pages based on the name (a draft of manga).
If you draw the pictures at the same time, when you need to make corrections to the size or position of the panels, dialogues, or speech bubbles, you will also have to redraw the pictures which will take time.
There is no problem with drawing the panel layout in the name (a draft of manga) freehand, but you should use a ruler for the rough sketch.
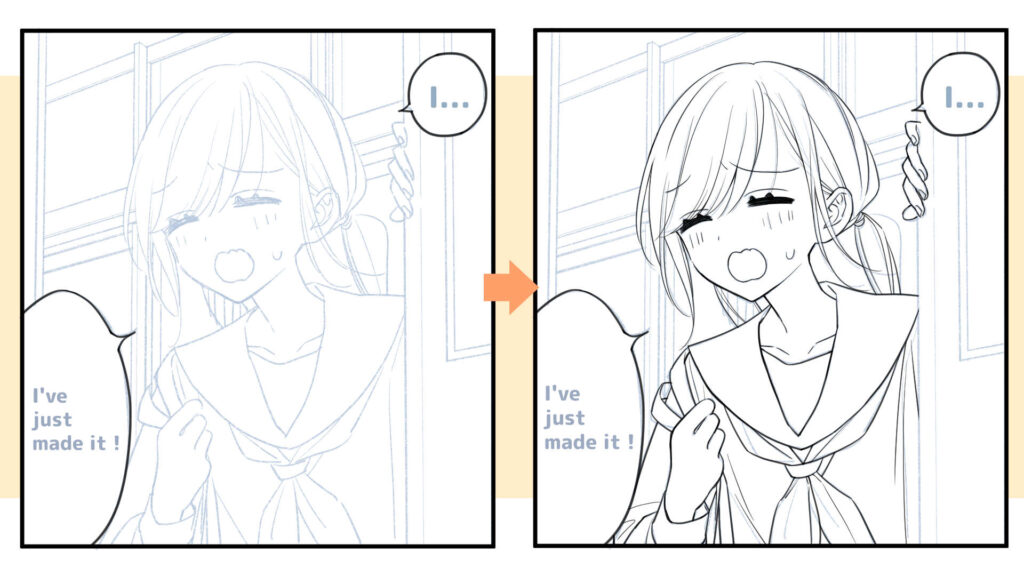
2. Decide on the size and position of the pictures (Getting a tentative picture)
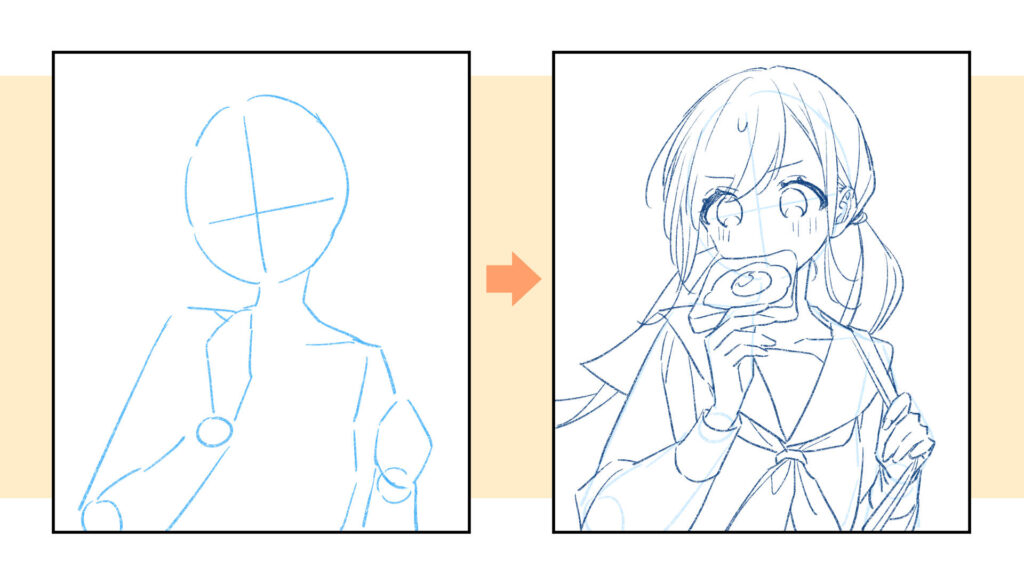
The process of deciding on the general shape, size and position of what you want to draw is called getting a tentative picture.
If you get a tentative picture, you can prevent the size, position and composition of the picture from deviating greatly from what you had in mind when you draw the rough sketch.
When getting a tentative picture with analog methods, we recommend using pencils or mechanical pencils with light blue leads.
The color is lighter than black leads, and they will not get in the way when you are drawing a rough sketch.
When using digital methods, getting a tentative picture with 3D materials will make it easier to grasp the size and three-dimensionality of the picture.
3. Drawing based on the tentative picture
Using the tentative picture you have got, you can now draw the characters and background.
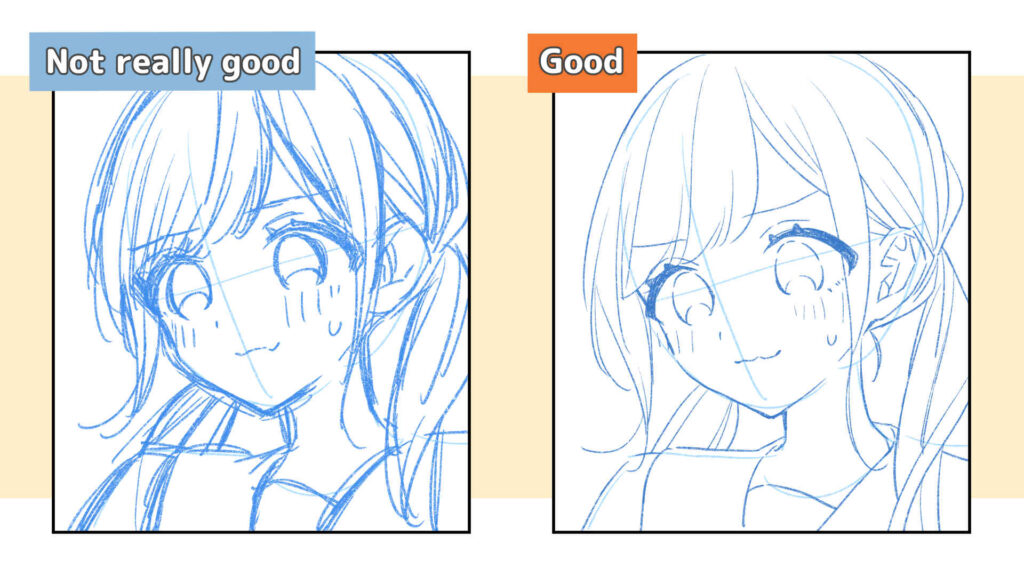
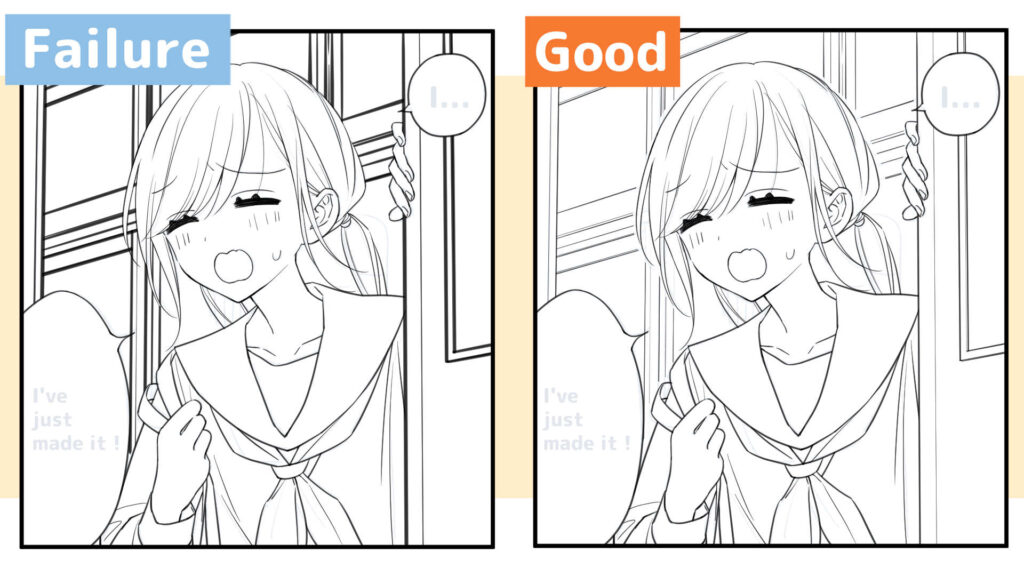
The key to drawing a rough sketch is not to overlap the lines too much.
If you draw a rough sketch with as few lines as possible, as shown in the diagram on the right, it will be easier to see where to trace over when you go on to the inking stage.
(4) Inking
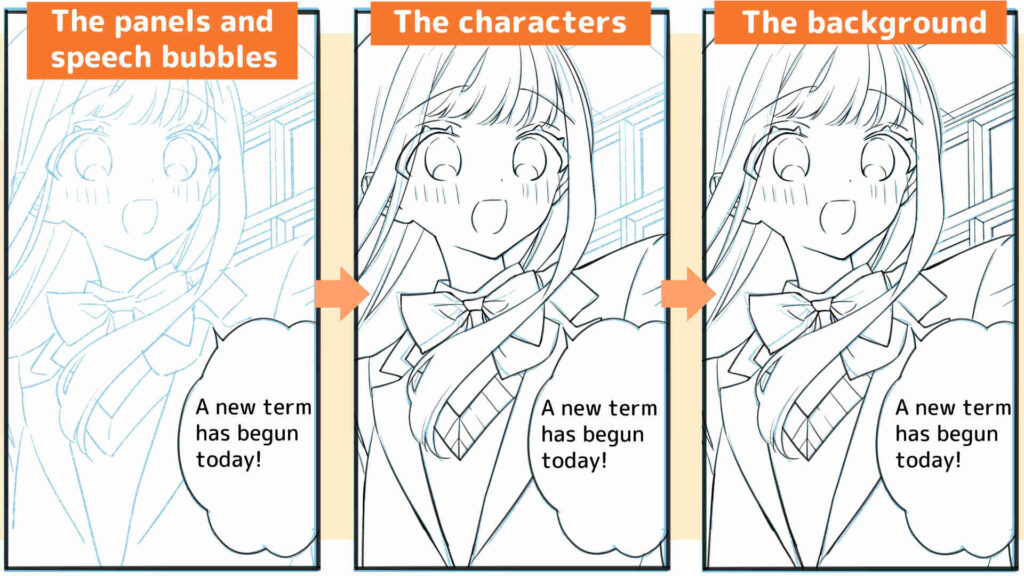
Once you have finished the rough sketch, you can start inking.
Inking is divided into three main steps:
- Inking the panels and speech bubbles
- Inking the characters
- Inking the background
When you’re done with inking, erase the rough sketch.
If you’re drawing analogically, you’ll need a dip pen, a graphic pen, ink, etc.
If you’re drawing digitally, it’s a good idea to have a pen tool or brush tool which are easy to use.
Redirect
Analog manga which can be started from zero! Tools’ list necessary for drawing a manga – Illustration and manga school, egaco
How to proceed inking smoothly
1. Inking the panels and speech bubbles
As with the rough sketch, it is recommended that you do the inking of the panels and speech bubbles first.
If you draw the panels and speech bubbles first, the lines where you start and finish inking will be clear, and it will be easier to pay attention to any parts protrude the frame.
If there is less that protrude the frame, the time spent on corrections will be shorter.
2. Inking the characters
After you have finished drawing the panels and speech bubbles, you can start inking the characters.
When inking the characters,
- Use a slightly thicker line for the outlines of the face and body,
- and a thinner line for the eyes, nose, mouth, hair, and fine patterns.
By changing the thickness of the lines in this way, you can create a more striking and visually appealing image.
If it is too much trouble to change the pen or brush size each time you draw a line of a different thickness, you may divide the process into stages, such as drawing everything in thick lines first, then drawing in thin lines.
There is also a method of drawing dividing the whole body into parts, such as drawing a face entirely => drawing hairs entirely => drawing a body entirely.
3. Inking the background
Once you have finished drawing the characters, draw the background.
The background is drawn with thinner lines than the characters to make the characters stand out.
When drawing the background, we recommend using a round pen for analog work, as it is easy to draw thin lines with.
For digital work, it is a good idea to use a small brush size.
Also, if you draw the background a little further away from the character’s lines, the character will stand out more.
There is no problem drawing the lines of objects that the character is holding or interacting with close together.
For analog manuscripts, do not ink dialogues.
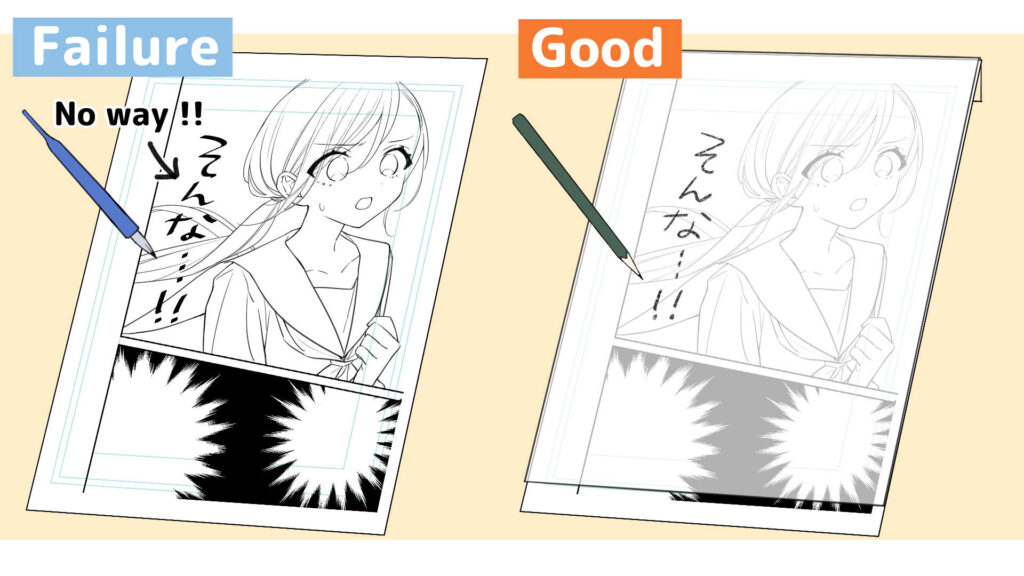
When creating manga in analog form for submission to manga awards such as those offered by magazines, you do not need to ink the speech bubbles.
When the manga is published, the magazine’s editorial department will digitize the manuscript and perform a process called photo-typesetting, so write the speech bubbles in pencil or mechanical pencil, and only ink the handwritten text that does not need a photo-typesetting.
If the dialogue is to be placed over a picture, use tracing papers.
Prepare tracing papers of the same size as the manuscript paper, overlap the manuscript paper without cutting it, and fold the edges, then tape the backside.
Check the position where you want to put the dialogue, and write it in pencil or mechanical pencil on the tracing paper.
If you use a tracing paper to add the lines, you can do it after you’ve added the background and screen-tones, so that the paper doesn’t become too bulky.
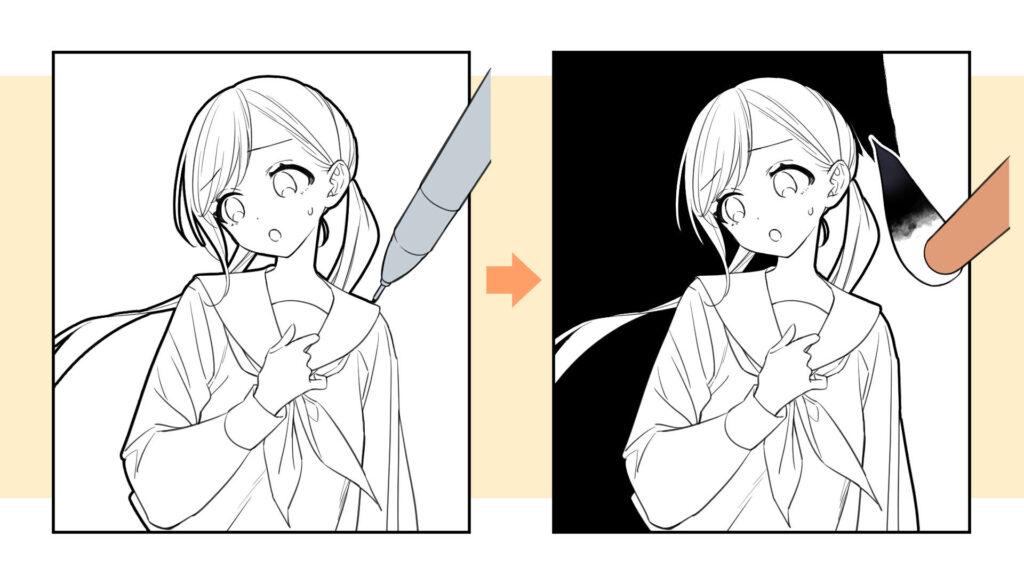
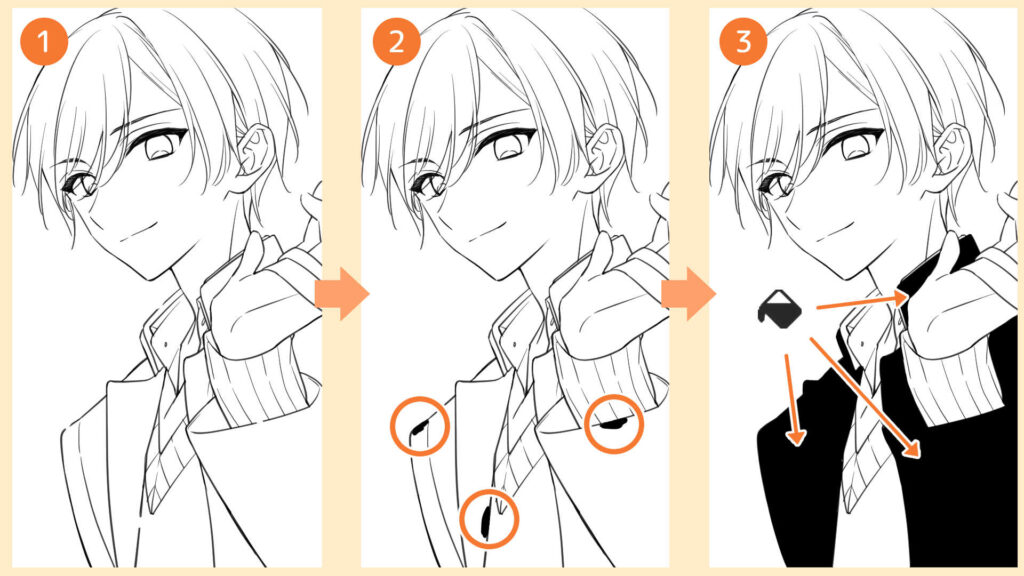
(5) Painting in a solid black / white
How to paint in a solid black / white
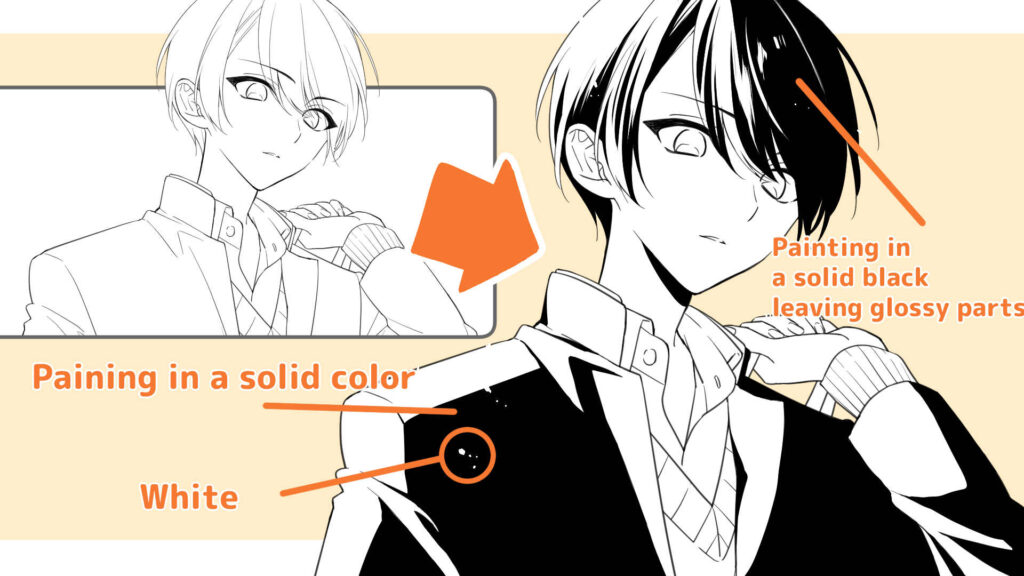
A Japanese expression, beta means painting black parts of things like hair and clothes with black color.
A Japanese expression, white means correcting mistakes or drawing in white to express light.
Glossy painting in a solid black color is one of painting methods using a solid black, it refers to a painting leaving glossy parts (white parts that catch the light) in the black hair of the character.
For the case of painting in solid black as well as drawing with white color, do the solid black first.
Sometimes, while painting the black areas with a solid black color, some of the paint may protrude.
In this case, there is no problem if you fix it with white in the next step.
On the other hand, if you paint the white color first, there is a possibility that you will have to do the same thing twice: fix it with white => solid black color might protrude=> fix it with white once again.
How to work in an analog way
When painting in an analog way with a solid black color, black ink or oil-based pens, etc. are used.
When painting a wide range with a solid black color, it is convenient to ink with a brush having a wide tip or a thick oil-based pen.
If you outline the area with a thin pen first, it will prevent the ink from protruding.
When correcting with white or adding light effects, use a correction pen, correction tape, or white ink for manga.
When using white ink, use a brush, but make sure it’s a different brush that you used for the solid black color.
If there is any black ink left on the tip of the brush, it will mix with the white and turn into grey, making it difficult to correct neatly.
How to work digitally
When painting solid colors digitally, you can use the bucket tool to paint a wide range at once.
- Prepare a line drawing
- Add missing lines using the brush tool
- Select the area you want to paint using the bucket tool
If the area you want to paint is not successfully surrounded by a line, the color may protrude, so before using the bucket tool, check whether both sides of line ends are met, and then paint any gaps with the brush.
How to paint hair in a solid color leaving glossy areas
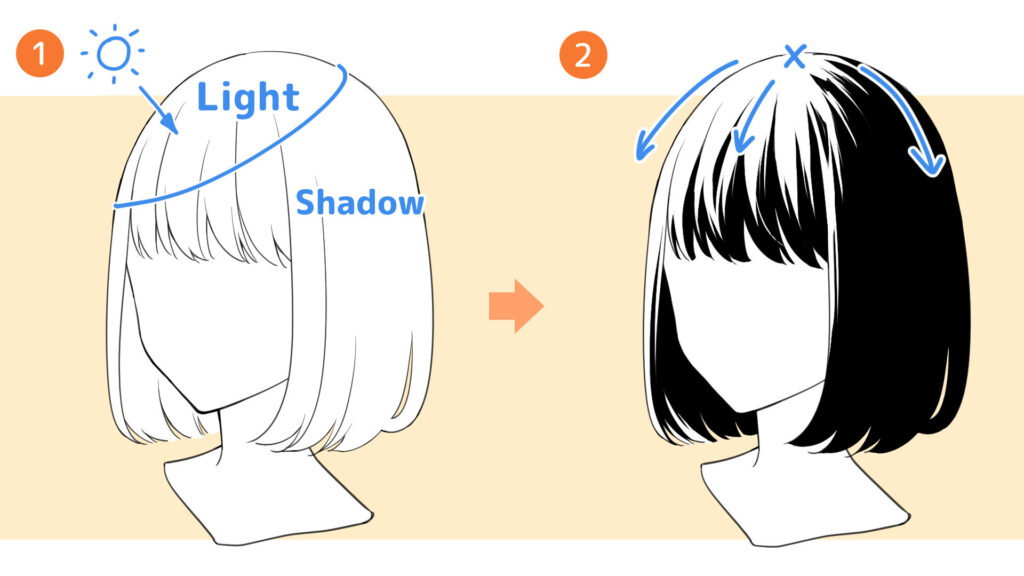
When painting hair in a solid color, hair’s three-dimensionality and glossiness can be expressed with painting in a solid color leaving glossy parts
- Decide the area where the light falls
- Leaving the area where the light falls, paint in a solid black color along the flow of hair
When you use more white for the areas where the light falls and more black for the areas that will be in shadow, you can create a good contrast.
For analog, a thin brush or brush pen is useful for fine expressions.
For digital, we recommend a brush with a setting that makes the beginning and end of the stroke thin, or a brush for a painting in a solid color leaving glossy parts.
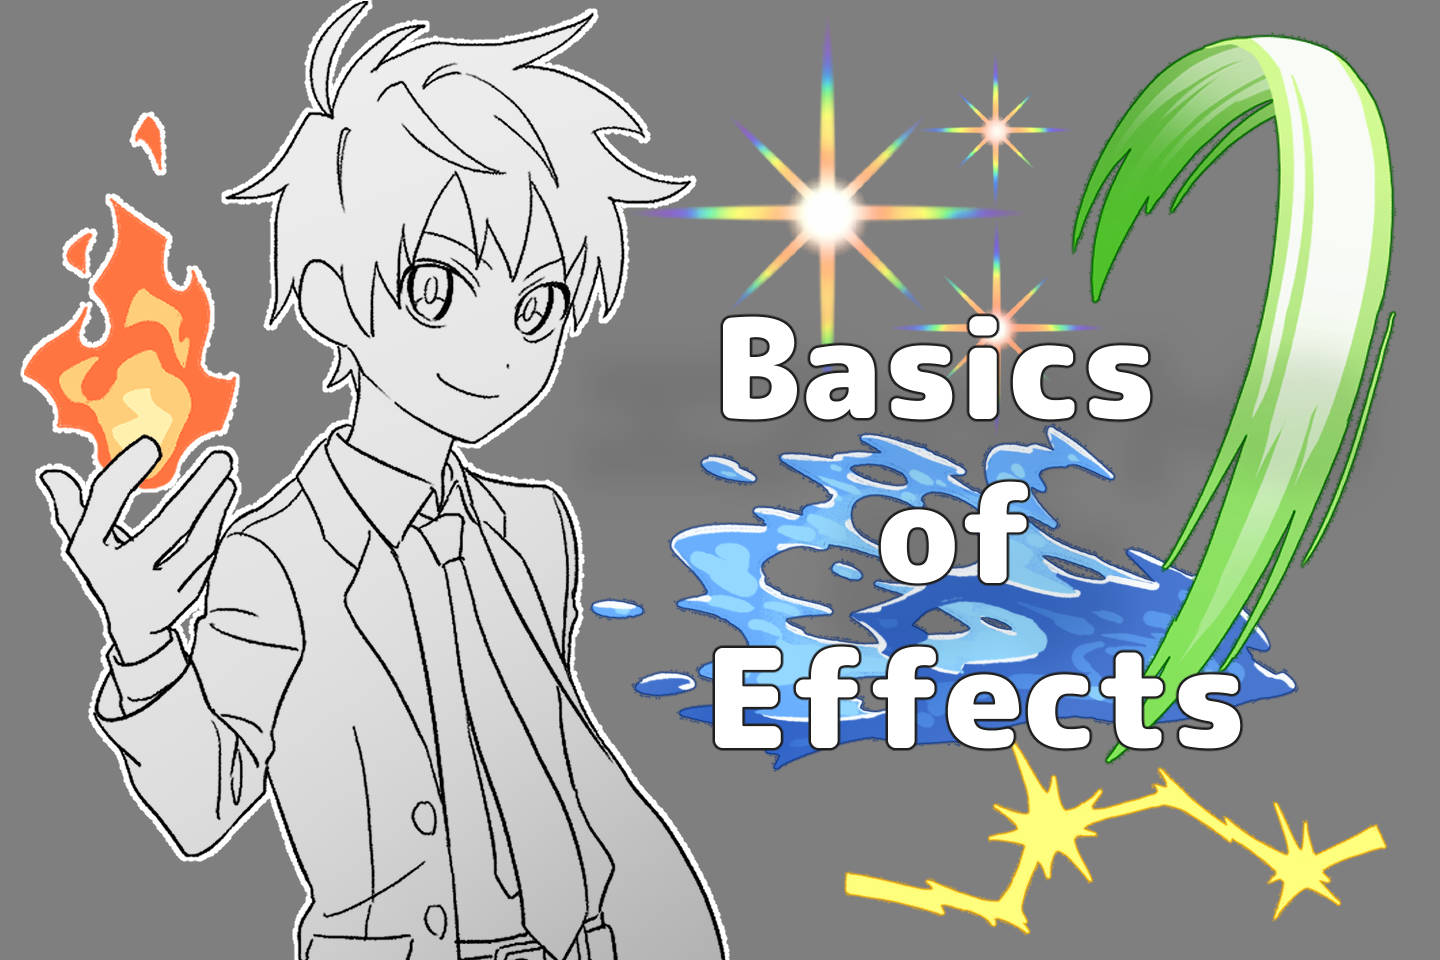
(6) Apply Screen-tones
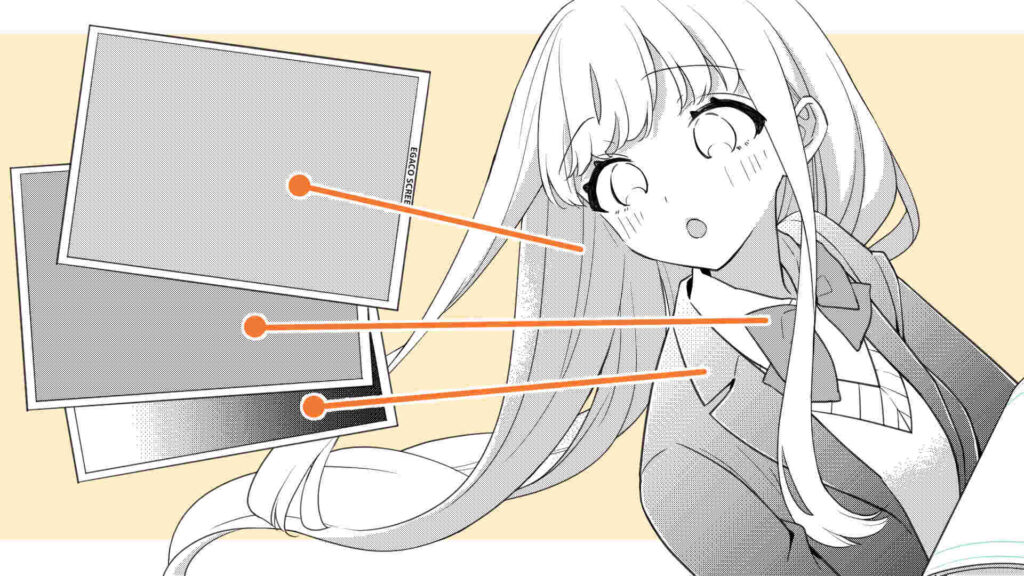
In Japan, tone refers to a screen-tone, which is a sticker-like film with dots or patterns printed on it.
Screen-tones are used for a variety of purposes, such as to express shadows and colors, to show patterns on clothing, and to create a certain atmosphere for a scene.
In an analog way of painting, you cut out the screen-tones and paste them onto a manuscript paper, but in digital painting, if your painting software has screen-tone materials, you can use the brush tool or bucket tool to paint.
How to paste screen-tones in an analog way
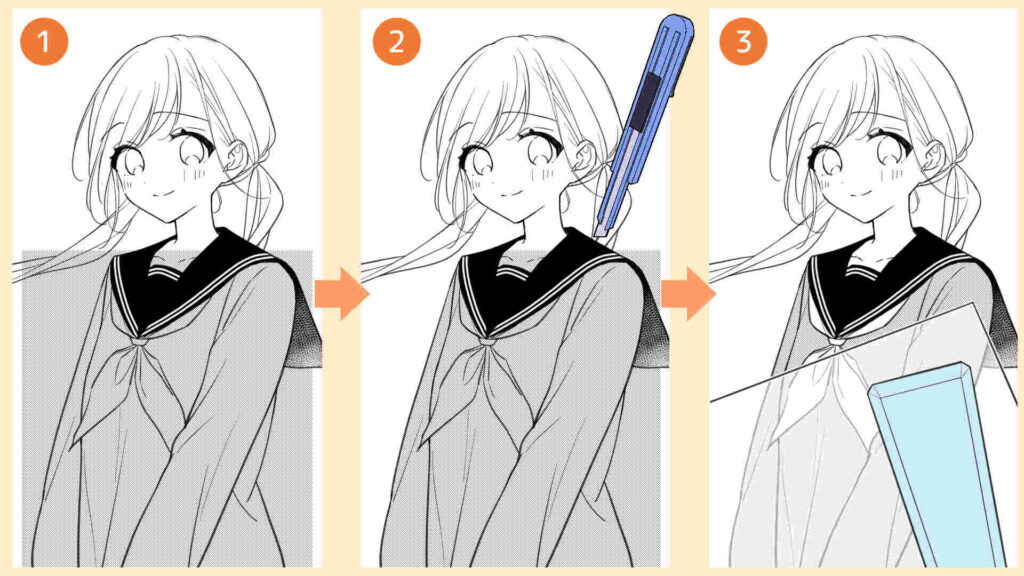
When applying a screen-tone using analog methods, you will need two tools: a cutter and a tone spatula.
The cutter is used to cut a screen-tone, and the spatula is used to apply the screen-tone.
The process for applying screen-tones using analog methods is as follows:
- Cut out the screen-tone larger than the area you want to paste, and lightly paste it on.
- Cut the screen-tone with a cutter alongside the line drawing, and remove the unnecessary parts.
- Rub the screen-tone on with a spatula so that it doesn’t come off the manuscript paper.
When rubbing it on, place a sheet of paper on top of the area where the screen-tone has been applied, and then put the spatula on the top of that to prevent the screen-tone from becoming distorted or coming off.
Very small pieces of screen-tone are more likely to come off because the area to be attached is small.
When applying small pieces of screen-tone, cut out the transparent or patterned screen-tone where the pattern is not printed, and apply it from the top to prevent it from coming off.
A cutter is used when applying screen-tones, so be careful not to injure yourself.
If you apply too much pressure on it, the screen-tone and the manuscript paper may tear together, so be careful with the amount of pressure you apply.
How to apply screen-tones digitally
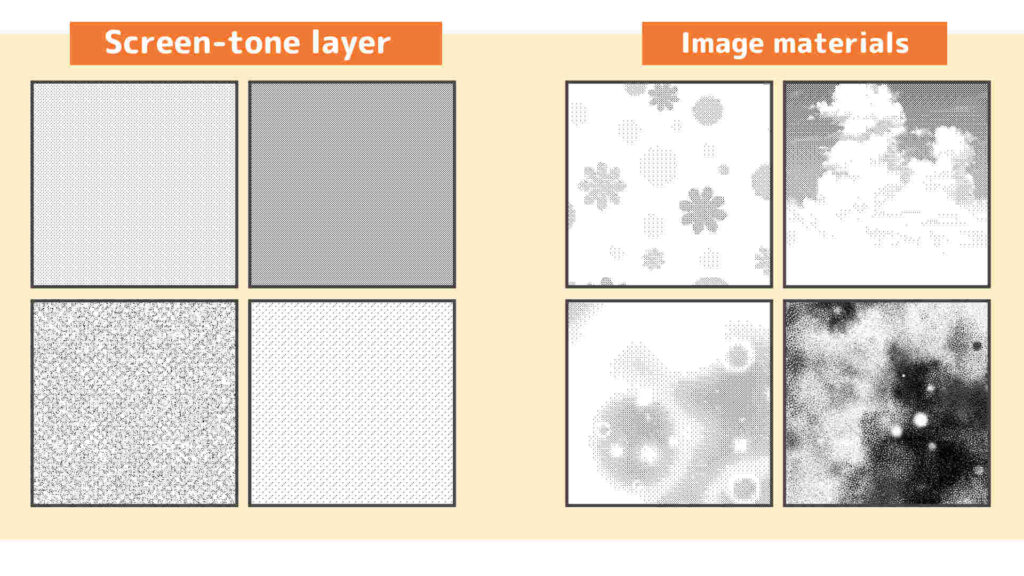
When applying screen-tones in Clip Studio Paint, you can use screen-tone layers or image materials .
Screen-tone layers are layers set with hatching screen-tones (screen-tone expressed with dots) or line screen-tones.
You can change the size of the dots or the thickness of the lines, which is useful for creating effects such as shadows or monochrome images.
Image materials are materials that use a single complete image, such as patterns on clothes, light effects, the sky, and backgrounds, etc.
Many image materials are distributed through Clip Studio Assets.
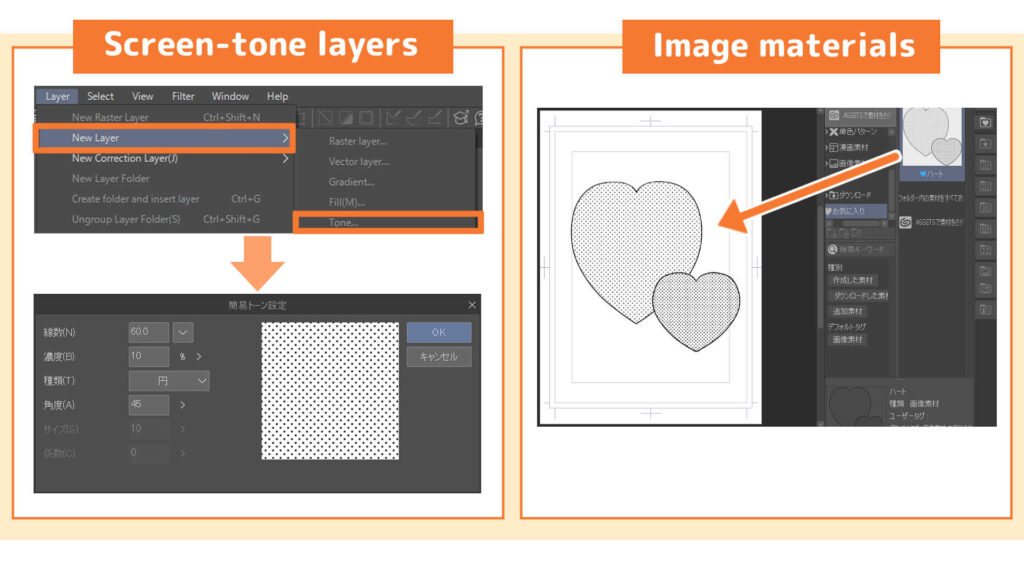
To create a screen-tone layer, select Layer Menu => New Layer => Screen-tone, in this order, then decide on the screen-tone settings in the dialog box that appears and click OK to create the screen-tone layer.
To use stock images, open the material palette and drag and drop the image you want to use onto the canvas.
After preparing the screen-tone layer and stock images, use the brush tool or bucket tool to apply the screen-tone to the desired area.
When using image materials to create a black and white document, it will not be printed out beautifully if you use the ones created in color or gray as they are.
Change the color mode of the material to monochrome (black and white binary) or use it after converting it to a screen-tone.
Redirect
Lectures on how to paste screen-tones for a digital picture with Clip Studio Paint! Your manga will change depending on the screen-tone you select – by Illustration and manga school, egaco
In Ibis Paint, create a new layer and select Normal => Screen-tone, to create a screen-tone layer. In addition to hatching screen-tone and line screen-tone, etc., there are also image materials in the app that can be used to express patterns and designs.
In a Japanese app, MediBang Paint, create a halftone layer and apply the screen-tone by drawing with a brush tool or bucket tool, etc.
You can also drag and drop the screen-tones you want to use from the material folder onto the canvas to add them.
(7) Final check
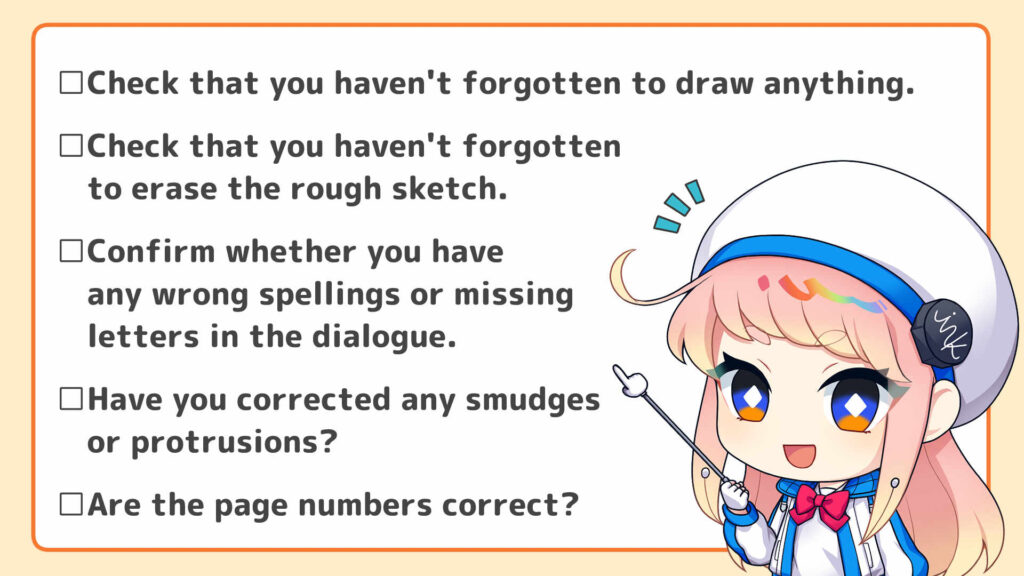
Once you have finished applying the screen-tones, take a final look at the whole manuscript and be sure to check the following five points for any forgotten details or missing lines:
- Check that you haven’t forgotten to draw anything. Check that you haven’t forgotten to ink in, to paint with solid color or apply screen-tones to any areas.
- Check that you haven’t forgotten to erase the rough sketch. If the rough sketch is left on, there is a possibility that it will come out in the print. Be sure to erase it.
- Confirm whether you have any wrong spellings or missing letters in the dialogue. If you are inputting the text digitally, you need to be careful as some fonts may not display environment-dependent characters or pictograms.
- Have you corrected any smudges or protrusions? If there are any smudges or unintentional protrusions, it will undermine the appeal of the manuscript. Use an eraser or white-out to fix it.
- Are the page numbers correct? Check that the page numbers match the actual page order.
If you are applying for a manga competition, make sure you follow the rules, and if you are making a fanzine, check the printing company’s manual for the submission of manuscripts.
Let’s get the steps right and complete the manga!
There are various processes for making manga, but if you get the steps right, you can reduce the time you spend worrying and the number of times you have to redraw, and you can progress smoothly with your work.
At first, it can be difficult to put a plot and a name (a draft of manga) together, or you may have trouble drawing in the pen neatly, and you may have problems with each step.
At the illustration and manga school, egaco, you can make your manga while receiving direct advice from professional instructors.
Why not try completing your manga together?
Please don’t hesitate to participate in our free trial lessons !
Pickup Articles
Category Related Articles